Homemade yeast-free bread. Delicious and healthy bread without yeast: we cook it ourselves in the oven. Preparing dough with rolled oats
4 years ago
23,635 Views
It is gaining more and more popularity. Recently, people have increasingly begun to talk about the dangers of baker's yeast and white bread. I think that, by and large, all the arguments about the dangers of baker’s yeast are still exaggerated. This product, of course, has both harm and benefit, but in this article we will not go into details; I am sure that if we observe a certain measure and balance in the use of any product, then everything will be fine with our health. And therefore I recommend alternating yeast and yeast-free bread in your diet.
At home, you can bake both types of bread in a bread machine or in the oven. I present to your attention recipe for yeast-free bread in the oven .

So, where do you start baking homemade yeast-free bread? Of course, from making sourdough. Sourdough is the basis of bread; it is its most important and most useful component. Yeast-free sourdough is saturated with lactic acid bacteria, which makes the bread fermented and such bread is digested much better; it is believed that the absorption of bread with yeast-free sourdough increases up to 95%.
First you need to be patient. We prepare the first starter for six days so that it turns out strong and rich.
What is necessary:
- peeled rye flour
- warm water
How to make yeast-free sourdough
This is a fairly lengthy process, but it's worth it. Still, yeast-free bread is very healthy and tasty. Therefore, let’s be patient and work our magic on the leaven.
Pour 4 tbsp flour into a bowl, pour warm ( important- not hot!) water and stir until the consistency of thick sour cream is homogeneous.

Cover with a dry towel or plate and place in a dark, warm place until tomorrow ( attention! You can’t put it on the battery!).
The process of development of pathogenic flora must begin - food for lactic acid bacteria. A sourish unpleasant odor appears. Add 3 tablespoons of flour, a little warm water, again the dough is like thick sour cream. Leave until tomorrow in a dark, warm place, covered with a towel or plate.

The starter should begin to bubble, the mass may become more liquid - this is a normal process. Repeat the procedure of adding flour and water. Cover and leave until tomorrow.

3rd day
The smell of sourdough changes to a more pleasant smell of fermentation, similar to the smell of yeast. If such a smell does not appear, it will happen a little later. Add 3 tbsp flour and warm water again. We also leave it until tomorrow.

4th day
The starter increases in volume and more bubbles appear. Our starter is developing and growing. We feed it again with flour and water and leave it for another day.

5th day
The starter becomes fluffy, with a lot of bubbles. Now she is ready, but in order for her to become stronger and our bread to be successful, we need to feed her properly again.

6th day
From this amount of starter we take 3 tbsp and transfer it to another container. Add 5-6 tablespoons of flour, dilute with warm water to form thick sour cream, put in a warm place for 6 hours.

Making a final leaven for bread
This starter will be used to make yeast-free bread. It should turn out lush, thick and porous.

The result is a lush, thick and porous sourdough for unleavened bread.
How to store yeast-free sourdough
— add water (2 times the volume of the starter) and store the liquid starter in the refrigerator for no more than 2 weeks. For next use, remove from the refrigerator, transfer 3-4 tablespoons into a container and leave for 1 hour at room temperature to warm up the starter. Then add 5-6 tablespoons of flour and warm water, stir until thick sour cream forms and leave to ferment for 5-6 hours. If you feed a cold starter, the process will not proceed.
- you can give it to your friends, to those who want to bake yeast-free bread at home, keep 3-4 tablespoons for yourself and store in the refrigerator
How to bake homemade yeast-free bread in the oven
What is needed for the test:
- 600-650 g 1st grade wheat flour
- 2 tablespoons sugar
- 2 teaspoons salt
- 1 tablespoon vegetable oil
- 300-350 ml water
- 7 tablespoons of ready-made yeast-free starter
- you can add sunflower seeds, sesame seeds or raisins to the dough (optional)
Mix the dough. There are no tricks here! Place all the ingredients for the dough (except for additives - seeds) into a deep bowl and knead the dough. First, mix all the dry ingredients with a spoon, then add the starter, vegetable oil and water. It will immediately become clear to you that it is impossible to stir the dough with a spoon, since there is little liquid in it, so mix thoroughly with your hands until a homogeneous soft dough is formed that should not stick to your hands. When all the ingredients are properly combined into a single mass, put the dough on the table and begin to knead it with the bottom of your palms, as if rolling the dough on the table and pushing the air out of it.

Knead the dough by hand
If desired, add seeds or raisins.

Add seeds or raisins
Place the finished yeast-free dough in a mold greased with vegetable oil and sprinkled with flour. Cover with a towel and leave to rise.

Place the finished dough into the mold
The volume of the dough should double. The time for this process can vary, from 4 hours or more. I leave the dough in a warm place overnight. It must be said that yeast-free dough rises much longer than with baker’s yeast. The time depends on the strength and saturation of lactic acid bacteria in your starter. This, as they say, is a matter of technique; the more often you prepare yeast-free bread at home, the better it will turn out each time. All comes with experience.

Bread is an integral part of our life, without which we cannot imagine our normal day, and all because it is universal.
For example, sandwiches can be made with anything and any kind: sweet ones - with honey, jam, condensed milk; hearty - with sausage and cheese, with sprats and cucumber, and so on.
This product is suitable for everything, and some people cannot even imagine a single meal without it; they say that without it, food becomes less tasty.
Useful and harmful qualities of yeast-free homemade bread
Pros:
The only disadvantage of preparing such a product is its taste, hardness and small size. The taste of yeast-free bread is lean, barely perceptible.
Often its density is much higher than that of store-bought yeast bread, and its taste may not be to everyone's taste.
How to prepare sourdough for homemade yeast-free bread
The basis of this type of baking is sourdough, on which the taste of the future bread bun directly depends.
So, to prepare sourdough according to the classic recipe we will need:
- 1 glass of clean drinking water;
- 1 cup flour (pre-sifted);
- A tablespoon of honey (optional).
This version of the starter is prepared in several stages, and, accordingly, over the course of several days.
Stage 1: take 100 g of flour (about a third of a glass), honey and a third of a glass of water. Cover the resulting mass with gauze or a waffle towel so that oxygen can penetrate freely and dust cannot.
We put it in a warm place for two days.
Stage 2: After two days, add another third cup of flour and the same amount of water to the starter. The reaction of the dough should be unambiguous: small air bubbles on the surface and a slight sour aroma of the dough.
Leave covered with a cloth in a warm place (for example, in the kitchen) for another day.
Stage 3: After 24 hours, the starter should acquire a distinct smell of alcohol and increase in size, add again a third of a glass of flour and the same amount of clean drinking water and leave it for the next day.
Stage 4 (final): After the last 24 hours, the starter should increase significantly in size. Now you can use it by adding a certain amount to the dough, having previously done some simple and well-known steps: a third of a glass of flour and the same amount of water, put in a warm place until signs of fermentation appear, that is, bubbles and an increase in volume.
The remaining mass is usually stored in a jar in the refrigerator. The consistency of this sourdough looks like thick village sour cream, very viscous and elastic.
An elementary recipe for yeast-free bread in a bread machine
To make bread we need:
- half a glass of warm milk;
- 1 egg;
- butter – 1.5 tablespoons;
- half a teaspoon of salt;
- 2 tablespoons sugar (to taste);
- 3 cups flour (possibly heaped);
- 1 teaspoon baking powder (optional).
The entire process of making bread in a bread machine involves the correct sequence of loading the ingredients. First, pour warm milk into the bowl, then add the egg, then add butter, salt and sugar.
For better mixing, the butter can be melted or softened. And finally, flour with baking powder.
All that remains is to choose the size and color of the bread bun, as well as the correct mode, for example “quick”. This bread usually takes an hour and a half to bake.
The bread maker will let you know when the bread is ready with a specific sound signal.
It is best to take out the bread when it has cooled and only then cut it. The job is done, ladies and gentlemen, homemade yeast-free bread is ready to eat.
Lenten yeast-free bread in the oven
Unfortunately, not every housewife has a bread machine, so we offer a recipe for making such healthy bread in the oven. This will not change the taste at all, and the simplicity of the recipe will pleasantly surprise you.
So let's get started:
- 1 cup rye flour (coarsely ground);
- one third cup of wheat flour (coarsely ground);
- 2 glasses of kefir;
- 2 tablespoons bran (optional);
- 1 tablespoon sugar;
- 1 teaspoon salt;
- 1 teaspoon of soda;
- 1 tablespoon melted butter or margarine.
Preheat the oven to 200 degrees and start creating. Place all dry ingredients in a deep bowl and pour in 1 cup of kefir. 
Knead the dough, steep, dense and practically not sticky. You may not need the full second glass. When adding kefir, be guided by the recommended state of the dough.
It is better to choose the form for the future bread in advance. It is convenient to use both silicone and metal molds; the only criterion in choosing for you should be its depth.
The deeper the pan, the taller the loaf of bread will be. The dough should cover the mold by half.
Cover the selected form with parchment or baking paper, then lay out the dough, distributing it evenly over the entire form with hands moistened with water. As a topping for a homemade bun, you can use cumin, sesame seeds or oatmeal, which should be sprinkled on top of the bread.
Well, now we put our bread in the oven to bake until we see a golden crust, about 20-30 minutes, after which we take it out and wrap it in a towel. In this form, the bread must cool, then it will remain soft longer.
How to make yeast-free bread at home is described in detail in the video.
Cooking rye yeast-free bread in a slow cooker
To prepare we will need:
- one and a half glasses of wheat flour;
- half a glass of rye flour;
- half a glass of oatmeal;
- 1 teaspoon salt;
- 1 teaspoon of soda;
- 1 tablespoon sugar;
- 1 glass of kefir;
- 2 tablespoons butter;
- 1 tablespoon breadcrumbs.
Combine melted butter with a glass of kefir. Combine all the dry ingredients of the recipe with the liquid ones and knead the dough.
You have to knead it quickly, otherwise it will become tougher.
Grease the multicooker bowl with oil and sprinkle with breadcrumbs. Now you can lay out the dough.
Then turn on the “Baking” mode and wait for a signal about readiness after half an hour. The bread needs to be turned over using an oven mitt or a knife and left to bake again for half an hour, but on the other side.
With this method, the bread is baked evenly on both sides.
The hot bread must be carefully removed from the multicooker and placed on a dish, then covered with a cloth towel and allowed to cool. Then the crust of the bread will be soft.
Delight your loved ones and yourself with cooled bread.
Monastic homemade yeast-free bread
To bring such bread to life, we will need a little free time, a good attitude and a bit of patience.
First, you should prepare the sourdough, since this is the type of yeast bread that is prepared on its basis. You can use the recipe for making sourdough starter given above, or try the one that church ministers usually use.
For the starter we need:
- warm brine (cucumber or cabbage without vinegar);
- a little rye flour;
- a small amount of sugar.
The amount of ingredients depends on the amount of bread you are going to bake. This starter can be prepared for future use, then it needs to be stored in the refrigerator.

Add flour to the warm brine and stir until a creamy consistency is formed, add a certain amount of sugar (to taste) and leave to rise in a warm place. The starter should rise several times, each time we stir it, releasing carbon dioxide and remember that the rising time is gradually decreasing.
After you have received the starter, you can start preparing the dough: mix warm water, starter, sugar and flour. The dough should be viscous and elastic, and resemble thick sour cream.
Let it sit, whisking occasionally if it rises.
Knead the dough for monastery bread, gradually adding flour, salt and, if necessary, sugar. Divide the light and airy dough into the molds, filling only half of their volume.
Then leave the dough to rest for half an hour and you can put it in the oven.
To keep the crust soft and pliable without breaking, moisten the hot bread with a little water, cover with a clean, dry cloth and let it cool.
It is best to prepare the sourdough in advance and have a free day in reserve, since extra time never hurts, and in a hurry, you can chop wood and miss one of the ingredients.
All ingredients for each recipe must be fresh and on hand, as this is your personal masterpiece that deserves the best.
If in doubt, you can check the readiness of the bread using a toothpick. Pierce the finished loaf with it.
If there is dough left on the toothpick, then you need to wait a little longer and put the bread back in the oven.
You can learn how to make white yeast-free bread from the video.
In contact with
The benefits and harms of which will be described in detail below are simple and quick baking. It is almost impossible to purchase such a product in a store. After all, all manufacturers, one way or another, add yeast to their product. Therefore, to obtain real yeast-free bread, we suggest using old Russian recipes. By using them at home, you can make very tasty and healthy baked goods without putting in much effort.
Yeast-free bread: benefits and harms of the product
Experts say that with frequent consumption of fermented products, the human body begins to suffer from rapid fatigue. His susceptibility to adverse environmental influences increases. In other words, lovers of lush and ruddy products very often have decreased immunity, which contributes to rapid illness. Therefore, among all homemade baked goods, yeast-free bread is the safest. The benefits and harms of this product are the main topic of discussion for many experts.
Store-bought yeast-free bread does not actually contain baker's yeast. But to obtain fluffy baked goods, manufacturers add special yeast cultures or so-called wild yeast.
Very often, to obtain such bread, they use dough obtained by processing hop cones or However, researchers claim that wild yeast is no different from ordinary baker's yeast.
So what is the difference between yeast and yeast-free bread? The benefits and harms of these products are absolutely the same. In this regard, experienced chefs recommend preparing real yeast-free bread, making it without any kind of yeast (including hop cones and willow twigs), and using only

Making yeast-free bread at home
As mentioned above, true yeast-free bread should be prepared without the use of any type of yeast. Therefore, to leaven such baked goods, we decided to use But first things first.
So, to make homemade yeast-free bread yourself, we will need:
- quick rolled oats - 1 full glass;
- whole grain flour - 1 full glass;
- table soda - dessert spoon incomplete (optional);
- table salt - ½ small spoon;
- liquid honey - 2 large spoons;
- sunflower oil (take without aroma) - large spoon;
- warm fat milk - 1.6 cups.
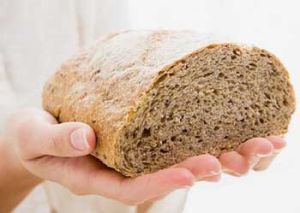
Preparing dough with rolled oats
Before baking yeast-free bread, you need to knead the base. To do this, warm fat milk is poured into a deep container, and then combined with a spoonful of honey and whole grain flour. Both ingredients are mixed until the consistency of thick sour cream, covered with a towel and left in a warm place (about 5 hours, but longer). During this time, the flour mass should ferment a little. If this doesn't happen, then it's okay. To obtain fluffy baked goods, you can add baking soda to it.

Thus, after keeping the ingredients warm, add rolled oats crushed in a coffee grinder, the remains of liquid honey, and table salt. By mixing the ingredients, you get a fairly stiff but soft dough. It is immediately used for its intended purpose.
Baking process in the oven
Yeast-free bread bakes quite quickly in the oven. To do this, the dough is placed in a mold greased with sunflower oil and sent to a heated cabinet. In it, the product is cooked for 45-57 minutes at a temperature of 197 degrees. During this time, yeast-free bread rises, becomes fluffy, rosy and tasty.
Serving homemade bread to the table
Homemade bread without using baker's or any other yeast is much tastier than what is sold in the store. Moreover, such baking is much healthier. After all, scientists have long proven that yeast fungi, which are used to make bread and other products, contribute to the appearance and development. Therefore, we recommend baking bread exclusively at home.
This product can be served either hot or already cooled. As a rule, bread with rolled oats and honey is presented to guests along with the first or second courses.

Preparing yeast-free bread with kefir
Fermented milk drink can serve as an excellent starter for making homemade bread. It’s not without reason that this product is often used for baking various buns, pancakes and other sweets.
So, to make real yeast-free bread at home, you need to purchase in advance:
- whole grain flour - about 450 g;
- baking soda - dessert spoon;
- table salt - dessert spoon;
- fresh high-fat kefir - about 420 ml;
- sesame seeds - 2 large spoons;
- small egg - 1 pc.;
- pumpkin seeds - 2 large spoons.
Preparing the base
Yeast-free bread with kefir is prepared much faster than the previous one. After all, to knead the base, there is no need to keep the dough in a warm place for a long time.

To prepare homemade bread, fresh high-fat kefir is poured into a metal container and heated slightly over low heat. After this, the fermented milk drink is removed from the stove and the table soda is quenched in it. When the product stops foaming, add table salt, sesame and pumpkin seeds, as well as whole grain flour. All ingredients are mixed until a homogeneous and soft dough is obtained. Cover it with a napkin and leave it aside for 15-19 minutes.
The process of forming products and baking them in the oven
After the dough has rested, it is divided into several pieces (3 or 4), and then molded into round shapes. Having laid out the products on a sheet, they are greased with a beaten chicken egg. This procedure will ensure that homemade yeast-free bread becomes golden brown and acquires an appetizing glossy crust. In this form, the formed products are immediately sent to a heated cabinet.
Yeast-free bread should be cooked in the oven for 47 minutes at a temperature not exceeding 200 degrees. During this time, homemade baked goods will noticeably increase in size, become fluffy, tasty and very aromatic.
Serving homemade baked goods to the table
After the yeast-free kefir bread is baked in the oven, it is immediately taken out and presented to the guests. As a rule, such a product is served along with hot tea. Eat it with butter, a slice of cheese or jam.

If you want to get sweeter baked goods, then you can add a little granulated sugar or honey to the dough.
Useful information about homemade yeast-free bread
Now you know how you can bake delicious and aromatic bread yourself without using baker's yeast. It should be noted that such a product has a number of useful properties. Among them the following can be noted:
- Homemade bread made without yeast contains an incredible amount of minerals and vitamins.
- Yeast-free bread made from is a self-sufficient and balanced product. Thanks to its unique composition, it helps to reduce excess weight, as well as normalize the functioning of the digestive tract and the entire body as a whole.
- Microbiologists say that regular consumption of homemade yeast-free bread significantly strengthens the immune system and also promotes the formation of healthy cells, preventing the formation of various tumors.

Among other things, one cannot help but say that bread prepared without the use of yeast can be stored for quite a long time without losing its taste and beneficial properties. It is this fact that encourages many housewives to make baked goods at home, rather than purchase them in a store.
Before we begin, let's remember:
- the combination of starches and protein is the most difficult for digestion and dangerous for health, so mixing nuts and seeds with cereals can be very tasty, but it makes any recipe heavier (unlike pulp or grated vegetables, fiber always helps digestion, enhances peristalsis, absorbs toxins and enriches any dish);
- sprouted grains are always easier to digest than “dry” ones, even after heat treatment (however, these can only be ground into “minced meat” and not into flour);
- Sweets (dried fruits) do not go well with starches, so it is better to add them minimally.
Homemade yeast-free bread recipes
1. Plain unleavened flatbreads
Ingredients:
- 1 glass of water
- 2.5 cups flour (preferably whole wheat)
- 1.5 teaspoons salt
- vegetables - a little bell pepper, carrot cake from juice, olives, sun-dried tomatoes, garlic, herbs are also suitable.
Homemade bread without yeast:
- Stir salt in water. Gradually pour the flour into the salted water in a thin stream.
- Mix the dough. Then let the dough stand (rest) for 20-30 minutes.
- Heat the frying pan.
- Roll out the flatbread thinly.
- Dry the flatbread for a few seconds in a hot frying pan. In total you get 10-12 flatbreads.
- The finished flatbreads must be sprinkled with water (you can use a household sprayer), otherwise they will be crispy.
- It is better to store the flatbreads in a plastic bag in the refrigerator for no more than 3 days.
2. Homemade bread with kefir
Very simple - a little kefir and salt + rye flour, depending on your mood, you can add cumin, seeds, etc.
Sift the ground wheat (in a coffee grinder) thoroughly through a fine sieve to obtain 3 cups of flour (or take ready-made whole grain flour - but it is worth remembering that it cannot be stored for a long time, so store-bought - probably with additives!).
Then add a little salt (to taste), your favorite spices (you can coriander, cumin, etc.), 1/2 spoon of table soda, you can add ground seeds or nuts, and also gradually pour in, while stirring the dough, whey from homemade cottage cheese, about a glass and a half until you get a thick dough.
Mix well and bake in a cake pan.
Place the dough on baking paper.
Bake for an hour in the oven, preheated to 180-190 degrees.
Instead of whey, liquid cottage cheese and 2 eggs are suitable (preferably just yolks). The taste will be almost the same, kefir will also work (much better than baker's yeast, although kefir itself is also a yeast product (a fermentation product of the kefir grain).
3. Based on Irish soda bread
- 250 g whole wheat flour
- 250 g rye flour
- 250 g oat flour
- 1/2 cup ground nuts
- 4 tbsp vegetable oil
- 1 tsp salt
- 1 tsp soda
- juice of 1 lemon
- 500-600 ml water
Homemade bread without yeast:
- Preheat the oven, grease a baking sheet with oil and sprinkle with flour. Lay out the dough. Make slits in the crust while baking.
- Lemon juice and water can be replaced with whey, kefir, etc., you can add raisins, fried or raw onions, bell peppers, cumin, carrot juice cake, etc.
4. Potato cakes
Ingredients:
- 300 ml (one and a half cups) mashed potatoes (can be in water)
- 1 tsp salt
- 300 ml flour
- 1 egg (you can try using only the yolk - this way the recipe as a whole will be easier for digestion and, accordingly, less harmful).
Preparation:
- Quickly knead the dough, divide into 10 parts and place on baking paper in the form of 10 thin (about 5 mm) cakes. Poke each one with a fork, otherwise the cakes will rise.
- Bake at 250 C for about 13-15 minutes (should be slightly browned).
- Cool, can be eaten warm or cooled, very tasty with butter, sour cream and herbs.
5. Oatcakes
Ingredients:
- 600 ml (3 cups) rolled oats
- 250 ml flour (can be dark, whole grain, wallpaper)
- 1.5 tsp salt
- 1 tsp soda
- 600 ml kefir
- 50 g melted butter (or olive)
How to make oatcakes:
- Knead the dough, let it sit for half an hour, then, just like in the previous recipe, lay out and knead the round cakes and bake at 250 C for about 15 minutes (you need to watch until they start to brown a little).
- You don’t have to give it a round shape, but lay it out as best you can on baking paper, poke it with a fork and roughly cut it after about 7 minutes, when the dough begins to set. And then, after removing from the oven, break it onto a plate.
6. Quick yeast-free pizza dough (recipe No. 1)
Ingredients:
- 2 tbsp flour
- 1 teaspoon salt
- 2 eggs
- 1/2 cup warm milk
- 1 tsp olive oil
Pizza dough without yeast recipe:
- Mix flour with salt.
- Mix the eggs in a bowl with warm milk and add olive oil.
- Pour the resulting mixture into the bowl of flour in small portions, stirring constantly. When all the liquid is absorbed into the flour, start kneading the dough, dusting your hands with flour from time to time. Knead for 10 minutes until the dough becomes elastic.
- Form the dough into a ball, wrap it in a damp towel and leave for 15 minutes.
Quick yeast-free pizza dough (recipe No. 2)
Ingredients:
- 1.5 cups wheat flour
- 1.5 cups rye flour
- about 1 glass of water
- a pinch of salt
How to prepare pizza dough:
- If you prefer soft dough, you will need kefir instead of water and a pinch of baking soda (first, soda is added to the kefir, left for 5 minutes, then the mixture is poured into the flour).
- Bake for 15 minutes and then another 15 with tomato paste and vegetables.
7. Rye bread with traditional yeast-free sourdough
- Sourdough is prepared on some kind of acidic base (for example, brine). Warm brine, peeled rye flour, a little sugar for fermentation. Mix flour to thicken the sour cream. In a warm place the starter will rise slowly. She needs to be besieged several times. Each time it will rise faster.
- After the starter is ready, put in the dough: warm water (required amount), starter, salt, sugar (necessary for the starter to work), peeled rye flour. The thickness of the dough is like pancakes. It rises in a warm place for 4-5 hours, you can set it down once. If the dough rises faster, it needs to be settled and kept for 4 hours - this is the norm for rye bread.
- Add a little wheat flour (~ 1/10 of the total amount), salt, sugar to the dough batch, and knead with peeled rye flour. The dough is “light”. After the dough has risen, without kneading it, put it into molds (1/2 of the volume of the mold).
- It is better to work with rye dough by wetting your hands in water. Using a wet hand, smooth it into the mold and place it in a warm place to rise.
- Rye bread is baked in a hot oven for 1 - 1.5 hours. After baking, the crust is moistened with water. You cannot cut the rye bread right away; it must cool. The readiness of the bread is checked by squeezing the bottom and top crusts: if the crumb between them quickly straightens, then the bread is baked well.
- The first baking may be unsuccessful, but each time the leaven will gain strength and the dough will rise quickly. A little dough or a piece of dough is left for the next baking and stored in the refrigerator.
- The night before, you need to update the starter: add a little water (can be cold) and mix in rye flour. It will rise until the morning (~ 9-12 hours) and you can place the dough (see above).
8. Hop sourdough bread
1. Preparing sourdough
1.1. Pour dry hops with double (by volume) amount of water and boil until the water is reduced by half.
1.2. Leave the broth for 8 hours, strain and squeeze.
1.3. Pour one glass of the resulting broth into a half-liter jar, dissolve 1 tbsp in it. a spoonful of sugar, 0.5 cups of wheat flour (stir until the lumps disappear).
1.4. Place the resulting solution in a warm place (30-35 degrees), covering it with a cloth for two days. A sign that the yeast is ready: the amount of solution in the jar will approximately double.
1.5. For two to three kilograms of bread you need 0.5 cups of yeast (2 spoons).
2. Number of components.
To bake 650-700 g of bread you need:
- water 1 glass (0.2 liters);
- For each glass of water you need: 3 glasses of flour (400-450 gr.);
- salt 1 teaspoon;
- sugar 1 table. spoon;
- butter or margarine 1 table. spoon;
- wheat flakes 1-2 full table. spoons;
- leaven.
3. Preparing the dough
3.1. One glass of boiled water, cooled to a temperature of 30-35 degrees, is poured into the mixing container, and 1 table is stirred in it. spoon of sourdough and 1 glass of flour.
3.2. The prepared solution is covered with a cloth and placed in a warm place for 2 hours until pinpoint bubbles form. The presence of bubbles means that the dough is ready for kneading dough.
4. Kneading the dough
4.1. In a clean dish (a glass jar with a volume of no more than 0.2 liters, with a tight-fitting lid), put the required amount (1-2 tablespoons) of the dough; this dough will serve as a starter for the next bread baking; it must be stored in the refrigerator.
4.2. Add 2 tbsp to the container with the dough. spoons of flour and other components in accordance with clause 2.1., that is, salt, sugar, butter, flakes (flakes are an optional component). Knead the dough until it sticks to your hands and place it in the mold.
4.3. The form is filled with dough no more than 0.3-0.5 of its volume. If the mold is not coated with Teflon, it must be greased with vegetable oil.
4.4. Place the form with the dough in a warm place for 4-6 hours. To retain heat, it must be covered tightly. If after the specified time the dough approximately doubles in volume, it means it has loosened and is ready for baking.
5. Baking mode
5.1. The pan should be placed in the middle of the oven on a rack.
5.2. Baking temperature 180-200 degrees. Baking time 50 minutes.
Bread baked yourself always turns out tastier, softer and more aromatic. Today we will tell you in detail how to prepare healthy yeast-free bread at home and surprise everyone with your abilities.
Homemade yeast-free bread recipe
Ingredients:
- flour – 305 g;
- low-fat kefir – 290 ml;
- sugar and fine salt - 1 teaspoon each;
- baking soda - a pinch.
Preparation
Sift the flour into a bowl, add salt, soda and sugar. Next, gradually pour in kefir and gently knead the soft, airy dough. Wrap it in film and leave for 35 minutes at room temperature. Then we form bread of any shape from yeast-free dough and bake it in the oven, making small cuts on the surface with a knife. We check readiness with a wooden torch, which should come out completely dry.
Recipe for yeast-free bread in a bread machine
Ingredients:
- flour – 305 g;
- milk – 205 ml;
- large egg – 2 pcs.;
- – 1.5 teaspoons;
- soda - a pinch;
- butter – 15 g;
- white sugar – 20 g.
Preparation
Before baking yeast-free bread at home, carefully sift the flour onto the table. After that, add soda, sugar, citric acid and mix well. Melt a piece of butter in a frying pan and cool until warm. Next, break the eggs into it and pour in the milk. Mix everything with a spoon until smooth, gradually add the dry mixture and knead the plastic dough with your hands. We transfer the composition into the bucket of the bread machine, install the “Yeast-free bread” program and press the “Start” button. After 45 minutes, carefully remove the finished product, cover with a towel and cool.
Recipe for rye yeast-free sourdough bread
Ingredients:
For sourdough:
- rye flour – 115 g;
- drinking water – 205 ml.
For the test:
- rye flour – 505 g;
- drinking water – 85 ml;
- strong brew – 145 ml;
- fine salt – 1 teaspoon;
Preparation
To prepare yeast-free bread at home using this recipe, you need to be patient, but the result will certainly please you.
So, we begin the process of making sourdough: mix 75 g of flour with 100 ml of boiled warm water until a thick mass is obtained, reminiscent of the consistency of rich sour cream. Next, cover loosely with a towel and leave it alone for about a day. The next day we begin to fertilize the starter. To do this, add 75 g of rye flour to it every day for 3 days and add 100 ml of warm water. We store the finished starter in a warm place and already on the 5th day you can start baking bread.
We dilute the finished starter with warm water and add a glass of pre-sifted rye flour. Knead the resulting dough, form a ball, wrap it in film and put it in a warm place for 3 hours. After this, add the remaining flour to the dough, add sugar, salt and pour in strong tea leaves. Using clean, wet hands, knead the dough into a soft but sticky dough. Cover it clean  kitchen towel and leave for 1.5 hours.
We wet the table with cold water, transfer the rested risen dough onto it and form an even log. Coat the baking dish with butter and transfer the workpiece. Now we melt the dough for 40 minutes, and then put the rye bread in a preheated oven, setting the heating temperature to 195 degrees. Carefully remove the finished hot bread from the mold and moisten the top with a small amount of cold water to create a shiny, beautiful crust.