Big paper rose with your own hands. Origami paper roses. Colored paper rose
According to legend, the rose did not yet have thorns ... Such beauty is easily made from paper. A ready-made flower without thorns, which will not fade and will become an original gift for a loved one. To make an origami paper rose, follow the step-by-step instructions.
For beginners, it is better to choose an easy way to learn the basics of the procedure.
Paper origami rose for beginners
The process consists of several interrelated steps. The first is the preparation of lines (or stripes, depending on which scheme). This technique creates the basis for folding. A sheet of paper will need to be turned over 3-4 times in a special way, following the instructions. The second stage is folding.
What will be required:
- a sheet of paper (office, corrugated, special color);
- origami schemes;
- pencil;
- scissors;
- PVA glue or glue gun (for fixing);
- scissors;
- wire (if necessary).

It is better to start mastering the manufacture with simple schemes, so that even a child can independently make a rose out of paper - origami. Some techniques allow you to make crafts without the use of glue and other additional materials.

Twisted paper rose
Take a sheet of paper prepared for crafts.
Cut the sheet into 2-3 identical long strips. Remember, the width of these stripes determines the size of the future flower (the wider, the larger the rosette). It is better to do 1-1.5 cm.
Bend the finished strips neatly diagonally. So from sheet A4 you get 2-3 (and more) colors.

If you want to additionally make a branch for the finished rose, take a separate sheet of green paper (corrugated or thick colored paper will do). Cut the leaf into 2-3 long strips. Let them be 10-15 cm in width. See that the length of the strip fits the size of the flower. Preferably 15-20 cm. If the flower turned out to be small - 10-12 cm. Fold and seal the edge with PVA glue.

Cut the leaves separately and glue to the finished branch.
Gently glue a rosebud to the end of the resulting branch. The method is considered simple, done quickly.
Origami rose simple
Master class on making a simple rose without patterns. For beginners, medium hardness, corrugated, office or colored paper is suitable for testing. Cut off the excess strip to get a square sheet.
Fold the paper in half first. Fold the resulting rectangle in half.
Open the upper side of the square, following the direction: from left to right so that you end up with a triangle. When finished, turn the workpiece over. Fold the other side of the square in the same way. It turned out a triangle.
Fold the bottom corners of the resulting triangle, following the center line. Instead of one, now two identical small triangles. Open and straighten the craft - you will again get a square.
Turn the piece over. Bend both lower sides from the upper triangle symmetrically, following the direction of a flat center line.
Bend one top corner towards the visible center point from the bottom line of the triangle. Straighten the sides.
Origami rose - transformer
It will turn out not a rose, but a masterpiece. For the manufacture of crafts, one sheet is enough. The finished rosette transforms from a three-dimensional cube and back.


Would need:
- thick paper in 2 colors (for example, pink and green);
- scissors;
- ruler.
The procedure seems dreary and complicated, but if you follow the instructions step by step, everything will work out. There is no need to take 2 colors, one A4 sheet is enough. It is cut into several identical squares (9 × 9 cm). But it's better to take 2 colors, it's easier to make an origami rose.


Fold the square in half. Fold both halves alternately in half so that the folds are on the same side.
Fold the upper right of the corners, focusing on the first of the folds on the left. Iron it.
Fold the bottom right corner as well. For convenience, you can expand the workpiece, then the angle will be on top. Two diagonal folds were added to the three straight folds on the paper.
Fold the bottom corner on the left, aligning the cut of the sheet so that it coincides with the right small crease.
Align the top cut by pressing with your finger, and then fix the resulting open pocket (see photo).


Turn the piece upside down. Repeat manipulations with a small lower corner on the left. Just look, there, push the corner down the corner made earlier.
Iron the crease, following until it intersects with the vertical crease on the right, as already done.
Repeat the manipulations to get another fold.
Turn the piece over. Carefully fold the corners. Bend the bottom corner on the right and the top left.
The result is a square with several corners. Fold the rest of the sheets (pink) as well.


Green squares must also be folded to form pockets. The step-by-step instructions described above will help. Bend the small corner at the bottom, located on the right. The resulting corner immediately bend up.
Rotate the workpiece to 180 degrees and repeat the steps above, taking the bottom corner on the left. You will get a blank similar to pink, only with a wrapped corner.


Turn the piece over. Bend its top corner looking like it was in pink, followed by the bottom corner.
At first it seems that making an origami rose out of paper is very difficult and time consuming. But in the end, you will get a paper cube that will transform into a beautiful little flower.
Connect the green parts. Hold the first (left) part so that the small corner looks up, and the longer corner looks down. Insert the second (right) part with a long angle into the groove.
Turn the third part and carefully insert the long corner into the groove from the second of the parts. Insert the long corner from the first into the groove from the third.
Follow the description and refer to the pictures. Try to cut the diagonals of the three parts to form a triangle.


Collect pink. Again, insert the long corners of these parts alternately into the open grooves. Look at the cutouts. You can see how the slots diverge beautifully to the sides from the top.
We connect. Carefully insert the long corners from the pink ones into the open grooves of the green ones. Do not touch short corners. You will get a small cube with protruding short corners. Open green.


Harder to open petals. To make the flower beautiful, act carefully. It seems that the craft is not assembled correctly. The petals just hold on tighter. If it doesn't work with your fingers, take something sharp.


Flower bouquets are an elegant decoration, and in terms of attractiveness, home-made ones can compete with garden ones. After viewing the master class, anyone will make a charming rose, and this is a wonderful gift.
Easy Method
It does not take much time to make a rose, and not only the result, but also the process itself brings pleasure. Flowers can be used as decorative elements that decorate the interior of the room.

You need to prepare: glue, scissors, sketchbook, colored paper, in addition, find the original vase.

Stages of work:
- From a sheet of paper, cut a square with a side of 10 cm, choose the color scheme to your taste.
- Draw a spiral on the workpiece.
- Take scissors to carefully cut the resulting part along the contours.
- Take the outer end of the spiral with your fingers and begin to twist it.
- After completing the formation of the bud, secure the structure by sealing the end on the inside.
- Cut out a green leaf, spread glue on its surface and connect with a bud.
- Fasten the finished flower with a leaf at the end of the branch.


A chic rose looks great, it needs to be put in a beautiful vase with an original decor.

Tissue Paper Rose
Before you start, you need to prepare adhesive tape, scissors and thick paper for homemade.

Stages of work:
- Bend the sheet in the middle and fold it in half again.
- Unfold the sheet and cut the paper into 4 equal strips with scissors.
- Tape the ends of the strips together to make a long strip.
- Twist the paper strip, you should end up with a rod that will later be used as a stem.
- Fold the rest of the paper in half, wrap it around the formed center and form a rosebud layer by layer.
- If the homemade product is white, then you can repaint the finished product in any shade of the rainbow palette.


Crepe paper rose
Prepare scissors, a simple pencil, glue or floral tape, a stick, crepe paper.

Stages of work:
Make a template, draw a heart on a piece of paper, the size of a rose depends on its size, for example: the height of the heart can be 15 cm.

Using the template, cut out 5 or 6 hearts with scissors.

For the stem, connect 3 wires together, as an alternative, take a wooden stick, wrap the workpiece with floral tape, also use glue.

To make petals, gently pull the paper in a horizontal direction in both directions. Wrap the edge of the heart on top of the stick, then wrap the petal around the stem and fasten it with a ribbon. Repeat all the above steps with all the hearts.

The leaves are cut out in advance, then the wire is wrapped in paper and the finished leaves are glued.

To make a green rose cup, use a strip of corrugated paper. It is attached to the flower with adhesive tape or glue, place the leaves along the stem and complete the design of the stem.

Homemade rose pattern
This time, for the queen of flowers, you will need to prepare a template, scissors, a stick, a pencil, glue, and a printer.


Stages of work:
- Find a rose template on the Internet and download it to your computer.
- Print the template on the printer, cut out petals with leaves from colored paper, an important detail is that on the template each element goes under its own number.
- Use scissors and use them to bend the ends of each petal.
- Bend the green leaves in half in length.
- Wrap the skewer with petal number 1, fix the paper blank with glue.
- Wrap the second and third petals in turn around the first petal, which also need to be fixed with glue.
- Rose petals 4-7 will need to be glued so that they take a cone shape.
- Gather the individual parts of the rose and glue them together.
- Choose the color of your choice, popular shades are pink, yellow, red and white.

Paper roses from colored cardboard
Prepare for this homemade scissors, glue, a simple pencil, sheets of colored cardboard.

Stages of work:
- Draw a spiral on paper with a wavy line coming from the center.
- Use scissors to make a cut along the line you made to get a strip that looks like an apple peel.
- Wind the spiral around a pencil, wind it as tightly as possible until you reach the middle. Now remove the pencil and spread the rose with your fingers.
- Apply glue in the middle, the adhesive should flow into the center of the spiral, press the homemade product.

Look at the photo of paper roses, beautiful homemade flowers look just great, it is impossible not to pay attention to it.

corrugated rosette
Take the following: crepe paper, glue, scissors, stick.

Stages of work:
Fold the paper lengthwise and widthwise several times. Cut out the petals in the form of hearts, while one cut allows you to complete all 8 parts.

Keep the petals a little between your fingers so that they look as natural as possible. Cut a paper strip 3 cm wide, apply glue evenly on its surface.


Place a small piece of wire at one end of the ribbon and wind a strip around it to form the core of the flower, to which the petals are glued. Apply glue to the petals and glue to the central part of the flower.

Take green corrugated paper and fold it in half twice, cut out the petals, and wrap the stalk with a green paper strip, before that, the wire should first be wrapped with foam rubber.

Knowing how to make a rose with your own hands, you can decorate any celebration in an original way, the queen of flowers is attractive in all its manifestations. An unusual flower looks great among decorations, it is able to give a festive mood to everyone around.

To make a homemade product, no special skills are required, so after watching the video instruction, you can easily repeat all the steps in practice.

DIY paper rose photo


Paper flowers are an excellent decor element and decoration for any gift. However, complex methods of creating bouquets are not suitable for everyone. Many beginner needlewomen are interested in the question: how to make a paper rose with your own hands? By following the instructions below, you can create your own jewelry.
We make a rose out of paper with our own hands
The instructions below will allow you to learn how to make a rose out of paper easily, spending a minimum of time on it.
simple rose
To create a rose, you will need to prepare a sheet of red paper, glue and scissors:
By template
After reading the following instructions, you will learn how to make a paper rose in stages as a decorative element. For work, you need to prepare sheets of red and yellow paper, scissors and glue:

Corrugated paper roses
Roses created from corrugated paper look attractive. To create, you need to take red and green paper, wire and glue. To make the rose lush, it is better to make 4 flowers:

vintage roses
A vintage rose is an interesting option. If you want to learn how to make a rose out of paper, the photo instruction will be useful. It is required to prepare corrugated and thick patterned paper, double-sided tape, glue and scissors:

yellow rose
In order to make such a rose, you need yellow paper, glue and scissors:

Lush roses from napkins
To make a lush rose, you need to take napkins of red and solid color. You need to hold the red napkin in front of you and bend a small part on top. The upper corner on the left side is clamped between the middle and index fingers. The opposite corner is taken with the other hand, and the napkin is wrapped counterclockwise.
The resulting tube is pressed a little and a bud is obtained. Then you need to wrap a tube from a green napkin to create a stem. The result is a beautiful rose.

Additional decorations for the rose
After learning how to make a paper rose for beginners, you should make sure that it has additional decorations. An excellent option would be beautiful baskets made of paper or other materials. You can create a bouquet of roses, complementing it with other paper flowers, sweets, etc.
The Queen of Flowers has always attracted attention, was a welcome gift and decoration. Poems and legends are composed about it, chic bouquets are made from it.
Many needlewomen are interested in how to make paper roses with their own hands. It will take more time and skill to create this flower than simple plants.

Consider several options for making an amazing flower.

Gorgeous bouquet as a gift
On cardboard, draw a whisk in the form of a spiral with a pencil. Then take scissors and cut out the pattern. The result should be a spring. The pattern is used to obtain blanks from colored material.


You should prepare the wire for the pedicel in advance. A little glue is applied to the edge of the future stem. The required number of buds is made, and then a bouquet is made.

exquisite flower
Fold the square of the selected shade in half diagonally. Then a petal is cut out of the resulting triangle. Having unfolded it, the master will see that the corolla with 8 petals has turned out.

4 blanks should be made. Each detail needs to be finalized by cutting off 1, 2, 3 and 4 petals, respectively. The rims are glued so that the extreme elements are fastened together.

The result will be parts with 2, 4, 5 and 6 petals. Using a pencil, the edge of each of them is slightly bent. Then the bud is assembled. Leaves are cut out of green material and glued to the bud.


Corrugated Paper Rose
The original decoration will decorate the interior of any home. Interesting photos of paper roses will allow you to find your own option for creating beautiful compositions.

For the corrugated version, you will need green and red material, stem tape, wire, scissors.

Cut out five elements in the form of drops and 15 details in the shape of a heart. The blanks are gently stretched along the edges. The bud is formed by alternately gluing the petals.

The elements are fixed with adhesive tape. Complement the product with green leaves that are attached to the stem of the plant.


Now it will be clear to the novice master how to make a rose from corrugated paper. Based on this product, you can get other options. To do this, just slightly modify the pattern of the petals.

Beautiful paper flower
The sheet is cut into strips of 1 cm. The width determines the size of the future souvenir. The edge should be bent diagonally, twisting the rose.

The bud is held together with glue during the manufacturing process. Several plants of the same or different colors allow you to create unique bouquets for decorating your home.

Rose from money
For a souvenir, you will need printed banknotes. To get a neat product, you need to follow the step-by-step instructions for making paper roses. A sheet of material is folded in the center and pulled together with wire, having previously turned the corners.

You need to make 4 parts, which are then easy to connect into a bud. The wire is twisted, as a result, the stem of the plant is formed.


big rose
The following materials will be used in the work: corrugated paper, wire, tape, glue.

Draw pattern patterns yourself by observing real plants. You can print ready-made patterns, cut them out and transfer them to cardboard.

A growth rose made of paper looks unusual at any celebration. If you create several copies, you get a huge bouquet.

For one product, you will need 15 heart-shaped elements and 5 drop-shaped parts. The resulting petals must be given the desired shape. The hearts are stretched a little, and the droplets are wound onto a pencil.

Two pieces of thick wire are wrapped with special adhesive tape. Then a bud is formed. A sepal is placed at the base. The leaves are alternately attached to the stem with a ribbon.


royal rose
For a beautiful accessory, you will need napkins of different colors, a ribbon, a regular pencil. This simple method will allow you to create an original gift.

The napkin is wrapped around a pencil. It needs to be compressed. After that, the pencil is pulled out. The result should be six finished parts that are fastened with tape. Then a corolla of 6 petals is formed.

Crepe paper flowers
This material is very similar to corrugated paper, but it is softer. The result is more delicate artificial plants.

Twisting is the basis for making souvenirs from this material. This option is ideal for beginners.

It is necessary to take a tape 5 cm wide and scissors. You will need glue to hold the button together. The tape is folded, corners are cut off from one edge to get a petal.


Then the process of winding onto a pencil begins, as a result a whisk is formed. Several blanks can be used for beautiful crafts, gift decoration.

Conclusion
Simple flower making techniques help beginners master the technique of paper flower making. This is an amazing hobby that adults and children will enjoy.

With the help of different patterns, large and small flowers, paper rosebuds, and growth products are obtained. They make a great gift for a birthday or any other occasion.

Any event can be decorated with original crafts and bright flower arrangements.

Photo of paper roses with your own hands


Roses are wonderful flowers with a wonderful aroma that are very popular. It is a pity that they quickly wither and do not please with their beauty for long. In this article we will look at: how to make simple paper roses with your own hands.
You will need: double-sided colored paper, a simple pencil, a sheet of paper, scissors, a glue gun, wire.
Master Class

Gorgeous roses are ready!
Exquisite rosette
You will need: orange and green colored paper, scissors, a simple pencil, glue.
Master Class

Corrugated Paper Rose
You will need: pink and green corrugated paper, green adhesive tape, stick or wire for the stem, scissors.
Master Class

Colored paper roses
You will need: colored paper, ruler, scissors and glue.
Master Class

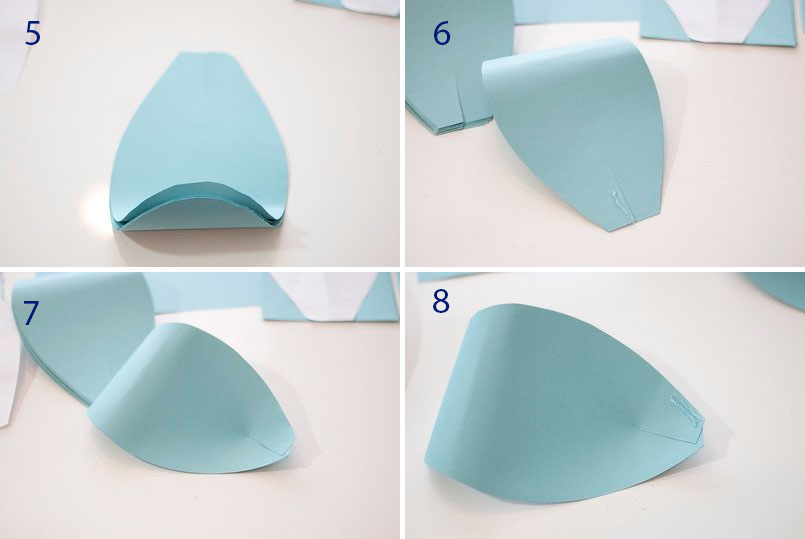
Origami rose
You will need: double-sided colored paper, scissors, a simple pencil.
Master Class
- Fold a sheet of colored paper diagonally as shown in the photo and cut off the excess strip to make a square.
- Bend the square to form a second diagonal.

- Bend the square in half to form lines like a snowflake.
- Move the sides of the workpiece in this way: the top - from the right side to the left, and the bottom - from the left to the right, to make a triangle.
- Bend all 4 peaks to the middle and run your fingers along the folds.
- Expand the workpiece to a double triangle and fold the top corner back.

- Spread the bud and bend the folded corner inward.
- Gather the double corner back and run your fingers through the folds.
- Raise 4 side corners to the top.

- Flip over, then fold each side to the center to the middle. You should get a blank with a hole at the bottom.
- Blow strongly into the hole from below to straighten the bud.
- Twist the petals using a simple pencil.

- Take the strip of paper cut off at the beginning.
- Fold the stem and insert it into the bud.
Roses from money
You will need: printed banknotes of any denomination, wire.
Master Class

original roses
You will need: red colored paper, a simple pencil, scissors, a round object.
Master Class
- Trace a round object on colored paper.
- Draw a spiral in the circle.
- Cut out the circle.
- Cut the spiral in such a way that you get a "spring"
- Twist the rosette, in the same way make the desired number of roses.
Original colored paper roses are ready! I recommend watching the video tutorial!
huge rose
You will need: thick cardboard, corrugated paper, a simple pencil, scissors, thick wire, green floral tape, adhesive tape, glue.
Master Class
- Draw or print templates and transfer them to thick cardboard.

- Cut out 15 heart-shaped petals and 5 droplets from crepe paper (for one flower).

- Shape the petals: hearts - stretch a little to the sides, and twist the droplets using a pencil.

- Take 2 pieces of thick wire and wrap with floral tape.
- Glue a piece of crepe paper to the stem as a core.
- Form a bud: glue drops, then hearts, fix with adhesive tape.

- Cut out a sepal from green crepe paper as shown in the picture.
- Secure the sepal at the base of the flower using duct tape.

- Cut out the leaves and glue them to the stem.
royal rose
You will need: yellow napkins, pencil, blue napkin, ribbon.
Master Class

giant roses
You will need: colored thick paper, a sheet of cardboard, scissors, glue.
Master Class
- Create templates for the petals: 6 large, 6 medium and 6 small.
- Cut out the petals.

- Make cuts at the base of the petals.
- Fold the ends of the petals away from you.
- Turn the petals over and glue the ends next to the notch, forming a natural petal shape.
- Glue 6 large petals together in a circle.
- Glue the medium petals, and then the small ones.

- Glue a sheet of cardboard to the bottom of the flower.
- Fold the sheet in half and cut the "brush" from the side of the fold. Repeat this process with two more sheets.
- Peel off and unfold the cut sheets.

- Fold the first sheet, then add the rest to make the core.
- Glue the core to the center of the flower.
- Make the desired number of roses in the same way.
Red roses
You will need: red and green corrugated paper, scissors, wire, thread and glue.
Master Class
- Cut a strip of red crepe paper 58 cm long and 19 cm wide.
- Fold together, the sides are long and glue the underside (along the grain of the paper) with glue.

- Glue the halves.
- Make a blank for the petals from cardboard. The dimensions of the template are indicated in the image.
- Fold a strip of red crepe paper like an accordion, attach a cardboard petal template and cut it out. For one rose, there should be 15 petals.