How to set an angular dimension in autocad. How to dimension in AutoCAD
In order to dimension in AutoCAD near a straight line, choose :Dimensions-Linear. I prepared a segment in advance, the size of which I want to specify. After the linear dimension is selected, you need to left-click on the left and right ends of the segment once. A preview of the size will appear, which now needs to be raised to the height you want to make the leader line with the size. The size index can be omitted, but in ESKD it is customary to designate the size above the part. We left-click on the part of the screen where you want to place the dimension line, and our size is ready! Now you can not only put dimensions in autocad for a simple line, but also to indicate almost everything dimensions details. To apply the size of the part in AutoCAD, we do exactly the same thing, but now we mark the start and end points of the part, not the lines, with the mouse. There are 2 small remarks here. half of the detail. In this case, we mark the second point with the mouse not at the end of the part, but where you want to end the dimension line. If you have already drawn a dimension line and want to move it, this is easily done using the blue squares that appear when you select a part dimension with the right mouse button. The second important note. How to resize in autocad? AutoCAD set the size (number) automatically. You can change this number in the size properties. To do this, do the following: 1. Select the dimension line with the left mouse button. 2. Right-click on the line with the size to call the menu Properties. I have Properties appeared as a window in the upper right corner of the screen.
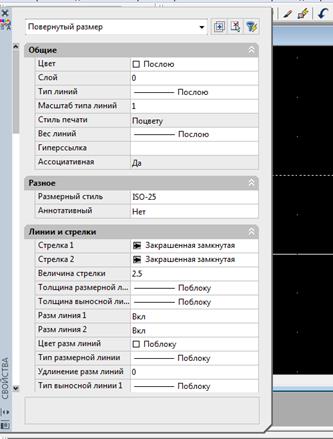
3. Scroll down the field with the properties, and find the item there Text, which has a field Text string. That's what we need to resize in autocad. We write in it the value we need. Now the size above the dimension line has changed.

In the same menu, you can set different properties dimensions in AutoCAD, such as font, size, alignment, color, arrow type, and more. I will not describe all the properties in detail here. Who needs it - see the menu Properties at the size. Circle size in AutoCAD (radius or diameter). In fact, this is the same size, since the radius is half the diameter. Set the size of a pre-prepared circle in AutoCAD. Choose: Dimensions-radius mustache (or Dimensions-Diameter). Select with the left mouse button 2 points on the circle in the case of a diameter, or the center of the circle + one of the points on the circle in the case of a radius. It turns out one of the options:

The size (number) above the line changes in the same way as in the case of a linear size: PropertiesText - Text string. Parallel dimension in AutoCAD. Now let's try to set a parallel dimension - a dimension between two parallel lines in the drawing. For a change, I drew a rectangle, and I want to set the size between its two parallel sides. In the top menu of AutoCAD, select: Dimensions-Parallel.
With the left mouse button, select 2 lines of the rectangle in turn. We get the size between two parallel sides:

In principle, the example is not very successful, since a linear size could be dispensed with here. But if you need to put a size in AutoCAD between two parallel lines that are not connected to each other in any way, then in this case the parallel size will be simply irreplaceable. How to change the number 40, we already know (read above) Angular dimension in AutoCAD The penultimate example for today is the designation of the angular dimension. Let's say we have a triangle, and we need to specify in degrees the value of one of its angles. Choose: Dimensions-Angular. Then, with the left mouse button, select two adjacent sides of the triangle, between which you need to set the size of the angle. Click Enter, and our angular size is ready! On the drawing it looks like this:

I talked about the most common types of dimensions in AutoCAD, and how they can be put on the drawing. Other types of sizes are less commonly used. When you choose a size from the menu Dimensions, AutoCAD offers tooltips on a blue background for reading, looking at which you can quickly figure out what to select and where to click to specify the size of the element. Multileader in AutoCAD: But what about leader dimensions common in drawings, with the help of which extension dimensions are placed where another type of size does not fit, or where there is simply no place to specify it?

This is done like this: Dimensions-Multileader, put the left mouse button on the place where the size arrow will point, and drag the multileader to the place on the screen where I have a shelf and it says "Leader". AutoCAD will immediately prompt you to enter your multileader text.
The video tutorial below focuses on two popular questions in the AutoCAD program:
- How to set the size?
- How, if necessary, to change the dimension number manually?
Did you think it was difficult, dear friend? 🙂
But no!
Watch this video and learn how to set and edit the size in AutoCAD in a couple of mouse movements:
Did you know that in AutoCAD it is absolutely illiterate to scale drawings immediately on a large canvas, that is, in the “Model” space? Yes, this is a truth that few people know about. Sad but true. But you have the opportunity to unravel this secret, hidden from us, of how to quickly set and painlessly change the scale of views on sheets in AutoCAD. […]
You can calculate the area in the AutoCAD program different ways. The value of the surface area is used in various calculations: payload or snow load, the amount of finishing work, or simply, an indication of the area of \u200b\u200bthe room on the plan. The two most common ways to measure area are shown in the video below. From it you will learn how easy it is to calculate the area in AutoCAD. Learn to work quickly in […]
In this article and video tutorial, we will learn how to create tables in AutoCAD. The Table command is on the ribbon. Find it and click to insert the table. A dialog box appears where you can set the size. future table, by adjusting the number of its columns and rows, as well as their width and height. After setting the parameters and clicking OK, […]
Answer: Theory: The size on the drawing shows the dimensions of the part or circuit: length, width, radius of the circle, hole diameter, wire pitch, etc. Dimensions in AutoCAD are needed in order to indicate to the installer, locksmith, or any other person who will manufacture the product according to your drawing - what size this or that element of the drawing should be made, what tolerances to take. In addition, the dimensions on the drawing in AutoCAD or Compass are a tribute Soviet era, in which it was accepted certain rules indicate the dimensions of the parts. These rules are called the Unified System for Design Documentation (ESKD). And to put it simply, the dimensions are nothing more than arrows with numbers. All of you must have seen them at some point.
Practice: Now we will practice the techniques for specifying dimensions on a drawing in AutoCAD. Since almost all parts of the drawing represent some kind of geometric figure, you first need to figure out for yourself how to set dimensions in AutoCAD for such simple figures, like rectangle, circle, 2 parallel lines, angle. For dimensioning in AutoCAD there is special item in the top menu, namely the item "Dimensions".
If you look at this paragraph, you will see that the sizes are different types: linear, parallel, angular, radius and others. All of them, in fact, are a line with an arrow pointer, as well as a numerical designation of the size above the arrow or inside the arrow (you can change it yourself). But the appearance of the arrow will change depending on which geometric figure you set the size. Consider the main types dimensions on the drawing.
Linear size on the drawing (straight line dimension)
 In order to dimension in AutoCAD near a straight line, choose :Dimensions-Linear. I prepared a segment in advance, the size of which I want to specify. After the linear dimension is selected, you need to left-click on the left and right ends of the segment once. A preview of the size will appear, which now needs to be raised to the height you want to make the leader line with the size. The size index can be omitted, but in ESKD it is customary to designate the size above the part. We left-click on the part of the screen where you want to place the dimension line, and our size is ready! Now you can not only put dimensions in autocad for a simple line, but also indicate almost all overall dimensions of parts. To apply the size of the part in AutoCAD, we do exactly the same thing, but now we mark the start and end points of the part, not the lines, with the mouse. There are 2 small remarks here. half of the detail. In this case, we mark the second point with the mouse not at the end of the part, but where you want to end the dimension line. If you have already drawn a dimension line and want to move it, this is easily done using the blue squares that appear when you select a part dimension with the right mouse button. The second important note. How to resize in autocad? AutoCAD set the size (number) automatically. You can change this number in the size properties. To do this, do the following: 1. Select the dimension line with the left mouse button. 2. Right-click on the line with the size to call the menu Properties. I have Properties appeared as a window in the upper right corner of the screen.
3. Scroll down the field with the properties, and find the item there Text, which has a field Text string. That's what we need to resize in autocad. We write in it the value we need. Now the size above the dimension line has changed.
In the same menu, you can set various size properties in AutoCAD, such as font, size, alignment, color, arrow type, and more. I will not describe all the properties in detail here. Who needs it - see the menu Properties at the size. Circle size in AutoCAD (radius or diameter). In fact, this is the same size, since the radius is half the diameter. Set the size of a pre-prepared circle in AutoCAD. Choose: Dimensions-radius mustache (or Dimensions-Diameter). Select with the left mouse button 2 points on the circle in the case of a diameter, or the center of the circle + one of the points on the circle in the case of a radius. It turns out one of the options:
The size (number) above the line changes in the same way as in the case of a linear size: PropertiesText - Text string. Parallel dimension in AutoCAD. Now let's try to set a parallel dimension - a dimension between two parallel lines in the drawing. For a change, I drew a rectangle, and I want to set the size between its two parallel sides. In the top menu of AutoCAD, select: Dimensions-Parallel.
With the left mouse button, select 2 lines of the rectangle in turn. We get the size between two parallel sides:
In principle, the example is not very successful, since a linear size could be dispensed with here. But if you need to put a size in AutoCAD between two parallel lines that are not connected to each other in any way, then in this case the parallel size will be simply irreplaceable. How to change the number 40, we already know (read above) Angular dimension in AutoCAD The penultimate example for today is the designation of the angular dimension. Let's say we have a triangle, and we need to specify in degrees the value of one of its angles. Choose: Dimensions-Angular. Then, with the left mouse button, select two adjacent sides of the triangle, between which you need to set the size of the angle. Click Enter, and our angular size is ready! On the drawing it looks like this:
I talked about the most common types of dimensions in AutoCAD, and how they can be put on the drawing. Other types of sizes are less commonly used. When you choose a size from the menu Dimensions, AutoCAD offers tooltips on a blue background for reading, looking at which you can quickly figure out what to select and where to click to specify the size of the element. Multileader in AutoCAD: But what about leader dimensions common in drawings, with the help of which extension dimensions are placed where another type of size does not fit, or where there is simply no place to specify it?
This is done like this: Dimensions-Multileader, put the left mouse button on the place where the size arrow will point, and drag the multileader to the place on the screen where I have a shelf and it says "Leader". AutoCAD will immediately prompt you to enter your multileader text.