How to make wine from white grapes at home. Homemade grape wine - simple recipes. Technology for making grape wine at home How to make homemade wine from grapes
Wine made from green grapes has a pleasant taste and light aroma. It can be presented as dry, semi-dry or dessert varieties. In addition to delicacy and lightness, this intoxicating drink has many beneficial properties. We will tell you how to make white wine at home below in step-by-step instructions.
Almost all known varieties of white grapes are suitable for making light wine. The only distinguishing features are taste, color and aroma. The berries should be well ripe at the time of picking. Even slight over-ripening is allowed. During this period, they will have a maximum concentration of sugars and a minimum of acids. The drink will be soft, but at the same time rich.
Harvest should only be done in sunny weather, in the afternoon. Otherwise, there will not be the required concentration of yeast on the berries and the product will not work.
Poor quality berries are removed from the harvested bunches, which can significantly spoil the taste of the finished wine in the future. They may cause unwanted bitterness.
White grapes have the ability to rot quickly, so the drink must be prepared from freshly harvested material.
The containers where fermentation will take place must be treated with boiling water. This procedure helps get rid of third-party microbes that can affect the wine making process. The grape variety from which the intoxicating drink is to be made also plays an important role. The fruit should not only be juicy, but also have a high sugar content and minimal acidity.
- The following meet these requirements better than others:
- Bianca;
- Aligote;
- Sauvignon;
- Riesling;
- Viorica;
Feteasca et al.
When using these particular varieties, you can apply classical winemaking technology and still get a drink with excellent taste.
Aligote grapes are suitable for making white wine
The production of grape intoxicating drink begins with the harvest. It is recommended to harvest white grapes intended for making wine when they are overripe. The only exceptions are the southern regions, where it is better to pick the berries unripe. In this case, the finished drink will be strong, aromatic and with a pleasant soft taste.
The collection must be carried out in clear and sunny weather. If it rained for a long time, then you need to give it a few days after it ends so that a sufficient amount of yeast forms on the berries again.

Juice for making wine
It can be done this way:
- sort the fruits and throw away the spoiled ones;
- crush unwashed berries with a rolling pin or other suitable object;
- Do not remove the seeds under any circumstances.
As a result of these actions, we obtain the so-called wort. During the fermentation process, you can optionally add sugar to it.
The proportion of sugar added during fermentation should not exceed 27% of the total volume of the wort obtained.

Fermentation
The resulting juice is kept for 12 hours and the smallest particles are allowed to settle. Next, drain the clean liquid using a hose into a clean container. To prevent the development of diseases and improve the quality of wine, it is recommended to add up to 1 gram of sulfur dioxide to the wort per 10 liters of finished juice. Sulfitation is not a mandatory procedure, because at home production volumes are usually insignificant.

White wine ferments at constant room temperature. As in the production of a drink from blue varieties, you need to put a water seal on the container and use it to monitor the fermentation process. It is important that souring does not occur. If there is a cessation of processes, then you need to add raisins or sourdough.
Yeast is able to process sugar in a couple of months, resulting in dry wine. To obtain semi-sweet varieties, fermentation must be forcibly interrupted by changing the temperature or performing sulfitation.

Excerpt
The resulting young drink should be taken to a cool room and kept for a couple of weeks. During this time, the remaining yeast will settle. Next, pour the drink into a clean container again, and get rid of the settled sediment. The product should be stored in a cool, dark place. As a result, sediment will gradually accumulate, and the wine itself will thus become clearer. It needs to be drained and separated from the grounds from time to time. This procedure is carried out throughout the year.
Dry white wine is consumed in the first few months after ripening. But strong varieties can be aged for a very long time (for 12-15 years). In this case, the bottles must be in a horizontal position.
 Wine should be aged in a dark and cool room
 The secret way to prepare a wine drink
There is another original way of making wine from white grape varieties. Its distinctive feature is that the berries are pre-frozen. This helps to change some qualities of the raw material, which in the future have a beneficial effect on the taste of the drink.
After freezing, place the grapes in a bowl, let them defrost, and then squeeze out the juice. Further, the cooking technology will be standard. Only at the final stage you will need to add sugar. This is done when the product has already played out and is ready for the next bottling.
The resulting white wine should be stored in a well-ventilated, humid room with constant low temperatures.
Under such conditions, the corks on the dishes will not dry out. They will also not be susceptible to oxidation due to contact with alcohol. Making wine from white grapes at home is a very troublesome task, requiring a lot of time and patience. However, the result is completely justified.
The product is not only incredibly tasty, aromatic and transparent, but also natural.
The last factor is very significant in our time. After all, the products sold on store shelves are not always suitable for consumption. Often it can cause significant harm to health. But homemade natural wine, on the contrary, is very beneficial for the human body. In addition, it is even recommended by doctors for dietary nutrition. And, as you can see, preparing it is quite simple. And what variety you choose for this is the tenth thing!
Surely, many lovers of good wine have at least once in their lives had the idea of making this drink on their own, but only a few decide to implement it. Some are afraid of inexperience, others try unsuccessful recipes or simply violate the cooking technology, relying on luck. And it’s completely in vain, because a step-by-step recipe is the basis of the basics, which, with due attention, will give you excellent grape wine created at home. The process of preparing it is quite simple, but labor-intensive, so our main tool is. This is a real assistant at each stage of creating wine, with which everything will go “like clockwork” even for pioneers!
Don’t forget that the history of winemaking goes back thousands of years and dates back to the Neolithic era, because it was then – more than 9 thousand years ago – that Stone Age people first tried to make wine from grapes and other berries.
Moreover, they managed to master this art so well that wine artifacts of antiquity are still being found by our contemporaries: the famous wine, which was made in 4000 BC, was discovered in 2010 in one of the caves of Armenia (and this is only one of dozens of cases). Go for it too - everything will definitely work out!
A little excitement before the “fight”: mass production of various grape wines, which is carried out by thousands of factories around the world, will never compare with the taste of a homemade grape drink. Fresh, with an incomparable aroma and a bright play of natural shades - it will definitely not give way to store-bought competitors on your table!
 Wine from grapes will turn out pleasant from any type of berry - both sweet and with pronounced sourness, so the question of choosing future raw materials is unlimited. Many winemakers even experiment by mixing different grape varieties, since this only benefits the taste.
Varieties like “Druzhba”, “Stepnyak” or “Saperavi” are considered the most popular due to the abundant sugar content in their composition, which makes the taste of the drink more rich and sweet. Competing with them are “Isabella” and “Lydia” - they have an unusual taste that is difficult to confuse with any other variety. True, they contain a little less sugar, so the amount in the recipe will be higher.
The ranking of grape varieties is topped by names such as Chardonnay, Merlot, Aligote or Pinot Blanc. The moderate amount of sugars and pliable pulp of these berries allow you to get the maximum volume of juice without much effort. However, if you follow the preparation recipes step by step, each variety produces abundant liquid.
An important detail: wine made from table grapes does not differ in taste from drinks made from technical varieties. The key difference between them is the purpose, which is determined by the structure of the berry itself.
Dining rooms are distinguished by their large size, external aesthetics, have elasticity and can withstand transportation well, so more often than not they – beautiful ones – are eaten fresh. Technical varieties are always small, their appearance is not very marketable, and the berries themselves are easily crushed during harvesting.
Technical stages of home winemaking
Wine from grapes of all varieties can be prepared at home using a simple recipe:
- 10 kg of grapes;
- 50-150 g of sugar per 1 liter of juice.
The proportions of sugar are average, since each winemaker changes the amount according to his own taste - some like it sweeter, others prefer more restrained notes. Too much or too little will not affect the technology, so feel free to shift the boundaries and adjust the sweetness of the wine according to your feelings, following simple rules (we’ll talk about their importance below).
Now let’s briefly outline the entire scope of work and break down point by point how to prepare wine correctly:
- prepare the necessary equipment;
- prepare and process grapes;
- get juice, examine it;
- prepare the wort efficiently;
- leave for vigorous fermentation;
- pour the drink, leave for quiet fermentation;
- leave for maturation and aging;
- pour into containers and store.
Wine, made step by step and in a timely manner at each stage, will delight you with a pleasant taste and will become a welcome addition to dinner. And now from words to action!
Preparing tools and utensils for work
Prepare a large container made of glass or wood of any species that will accommodate the entire portion of grapes. You can also use clay dishes or simple enamel basins; the most important thing is to exclude any contact of the berries with uncoated metal objects (iron bowls, pots, etc.).
Literally 15 minutes are enough for the juice to begin an irreversible reaction with alcohol, so in the best case, the wine from the grapes will lose its taste, and in the worst, it will completely deteriorate. If you don’t have a suitable container at home, use food-grade plastic containers - this is a last resort, but it will provide protection from the reaction.
In order for a wine made with your own hands to please you with an excellent result, preference should be given to glass. This is the optimal material for fermentation, which does not interact at all with what it was filled with. If the choice fell on wooden barrels, then they must be washed and fumigated with sulfur (other disinfection methods are ineffective here).

Traditional trampling of raw materials for wine
Carefully ensure that your hands, every object and container are perfectly clean and dry. It is advisable to clean all equipment with soda or neutral dishwashing detergent, and then rinse thoroughly under running water. Wipe dry with a cotton cloth and leave for 10 minutes to dry completely. This way, homemade grape wine will receive a reliable shield against bacteria and souring.
Choose available tools for extracting juice from stainless steel. These can be meat grinders or juicers, in which the press parts are made of high-quality materials. If you prefer to squeeze the juice by hand, wear sterile gloves on your hands (they are sold in every pharmacy). The second method is more successful, since this way the seeds will not be crushed, giving the wine a bitter taste.
By the way, in Moldovan villages the juice is traditionally extracted with feet, trampling the berries with bare feet. It doesn't look appetizing, but the wine turns out excellent!
We collect and prepare grapes for processing
Wine made from grapes requires exceptionally ripe berries, and for dessert wines even slightly overripe ones, since they contain more sugar. It is necessary to collect bunches in dry weather to prevent the appearance of moisture. Throw away spoiled or unripe grapes without regret, since they have no benefit, but they can significantly spoil the taste.
Process immediately after harvest or within 2 days after. This way your raw materials will retain the maximum amount of juice and sweetness, and the withering process will not be taken by surprise.
If grapes are purchased in a store or market, do not wash the fruits, as their quality will noticeably decrease. Wild yeast, which is concentrated on the surface of the fruit and is necessary for fermentation, will be washed away with water and fermentation will be at risk (this also applies to the recipe for making homemade wine with a base of special wine yeast).
Let's move on to extracting grape juice
First you need to decide how you want to prepare grape wine – “white” or “red”. The name of each technique reflects the color of the drink and the type of berries that go into production.
The basis of the “red” is the fermentation of the wort on the pulp or skin, due to which the drink becomes aromatic, very bright and saturated with antioxidants. Fermentation occurs due to natural yeast. The basis of “white” is the fermentation of pure juice with minimal fermentation on the pulp (no more than 10-12 hours), as well as the use of wine yeast or ChKD (in winemaking - pure yeast cultures).
 Let's start chopping the grapes. You can crush it with wooden masher, spoons, clean hands or even feet (the main thing is the result, and the appetite will come during tasting!). In the case of making grape wine using ChKD, after grinding, add “Pyrosulfite” to the raw material.
The special powder has antioxidant properties and also blocks the proliferation of fungi, bacteria and other fermentation pests. On average, this is 25 mg of the substance per 1 kg of grapes. Here you need to look at the quality of the berries: if they have been waiting for a long time to be processed and their appearance has deteriorated, increase the dose up to 50 mg. For homemade wort using the “white” method, the calculation is as follows: from 70 to 100 mg per 1 kg of raw materials.
Afterwards, it is necessary to add wine yeast to the grapes, since “Pyrosulfite” is rich in sulfur substances, which neutralize the effect of wild yeast. In case there is “sulfur” in stock, but it was not possible to buy CHKD, make a regular starter 5 days before the start of processing (a “miniature” wort is prepared from 1 kg of berries and then sent to the main container).
Let's return to grapes with natural yeast. Place carefully chopped berries and juice into glass containers with a wide neck (if there is no glass, take stainless steel or plastic containers). We fill the container ¾ full so that the wine cannot “escape” during the process.
Cover the dishes with a clean gauze cloth, place them in a dark place and leave to ferment for 3-5 days. Monitor the ambient temperature: +25-+28 °C for red wines, +16+22 °C for white wines (lowering the temperature will stop the yeast from working).
You will have to visit the wort daily 2-3 times a day. The pulp that will collect on the surface must be knocked down with a wooden spatula. This measure will prevent the development of mold, which can form very quickly under fermentation conditions. Primary fermentation can optionally be increased from 5 to 14 days if you want to get a more tart taste and richness.
Preparing must - the basis of grape wines
 The main challenge here is the level of sugar and acidity. It is very difficult to determine these indicators at home, since you will need a hydrometer - a special measuring device. Relying on summary tables for varieties that contain information about sugar content is of no practical use, since it is important to take into account not only the variety, but also the climate in which the grapes grew. But there is a simple and very sure way out: try the juice. The evaluation criterion is pleasant sweetness without cloying notes.
So, add sugar. We do this gradually, without filling the entire volume and constantly try. Keep in mind that 2% sugar in the must is equal to 1% pure alcohol in the prepared wine. If you leave the wort without sugar, the final strength will be 10% of the possible 14%, and the taste of the drink will be zero percent sweet. On the contrary, if you overdo it with sugar, the alcohol concentration will increase significantly, and the yeast will stop doing its job. Therefore, follow the recipe for red or white grape wine, observing the measure.
Now is the time to determine the acidity of the prepared wort. Formal indicators average 6 g for red wine and 8 g for white. The technique is the same - we focus on our own feelings. If the juice turns out sour, feel free to dilute it with water, reducing the acidity. Use universal proportions: add 3 parts water to 1 part juice.
As soon as the taste indicators return to normal, we begin to pour the wine into large glass bottles with a narrow neck (you can take similar ones made of plastic). We do not fill the liquid completely, leaving free space (from 5 to 10 cm) for the foam that will certainly form.
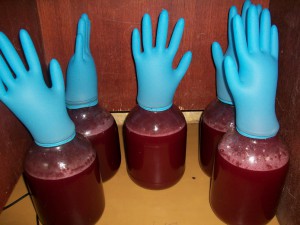
We close the container with a water seal, which will ensure the release of carbon dioxide and prevent the drink from souring. If you don’t have a hose for a water seal at home, an ordinary sterile glove will do, where you need to make a hole on one of the fingers with a thin needle to remove gases.
The stage of vigorous fermentation begins
Grape wine is quite demanding regarding ambient temperatures, which directly determine the result of fermentation. Thus, red wines at home at the current stage need a temperature of +20 to +25 °C, white wines - from +12 to +18 °C. The minimum value is +10 °C, and an even greater lack of heat will freeze the yeast.
On the contrary, an excessively high concentration of heat (from +35 °C) can completely destroy yeast fungi, so be careful. The exception is wine yeast, which can ferment effectively in extreme heat, but not every type of CKD is capable of this. Protect bottles of fermenting wine from possible drafts and direct sunlight - these two factors can change the thermal regime, reducing the quality of the drink.
Now the bottles can be placed in a secluded place and not disturbed for the entire fermentation period. Once the yeast has processed all the sugar, the appearance of new bubbles will stop or become extremely rare. Another signal that rapid fermentation has completed will be a deflated glove and a cloudy yeast sediment at the bottom of the container.
Pour the drink and send it for quiet fermentation
 To do this, place the container on a table or chair, focusing on a height of 50-60 cm from the floor. Using a siphon (a simple soft hose), carefully pour the liquid into a new container, trying not to disturb the bottom with sediment. You cannot be lazy and skip the pouring stage, since the yeast mass, continuing to come into contact with the drink, will completely ruin its taste and aroma.
During this period, homemade wine made from grapes still retains a cloudy tint, but there is no need to worry: it will still have time to become transparent and lighten slightly. Try the drink and assess your sugar level. If there is not enough of it, feel free to add more, since during the quiet fermentation stage it is not converted into alcohol.
Fill the bottle up to the neck to prevent any contact with oxygen, and close with a lid (or an air seal/glove if sugar has been added again). The container with wine must be placed in a dark and cool place where the air temperature is kept between +5+16 °C (ideally a cellar or basement). The main condition is not to allow the temperature to exceed +18+20 °C, because only in this case will it be possible to make truly tasty homemade wine.
Maturation period and aging
The minimum aging period is 1.5 months for white wines, and 2 to 3 months for red wines. The longer the wine matures, the better its quality (bottles can be aged for 1 year). If a small sediment appears at the bottom of the container, pour again using a soft hose. Fine sediment will not affect the taste, but getting rid of it will help clarify homemade wine made from grapes.
At the ripening stage, the recipe for wine from ripe grapes is no longer adjusted for sugar, and it is advisable to store the bottle at rest, without moving it from place to place (only dividing the pouring if necessary).
The wine is ready: bottled and stored
 The first step is to prepare bottles with airtight lids, and ideally with long corks that can be used to conveniently seal the neck. However, any sealable containers will do – even jars! This is just a matter of aesthetics and does not affect the quality of storage.
The technology for producing white and red wine at home does not require any special equipment, but clean hands and working tools are a key condition for obtaining the desired result. Therefore, it is much more important to thoroughly rinse and dry the container: this will protect the drink from bacterial invasion, preserving its wonderful aroma and taste.
Bottles need to be filled to the middle of the neck so that there is literally 1.5-2 cm of free space between the cork/tire. After bottling and corking, the wine is again sent to a cool place for storage. By the way, if you have closed them with stoppers, then you should store them exclusively in the “lying” position (this will preserve the elasticity of the stopper and the tightness of the blockage).
 Grape wines are completely unpretentious in preparation, but require constant attention in the first stages - stirring, churning the pulp and maintaining the optimal temperature. In the rush of everyday affairs, you can easily forget about this, and soon say goodbye to the wine that has become covered with a moldy film. To prevent this from happening, arm yourself with an alarm clock: at the right moment it will definitely remind you of an important matter.
Making wine from grapes, especially at home, will require careful attention to the process. Therefore, when preparing and crushing grapes, do not be distracted by extraneous matters: you can imperceptibly “enrich” the juice with many bacteria that lie in wait for your hands even on a kitchen towel. In normal cooking they are not dangerous, but during active fermentation of the drink they can “go sideways”.
How pleasant it is to spend an evening at home in the company of loved ones with a glass of good wine. Especially when it is made by yourself. If you, your friends or relatives grow grapes on your property, we recommend making wine from them. We will help you with this - below is the best step-by-step recipe on how to make homemade wine from grapes.
We do not recommend using berries purchased in the store. The fact is that the natural fermentation process of grapes occurs thanks to the natural yeast contained on its surface. If you wash the berries, the yeast will be washed off and you won’t succeed. Remember, you cannot wash grapes. For the same reason, it is very important that there is no rain and sunny weather for at least 2-3 days before harvesting. In the case of purchased grapes, you can never be sure what kind of processing they went through before they hit the shelf.
We provide a simple recipe on how you can prepare good wine yourself from high-quality and proven products.
Classic wine recipe
The recipe consists of only two ingredients – grapes and sugar. Any variety of white or red grape that fully ripens in your region will do. The preparation, namely the amount of sugar added to the drink, will depend on how sweet the berries of a particular variety are. If the berries are very sour (so much so that your cheekbones are sour), you can also add a little water, but this is in extreme cases.
1. Grape harvest

First, to make homemade wine from grapes, you need to pick the grapes directly from the vine when they are fully ripe. It is better not to pick up berries from the ground, as the characteristic earthy flavor may transfer into homemade wine.
Please note that overripe berries (which have begun to ferment on the branch) and unripe ones cannot be used to make wine. Therefore, after harvesting, carefully sort it out, removing leaves, branches, overripe and underripe berries. If you do not plan to start making the drink right away (the berries can be stored for two days), then before you make wine from the grapes, you will have to sort them out again.
2. Berry processing
Now you need to pour the berries into a clean plastic basin, wooden barrel or enamel pan (leaving a quarter of the volume empty) and crush them. It is better to do this with your hands or a wooden pestle (popularly known as a masher). As a result, you get juice and pulp - the pulp, skins and seeds of the grapes remaining after squeezing.

3. Start of fermentation
In order for our raw materials to begin to ferment, it must be covered with a cloth and stored in a warm, dark place for 3-4 days. The optimal temperature is from 17 to 27 degrees Celsius. After 8–20 hours, the fermentation process will begin, and the pulp will float to the surface. To avoid juice souring, stir the contents of the container once or twice a day.
4. Juice separation
After the specified time, you can drain the juice. This is done like this: first collect the floating pulp from the surface and put it in a separate container. The remaining must must be filtered several times (2-3 will be enough) through cheesecloth to remove the remaining grapes and saturate the drink with oxygen. You can also squeeze the juice out of the remaining pulp through cheesecloth, and then throw it away, it has already done its job.

We recommend tasting the juice at this step. If it turns out to be very sour (such that it makes your cheekbones cramp), you can add a little water, but not more than 0.5 liters per 1 liter of drink. Just keep in mind that sugar will be added later, which will lower the acidity, and water will reduce the quality of the grape wine. Therefore, add water only in extreme cases.
Pour the grape juice into a fermentation container - a large glass bottle or jar. You can also use a food-grade plastic canister. Remember, about a third of the volume of dishes used should remain unfilled.
5. Installation of a water seal
To avoid the interaction of young wine with oxygen, as well as to remove carbon dioxide formed during the fermentation process, it is necessary to install a water seal on the bottle (jar, canister).

The most common design of a water seal is a plug with an inserted tube to which one end of the hose is connected. The second end is lowered into a jar of water. You can observe the fermentation process in the form of characteristic gurgles.
Of course, you can make a water seal yourself if you have the appropriate elements, but we recommend installing a device purchased in a store. It is sold separately or together with a fermentation vessel.
In addition, a rubber medical glove can be used as a water seal; a small hole must first be made in one of the fingers with a needle.
6. Active fermentation
For an active fermentation process, it is necessary to provide a suitable temperature - from 17 to 22 degrees Celsius for white grapes or from 21 to 28 degrees Celsius for red grapes. Do not allow the temperature to drop below 16 degrees Celsius, as well as sudden temperature changes. Otherwise, fermentation may stop prematurely. The container should be in a dark place or covered with a thick cloth.
7. Adding sugar
As practice shows, 2 percent sugar in wine wort increases the strength of the finished drink by 1 degree. If you don’t add sugar at all, the wine will be less strong by no more than 10 degrees. And if you add, then the maximum possible strength is 14 degrees; at higher concentrations of alcohol, wine yeasts die and the fermentation process stops.

You can add sugar after 2-3 days of active fermentation. Try the juice, if it is sour, add sugar at the rate of 50 grams per 1 liter. To do this, we recommend pouring a liter of juice into a separate container, adding the required amount of sugar, stirring well until the crystals are completely dissolved and pouring into the main bottle.
Repeat the procedure approximately once every 5–7 days. After 2-3 weeks, you will notice that the sugar content of the drink practically does not decrease, this means that sugar has stopped being processed into alcohol and this amount is already enough.
8. Transferring wine, separating sediment
Typically, a full fermentation cycle lasts from 1 to 2 months, depending on temperature conditions and the fermentation activity of the wort. Moreover, if fermentation continues 50 days after installing the water seal, it is better to drain the contents of the fermentation tank from the sediment into a clean container. Use a thin hose for this, be careful not to damage the sediment. We re-install the water seal on the new container and allow the wine to ferment.

Young wine should be drained if the water in the jar does not gurgle for more than one day (in the case of a water seal), or if the glove has sank and deflated, and the juice has become lighter in color and sediment has formed. We do this immediately. If this is not done, the young wine may begin to taste bitter, as dead yeast fungi precipitate, the long presence of which in the drink negatively affects its taste and smell.
Before pouring young wine into another container, you need to move it to a higher place. In this case, a slight agitation of the contents will occur, so you must wait until the solids have completely settled, and only then start draining. The technology is as follows: insert one end of a thin elastic tube or hose into a filled vessel, and the other end into an empty fermentation container located at a lower level (on the floor). Be careful that the tube does not touch the sediment and is at some distance from it (several centimeters), otherwise it will transfer along with the liquid contents, and we do not need this.
9. Adjustment of taste and strength
Active fermentation has already completed by this step, so the added sugar will not be processed into alcohol, but it can be used to adjust the taste of the final product. Focus on your taste preferences, while the maximum amount of sugar that can be added is 250 grams per 1 liter of wine. We do this by pouring a small amount of liquid into a separate container. Then dissolve the sugar there and pour the syrup into the main bottle, as in step 7.
You can also make fortified wine by adding vodka or diluted alcohol after fermentation, but not more than 15% of the total volume of the resulting drink. This method of adjusting the recipe helps to better store the wine, but the taste will change slightly, not for the better. Therefore, this option is not for everyone. By the way, some people call fortified wine cocktail wine, as it goes well with juice.
10. Exposure

So, we fermented the grape juice, separated the sediment, adjusted the sweetness and strength, now the wine needs to be aged to saturate and form the final taste. Homemade grape wine must be aged for at least one and a half (for white grapes) or two (for red) months, or a maximum of a year. Further aging will not affect the organoleptic properties of the drink in any way, so it makes no sense.
Pour the young wine into a clean glass container. These could be cans or bottles. The drink must be topped up so that no air remains in the container being used after it is clogged. After this, put the bottles or jars in a cool, dark place - a basement or cellar - to age at a temperature of 5 to 20 degrees Celsius.
As sediment settles, the drink must be poured into other containers, as described in step 8. In this case, if you do everything correctly, the wine will lighten and reduce its turbidity.
11. Filling and storage
It is easy to determine the readiness of alcohol - when the sediment stops falling, homemade wine from grapes is ready. Its strength will be from 11 to 13 degrees. Of course, if you did not secure it in step 9. For further storage, the wine must be poured into glass bottles, tightly capped and stored in a cool place.
12. Consumption

When we make wine from grapes at home, it usually tastes a little different from store-bought, and may also be a little cloudy, this should not scare you. You can drink homemade wine neat, or you can add ice cubes or juice (for example, cherry). Experiment, look for the ideal combination of flavors and proportions, then you will get the most delicious wine.
If you have your own recipes or additions to ours, share them with other readers of the site in the comments.
Wine made from grapes has earned its popularity since ancient times and has not lost its relevance to this day. Surprisingly, the simplest grape wine recipe is also the best to make at home.
The thing is that the technology for its preparation uses a simplified method that is accessible even to a beginner in winemaking. However, do not forget that the simpler the recipe, the easier it is to make an irreparable mistake - the slightest mistake, and all efforts will be destroyed in the bud. I have selected three simple recipes for wine from grapes, two of which are quite extraordinary, but are available for making the drink at home.
Almost every winemaker can boast of his own special, signature recipe for this alcoholic drink.
To begin with, I propose to take a closer look and thoroughly study all the intricacies of making wine from grapes at home using a traditional method that has been proven for generations. If you want to make dry wine with pronounced acidity, then add less sugar to the grape juice.
Cooking process
- We carefully sort through the unwashed grapes, removing leaves, branches, rotten and unripe fruits.
- Crush the grapes thoroughly until you obtain a mushy, homogeneous state. To achieve this goal, I recommend using a blender, masher, meat grinder, or crushing the berries with clean hands.

- Place the resulting porridge in a suitable enamel bowl with a wide neck, filling it to a maximum of 70-75%.
- Cover the pulp with a gauze cloth folded in several layers and send the container to a dark place where the temperature is consistently maintained from 19 to 25 degrees.
- After 9-17 hours, a so-called “cap” of fruit skins forms on the surface of the wort, which must be knocked down by thoroughly stirring the liquid with a wooden spatula. We repeat this procedure 2-3 times a day for 4-6 days.

- As soon as the pulp brightens, a sour smell becomes noticeable and a slight hissing is heard, then carefully remove the pulp from the surface of the wort, put it in a gauze bag and squeeze the juice out of it.
- Carefully pour the fermented juice from the sediment into a separate dry container and mix it with the squeezed liquid from the pulp.
- We filter the grape juice twice through a gauze filter, and then pour it into the fermentation vessel.

- Add sugar there, focusing on your own taste preferences, and stir everything well, trying to dissolve the grains of the latter as much as possible.
- We install a water seal or a medical glove on the vessel and place the wort in a warm and dark room.

- Let the mixture sit until the fermentation process is complete. It usually lasts about three weeks.
- Carefully drain the young product from the formed sediment, trying not to stir it up.
- Then we repeat the cleaning process using gauze and cotton filters.
- We taste the drink for sweetness and if sugar is added, install the water seal again and allow the wine to ferment for a few more days until the fermentation process stops.
- Pour the finished alcohol into a dry glass bottle, filling it to the very neck. This is necessary in order to avoid any contact with oxygen.

- We seal the container hermetically with a stopper and send the homemade product to the basement or any other room in which the temperature range is from 5 to 15 degrees. It is very important to avoid sudden changes in temperature, otherwise the taste of the drink may deteriorate.
- To prepare white wine, we age the drink for approximately 40 days, and for red wine – 70-90 days.
- If sediment more than 4 cm thick appears at the bottom of the vessel, we clean the alcohol by pouring the liquid into another container, leaving the sediment at the bottom. As a result, the alcoholic drink will mature and acquire the desired shade.
Wine recipe from concentrated grape juice
Few people are familiar with the method of making wine from concentrated grape juice, which at home requires less effort and significantly reduces the ripening time. The thing is that grape juice concentrate begins the fermentation process faster than fresh grape juice.
The second advantage of this component is that with it the process of making a wine drink is extremely simple. Wine made in this way has a particularly refined taste, a subtle, captivating aroma and a beautiful purple hue.
List of required ingredients
Cooking process


Among the huge variety of wines, homemade wine made from dried grapes attracts special attention. Professional winemakers call this wine “raisin wine.” I assure you, once you taste this alcohol, you will be pleasantly surprised at how diverse the taste and aroma of grape wine can be. 
The finished product is quite strong and sweet, while having a strong aroma and rich taste. Experienced tasters manage to sense nutty and floral notes in the aroma of this nectar, in addition to the clearly noticeable hint of dried fruit.
List of required components
Cooking process

Preparing sourdough
- Place the raisins in a blender bowl and grind thoroughly.
- Add 40 g of sugar and 200 ml of warm water to the resulting mixture.
- We send the starter to a warm place for several days until the mass ferments well.
Preparing wine


Video of grape wine recipes
I definitely advise you to watch several informative and interesting videos in which skilled winemakers will teach you in detail how to make real wine from grapes at home, which is not inferior in quality to some collectible products.
Video No. 1. Here, a professional winemaker will tell you how to make wine from black grapes at home using a simple, unpretentious recipe. The master will share his personal experience over many years and demonstrate his every step, from grape harvesting to tasting the finished wine.
Video No. 2. In this video, an experienced amateur will share his own secrets and teach how to prepare white wine using a personally developed method. In addition, he will explain in detail the entire fermentation process, including decanting.
Video No. 3. The specialist will present for your consideration an interesting and detailed method of preparing amazing homemade wine based on grape juice and honey. The video covers the process of preparing wine nectar, accompanied by a huge number of useful tips from the master.
Helpful information

I hope that now your dream of learning how to make grape wine yourself will finally come true. Enjoy the process itself and receive pleasure and positive feedback from tasters of your creation.
If you have developed other versions of making a grape drink, then be sure to share them with me. Good luck!
Winemaking is an art whose secrets take years to learn, but anyone can make homemade grape wine. It is clear that this will not be a masterpiece worthy of world exhibitions, but if you follow the instructions, the taste of the homemade drink will be better than many store-bought ones. I bring to your attention a detailed technology for preparing wines (red and white) at home. The recipe uses only grapes and sugar, in rare cases additional water is required.
The best grape varieties for home winemaking are Stepnyak, Platovsky, Rosinka, Druzhba, Regent, Saperavi, Crystal, Festivalny, which do not require special care and have a fairly high sugar content. But this does not mean that you cannot make wine from other varieties, for example, Isabella or Lydia, you just have to add more sugar.
Before starting cooking, take care of all containers and utensils used. To avoid contaminating the juice with pathogenic microorganisms, such as mold, the containers must be perfectly clean and dry. Barrels, bottles, and buckets can be smoked with sulfur, as is done in industry, or washed with boiled water, then wiped with a dry cloth. I strongly recommend avoiding containers in which milk was previously stored, since even thorough cleaning does not always help.
Ingredients:
- grapes - 10 kg;
- sugar - 50-200 grams per liter of juice;
- water – up to 500 ml per liter of juice (in rare cases).
It is advisable to add water only if the juice is very sour - the taste stings the tongue and makes the cheekbones cramp. However, remember that adding sugar itself reduces acidity. In all other cases, diluting with water worsens the taste and is therefore not recommended.
Grape wine recipe
1. Harvesting and processing. To ensure that the wild yeast necessary for fermentation remains on the grapes, it is advisable to pick the berries in dry, sunny weather. There should be no rain for at least 2-3 days before.
Only ripe fruits are suitable for winemaking. There is too much acid in unripe grapes, and in overripe berries, acetic fermentation begins, which can subsequently spoil the entire must (squeezed juice). I also do not recommend taking carrion, which gives grape wine an unpleasant earthy taste. Picked berries need to be processed within two days.
Carefully sort the harvested grapes, removing twigs and leaves, unripe, rotten and moldy fruits. Then crush the berries, place the pulp along with the juice in an enamel pan or plastic bowl, filling the container to a maximum of ¾ of the volume. It is better to crush the grapes with your hands so as not to damage the seeds, which contain substances that make the wine bitter. If there are a lot of berries, you can carefully crush them with a wooden rolling pin (pestle).

 Wooden fixtures only
 Avoid contact of juice with metal (except stainless steel), as this causes oxidation, which impairs the taste. That is why the berries are kneaded with hands or wooden tools, and the pulp (crushed grapes) is placed in an enamel container with a wide neck - a bucket or pan. You can also use food-grade plastic containers or a wooden barrel.
Cover the container with the pulp with a clean cloth to protect it from flies, and place it in a dark, warm (18-27°C) place for 3-4 days. After 8-20 hours, the juice will begin to ferment, a “cap” of skin appears on the surface, which should be knocked off 1-2 times a day, stirring the pulp with a wooden stick or hand. If this is not done, the wort may turn sour.

 Violent fermentation of pulp
 2. Obtaining pure juice. After 3-4 days, the pulp will lighten, a sour smell will appear and hissing will be heard. This means that fermentation has begun successfully, it’s time to squeeze out the juice.
Collect the top layer of peel in a separate container, squeeze it out with a press or by hand. Filter all the juice (drained from the sediment and squeezed out of the pulp) through gauze, pouring from one container to another 2-3 times. Transfusion not only removes small particles, but also saturates the juice with oxygen, which contributes to the normal functioning of wine yeast at the initial stage.
When working with unripe grapes or grapes grown in northern latitudes, in rare cases it may be necessary to add water. If the juice turns out to be very sour (it makes your cheekbones ache and your tongue tingles), add water - a maximum of 500 ml per 1 liter. The more water, the worse the quality of the wine. It is better to leave the acidity slightly higher, since the concentration of acids decreases slightly during fermentation.
Fill the containers (maximum 70% of the volume) intended for fermentation with pure juice. Ideally, these are large glass bottles; in extreme cases, if the volume of wine is small, jars are also suitable.
3.Installing a water seal. To prevent homemade grape wine from turning sour, it must be protected from contact with oxygen, while simultaneously ensuring the release of the by-product of fermentation - carbon dioxide. This is done by installing one of the water seal designs on the container with juice. The most common option is the classic water seal made of a lid, tube and jar (pictured).

 Diagram of a classic water seal
  Wine fermentation with a glove
 The design of the water seal is not of fundamental importance, but in terms of convenience, it is better to put a classic water seal on large bottles, and a glove or a lid-shaped seal (sold in stores) on jars.

 Lid with water seal
 4. Initial (active) fermentation. After installing the water seal of the container with fermented juice, it is necessary to ensure suitable temperature conditions. The optimal fermentation temperature for red homemade wine is 22-28°C, white – 16-22°C. The temperature must not be allowed to drop below 15°C, otherwise the yeast will stop before it can process all the sugar into alcohol.
5. Adding sugar. Approximately 2% sugar in the must yields 1% alcohol in the finished wine. In most regions of Russia, the sugar content of grapes rarely exceeds 20%. This means that without added sugar, at best the wine will be 10% ABV and zero sweetness. On the other hand, the maximum possible strength is 13-14% (usually 12); at a higher alcohol concentration, wine yeast stops working.
The problem is that it is impossible to determine the initial sugar content of grapes at home without a special device (hydrometer). Focusing on average values for varieties is also useless, since this requires data on the sugar content of the selected variety in a specific climatic zone. In non-wine-growing areas no one makes such calculations. Therefore, you have to focus on the taste of the juice - it should be sweet, but not cloying.
To maintain normal fermentation, the sugar content of the wort should not be more than 15-20%. To ensure this condition, sugar is added in parts (fractionally). 2-3 days after the start of fermentation, taste the juice. When it becomes sour (the sugar has been processed), you should add 50 grams of sugar for each liter of juice. To do this, pour 1-2 liters of wort into a separate container, dilute sugar in it, then pour the resulting wine syrup back into the bottle.
The procedure is repeated several times (usually 3-4) during the first 14-25 days of fermentation. At a certain point, the sugar content of the wort will decrease very slowly, which means that there is enough sugar.
Depending on the temperature, sugar content and yeast activity, the fermentation period for homemade grape wine is 30-60 days. If fermentation has not stopped 50 days after installing the water seal, in order to avoid the appearance of bitterness, the wine should be poured into another container without sediment and placed under the water seal to ferment under the same temperature conditions.
6. Removing wine from sediment. When the water seal does not release bubbles for 1-2 days (the glove is deflated), the wort has cleared, forming a layer of loose sediment at the bottom, it’s time to pour the young grape wine into another container. The fact is that dead fungi collect at the bottom; staying in the wine for a long time, they cause bitterness and an unpleasant odor.
1-2 days before removing the wine from the sediment, place the fermentation container at a height above the floor (50-60 cm). This could be a bench, chair or any other device. When the sediment is again at the bottom, pour the wine into another container (clean and dry) through a siphon - a transparent soft hose (tube) with a diameter of 0.7-1 cm and a length of 1-1.5 m. The end of the tube should not be brought closer to the sediment; than 2-3 centimeters.
Drained homemade wine will not be completely clear. This is not scary, the appearance of the drink has not yet formed.
 Sludge removal process
 7.Control of sugar content. It's time to decide on the sweetness of the wine. Since active fermentation has already ended, all the sugar added at this stage will not be converted into alcohol.
Add sugar based on taste preferences, but not more than 250 grams per liter. The application technology is described at the 5th stage. If you are satisfied with the sweetness, there is no need to sweeten it additionally. Lovers of strong alcohol can make fortified grape wine by adding vodka (alcohol) at a rate of 2-15% of the volume. Fixing helps preserve the wine, but makes the taste harsher and the aroma less intense; alcohol notes appear.
8. Quiet fermentation (ripening). The stage during which the final taste is formed. Lasts from 40 to 380 days. Longer aging of homemade grape wines is not advisable, since it does not improve the properties of the drink.
Place the bottle of wine (preferably filled to the top to avoid contact with oxygen) under the water seal (recommended if sweetening was done) or close it tightly with a lid. Store the container in a dark cellar or basement at a temperature of 5-16°C. If this is not possible, the young wine needs to be provided with a maturation temperature of 18-22°C, but not higher. It is important to avoid sudden temperature changes, for example, day and night, otherwise the taste will deteriorate. The minimum aging period for white wine is 40 days, for red wine – 60-90 days.
When sediment appears at the bottom in a layer of 2-5 cm, pour the wine from one container to another through a straw, leaving the sediment at the bottom, as described in the 6th stage. As a result, the drink will gradually lighten.
9. Artificial lightening (pasting). Even after several months in the cellar, homemade grape wine may remain cloudy. The problem is solved by removing impurities. The most common methods are pasting with gelatin or egg white.
Lightening only improves the appearance, but does not affect the taste in any way, so I recommend cleaning only as a last resort.
10. Spilling and storage. At the last stage (when sediment no longer appears), the wine can be bottled and tightly capped.
Shelf life at a temperature of 5-12°C is up to 5 years. Strength – 11-13% (without fixing with vodka or alcohol).

The video shows the technology for making wine from sour grapes, in which the squeezed juice is diluted by half with water. Relevant only for northern regions with very sour berries, since adding water worsens the taste.