About backups or how you can clone a hard drive. How to clone a Windows hard drive - programs to create an HDD clone
– disk copying operation at the logical (sector-by-sector) level. In Windows and Linux, it is more convenient to clone a disk using a special program than using system utilities. An example disk clone program is Handy Backup.
How to clone a drive using Handy Backup
To clone an entire disk to SSD or HDD media using the automatic disk or partition cloning task in Handy Backup, follow the instructions below.
- Create a new backup task. On Step 2, select the plugin in the Disk Clone group System Recovery. Check the box next to the drive you want to clone.

- At Step 6 set the schedule for disk cloning. Read more about creating a scheduled task in the User Guide.

- When the task is created, run it or wait for it to run as scheduled.
- Next, create a new recovery task.
- In Step 2 open your disk clone storage and double click on the file backup.hbi.
- In the restore dialog that opens, click the " Change location".
- Select a new drive to clone information from your drive to this media.

Attention! The device must be connected to the PC at the task creation stage!
- Click OK and continue creating the restore task.
Advice. If you are scheduling a restore task, make sure that it starts at a sufficient interval after the start of the corresponding copy task!
- Finish creating the restore task.
Working in pairs, your two tasks will clone your hard drive to an SSD or HDD on a schedule.
How to clone a disk partition
To clone a disk partition, follow the instructions above, but select the Disk Image plugin instead of System Recovery. This plugin allows you to create disk partition backups.

Why clone a disk or partition?
Cloning a partition or an entire disk solves many important tasks in the IT field.
- Cloning a system disk or partition. Allows you to transfer a copy of the boot disk to a new device or an arbitrary number of devices, ensuring the logical identity of the bootable systems and software.
- Creating a Data Drive Clone. Saving a physical copy of the data structure on a disk or partition allows you to multiply the contents of the disk or make a backup copy (backup) in case of unforeseen circumstances.
- Cloning a boot drive for recovery. System cloning is a reliable means of protecting your system configuration from viruses or accidents that destroy the functionality of your computer.
Recommended Solutions to Clone a Windows Drive to Another Drive
Download
Buy!

Version 8 dated March 4, 2019 . 104MB
Backup program Handy Backup. 2900 RUB for a license
The Professional solution contains out of the box Disk Image and System Recovery plugins for cloning disks and partitions for Windows 10, Windows 7/8/8.1, Linux.
You can also clone disk partitions using the Standard version by purchasing the Disk Image plugin as an extra!
How to clone a disk? Benefits of Handy Backup

Scheduled disk cloning
Handy Backup can create a clone of a disk or partition at exactly the specified time and frequency. You can also clone a disk partition or an entire disk when a specified event occurs, for example, when a USB device associated with a task is connected to a PC.
Ability to manage partition or disk cloning
You can run other programs before and/or after the disk cloning task, for example for garbage collection or data security purposes. You can also receive task reports by email, save the Windows registry and other data along with the disk clone, and more.
Safe disk clone creation
With the built-in encryption and data compression functions, you can clone a system drive or a data drive for encrypted storage; it is impossible to restore, modify or view its contents without the key to the cipher.

"Hot" clone of a system drive or data drive
Handy Backup clones disks without stopping the already running processes associated with these disks. In particular, Handy Backup can clone a partition or disk that contains a Windows or Linux system running on the machine at the moment.
Handy Backup is an effective disk cloning software in Russian. You can try its power yourself by downloading a 30-day free version of the program with a full range of features and plugins.
Often, many users of modern computer systems are faced with such a problem when hard disk cloning may be required. Among the most common situations, one can separately note the fact that over time, the hard drive simply begins to “crumble”, and the information on it is very important (up to the installed programs and the operating system itself).
What is hard drive cloning?
As it is already clear, the process of cloning a hard drive itself is nothing more than creating an exact copy of all the information contained on it. And often the whole process can be reduced to just two main methods of transferring information to a new medium: the use of programs that work in automatic mode, and manual copying.
Let's see how to clone a hard drive in Windows using the best option. It should be noted right away that both methods are good in their own way. Why? Now we'll figure it out.
Creating a hard drive backup
Unfortunately, not all users are aware of the universal methodology for cloning a hard drive, which is available in almost any version of Windows.
To save the necessary information, you can use elementary backups. Access to such features is carried out through the use of the standard "Control Panel" section "Copy and Restore". Although it is claimed that the creation of any backup copy of the operating system itself will not affect the affected programs or user files in any way, this is not the case.

In any case, you can use not only standard tools, but also specialized programs for creating disk images, after which, when installing a new hard drive, you can copy the entire image to it and even run the previously installed operating system.
Most popular means
However, in this case, not everything is as simple as it might seem at first glance. Cloning a hard drive programmatically is a good thing. But do not forget that you first need to install a new hard drive in your computer.
But the option is not ruled out that there may not be an additional slot for its installation. There certainly is no difference here, whether the Windows 7 hard drive is being cloned by its own capabilities or by other means.
As it turns out, the simplest way out of this situation is to turn off the optical drive, instead of which the cable is connected to the new hard drive.

You can use Acronis True Image to create a copy. First, you will need to select the automatic mode for cloning the hard drive, indicating the source disk, after which you will need to specify the target disk to which the information will be copied. Here it is worth considering that you can use the creation of exactly the same partition as on the old disk, the proportional distribution of space on the new disk and manual copying. It all depends on the needs of the user. It is clear, after all, that the same cloning of a Windows 8 hard drive (meaning the main boot sector for the subsequent start of the system) is generally not necessary to perform one-on-one (especially if there is clearly more space on the new hard drive). Here you can use either the second or third method, which is more preferable.
In addition, in such a situation, you can also create logical partitions manually with a choice of reserved disk space for each of them.
As is already clear, the use of any of the above methods comes down to creating a standard backup copy or simply copying information, although in the latter case it is far from certain that the transferred “OS” will work on a new hard drive, not to mention device drivers. And that's why.
Related problems
Of course, you can also use hard disk cloning, which is carried out using various utilities. But, as practice shows, after that, the drivers in most cases will have to be reinstalled manually. And this, as is already clear, is a hassle and an extra headache.

It is better to use the Windows Easy Transfer menu, which is located in the utilities section. There shouldn't be any problems here.
As for the actions to be performed, you will need to select the source computer and the new disk to which all information will be copied without exception. Here, however, it is worth considering another important point. If the size of the hard drive is reduced compared to the original, the transferred information may be damaged or not completely copied. There are no problems with increasing disk space.
Among other things, Microsoft experts strongly recommend disabling the use of the paging file before performing all operations. Its use can cause some fairly serious problems.
Conclusion
As it is probably already clear, the process of cloning a hard drive itself is by no means particularly time-consuming or complicated. What exactly to use as the main tool, everyone decides for himself.
But it seems that the best option here can be called native Windows tools in relation to installed versions 7, 8 and 10. For the XP version, it is better to use specialized utilities (they work much better there and do not cause conflicts).
In some cases, the user wants to transfer all data from one hard drive to another. This procedure is called cloning. So, hard drive cloning is a process of sequential and complete record data from the original drive to another. For home PC users, this procedure allows quick change HDD or SSD in case of replacement or upgrade. This operation can be performed using simple programs with an intuitive interface, one of the most famous is TrueImage fromAcronis.
For large companies, the disk cloning procedure allows you to quickly set preferences on a large number of identical machines, when expanding the office or replacing work computers. Then the original instance with a fully configured system and installed work programs for the company's employees. One original HDD or its image becomes a donor for a dozen workstations.
The process of working with the Acronis program interface
All user interfaces of media cloning programs are very simple. These programs can be run both in the operating system and with external media: USB stick or DVD. This makes it possible copy data from / to a computer without loading Windows 
Acronis True Image is designed for both cloning hard drives, and transfer operating system from HDD to SSD. He handles it no mistakes, moreover, it has support not only for BIOS, but also for UEFI. First you need to find the latest version and install it to a bootable flash drive or CD. Can use any utilities for creating bootable devices, such as USB Flash boot to DOS.
After that, in the BIOS or UEFI interface, you must select download fromUSB drive. At the time of system boot press F2, F8, F9 or Del key. Paragraph "". This is followed by a computer, after which you must select utilityAcronis.
In its interface, you should specify original disk and target, moving sections one at a time. If the target disk is smaller than the source disk, you must select system partitions, and only select from user space necessary files. Thus, it is possible to carry out transfer operating system from HDD to SSD to speed up your computer. 
After using and successfully starting Windows, you need to delete empty partitions on the source disk, using the utility " Hard Disk Wizard". To do this, there is an item for deleting a partition and an item for adding unallocated space.
Transferring a system from one computer to another using True Image
To transfer the system and the contents of the hard drive from one computer to another, the program from Acronis provides the ability to preservation backup of hard disk partitions on external media. It is enough to follow all the above steps and enter the submenu " Backup". If you do not use compression, then such a copy will take up as much space as the original data. For this reason, it is necessary to use external storage sufficient volume. The maximum backup size can be halved. 
After transferring information to external media launch Acronis True Image on a secondary computer by connecting an external drive to it. Selecting " Restoring a backup»You must follow the instructions and mark the hard drive under the system and user partitions.
In this article, I want to share with you a super simple, extremely fast, and completely free workflow that creates a perfect 1 in 1 copy of an HDD (or partition) for backup or to migrate to an SSD. This method has saved me so many hours, days and maybe weeks of stress, and it's free and done in minutes.
You want to transfer the contents of hard drive A to drive B (maybe an SSD)
There are plenty of backup tools (and sometimes even migration tools) that will backup your entire operating system for you, sometimes copying all the files on your hard drive, sometimes duplicating a complete partition. I have used them several times and believed this tool, it only gave me the realization that the result was completely unusable, simply because these tools do not create a REAL copy of the hard drive.
The built-in Windows backup tools will simply create a compressed image, which is only useful if you have a DVD drive, burned ISO (disk) with exactly the same version of Windows, a lot of time and a lot of luck. Creating a fully working system from these backups very often ends in failure.
Other tools create a complete copy of the entire Windows partition, which looks very, very good. Until you really need this backup and imagine it won't be bootable because these tools don't copy the tiny (hidden) partitions that contain the bootmanager. Bummer!
Or do you just want to backup your drive at extreme speed?
The instructions are also useful if you just want to make a one to one copy of any data discs that contain your files. The manual copy will process each file and each directory and initialize the copy process for each individual item, while the one-to-one copy method will simply copy everything as a big block in low hardware.
What do you need:
I use Macrium Reflect (Free Edition) for this. Before you ask: it's completely free, I don't get paid or anything like that for saying this, and there's no affiliate link or anything like that. It's just an awesome tool. I am writing this in March 2015, and if you are reading this years later and the program is no longer free or available anymore: There are several websites on the net that contain an archive of earlier versions of almost any program, maybe this will help.
Macrium Reflect can copy individual partitions to any disk, usb or partition, or clone an entire disk (including hidden boot/swap partitions) to any other hard disk, even if the destination disk is smaller or larger. However, to be sure, it should have enough space for the content.
How to clone:
The cloning process is extremely simple. Check the box on the left to fully clone your hard drive. DO NOT uncheck the boxes at the bottom of the sections, even if you do not understand what these sections are and where they came from. Because without these hidden partitions, your clone won't have a boot area.
Click “clone disk” and select the destination disk in the next window. Further, everything is self-explanatory.
To confirm: Open a command prompt, type “compmgmt.msc” there, go to -> “Computer Management” -> “Storage Devices” -> “Disk Management”. There you should see an exact copy, along with the hidden section.
Be sure to unplug one of the drives so you don't get confused after a reboot.
Hello admin. I want to clone the Windows 8.1 operating system in Acronis True Image 2015 from a regular hard disk to an SSD, I think this method is much simpler than all the others, first I specified the Source disk, then the Target disk and that's it. A 500 GB hard drive is naturally larger than a 120 GB solid state drive, but can you exclude unnecessary disks, folders, and even just files in the cloning settings?
Of course, I can do everything myself, but I'm afraid, since I have little experience with Acronis True Image, and you only look at it like this!
How to clone the Windows 7, 8, 8.1 operating system in Acronis True Image 2015 from a regular hard drive to an SSD (the size of the drives varies)
Hi friends! If you often work with Acronis True Image, then you probably noticed that the program settings have such an option called Cloning, and as our reader rightly noted, this option is very finely tuned.
For example, I suggest you clone my Windows 8.1 from a regular 250 GB hard drive to a 120 GB SSD. A simple 250 GB hard drive is almost full of files and naturally all the information from it will not physically fit on the SSD, but when cloning we can exclude unnecessary folders, files and even entire disks, as a result of the cloned information exactly 120 GB will remain, that is, as much as SSD volume. But you need to do everything right, because the Windows 8.1 operating system cloned to another hard drive should start with us!
First, connect an SSD solid-state drive to the system unit with a second device.
For the success of this serious operation, you must be well versed in Disk Management, pay attention to this window of my computer and you will immediately understand what's what.
Disk 0
A simple 250 GB SATA hard drive.
1 . The first hidden section (we will clone) System Reserved (Reserved by the system), has a capacity of 350 MB. The main purpose of the hidden partition is to store Windows 8.1 boot files. If you have Windows 7 installed, then this partition will be 100 MB in size.
2 . The second section has the letter (C:) (we will clone) 105 GB, installed operating system Windows 8.1.
3 . The third section under the letter (E:) capacity 127 GB, with data files: music, movies, and so on, occupied by 100 GB. We can clone this partition not completely, just exclude large files when cloning. Or we can completely exclude this partition from the cloning operation and instead, at the end of the process, an empty partition is formed on the SSD.

Disc 1. Solid state drive SSD, when cloning, all information on it will be deleted
Acronis True Image 2015
For cloning, it is better to use the boot disk of Acronis True Image 2015, as this version works without errors with SSDs and has UEFI support. It is better not to install Acronis True Image in Windows and work with the boot disk of this program, so you will avoid many mistakes.
You can make a bootable flash drive with Acronis True Image 2015 in the program itself or with the help of this article of ours .
So, we boot from a disk or flash drive with the Acronis True Image program. Who does not know how to boot from a disk or flash drive, read our article - .
For example, I enter the boot menu of my computer with an ASUS motherboard by often pressing the Delete key when turning it on, then select the "Boot Menu" and select the drive or USB flash drive in it.

In the main window of Acronis True Image 15, select
Tools and Utilities

Disk Cloning


Select with the left mouse the Source disk (the disk from which you want to clone the Win 8.1 operating system), in our case, a simple hard disk 3 MAXTOR STM 3250310AS and click Next.

Select with the left mouse the Target disk (the disk to which you want to clone the Win 8.1 operating system), in our case, the solid state drive Silicon Power SSD and Beyond

Acronis displays a warning "The selected target hard disk contains partitions that can store data. Click OK to confirm deletion of all partitions on the target hard disk." Click OK and Next.

Window Exclude by files and folders.
In this window, Acronis True Image 15 tells us that in order to clone information from the Source disk to the Target disk, we need to exclude 23.72 GB of files from the Source disk. You can't exclude files from the first section (Reserved by the system) as the Windows 8.1 download files are located there. It is also undesirable to excludefiles from the disk with Windows 8.1 installed. The drive with the installed Windows 8.1 operating system is assigned the letter (D :) here, if you click on it with the left mouse button, the operating system files will open.


So we will exclude files from the disk (E:).
Attention : Friends, you can simply exclude this entire disk (E :) from cloning, as a result, Disk C will be cloned to the solid state drive:(Reserved by the system) containing download filesoperating systemand another drive (D:) containing Windows 8.1 files, but you can choose a more difficult option. Let's open the disk(E:) and select an unnecessary file or folder on it. For example, on this disk, the NewVirtualDisk1.vdi virtual hard disk has been an eyesore for a long time, I have not needed it for a long time and its volume is about 50 GB, let's exclude it from cloning, mark this virtual disk with a checkmark. Program

As you can see, after excluding the file, we still have 30 GB of free space left. Click Next

If you click Proceed now, the cloning process will begin exactly as shown in this window.
Before - what is on the solid state drive now and all this will be deleted.
After - what will be on the SSD after cloning, that is, two small partitions.
I want to say that I personally do not need this state of affairs. I need a hidden partition on the SSD disk (Reserved by the system) containing the operating system boot files and another disk (D:) containing the files of Windows 8.1 itself

So I'll be back at the window File exclusion and tick the whole disk
(E:). Acronis True Image 15 restarts cloning space calculation.

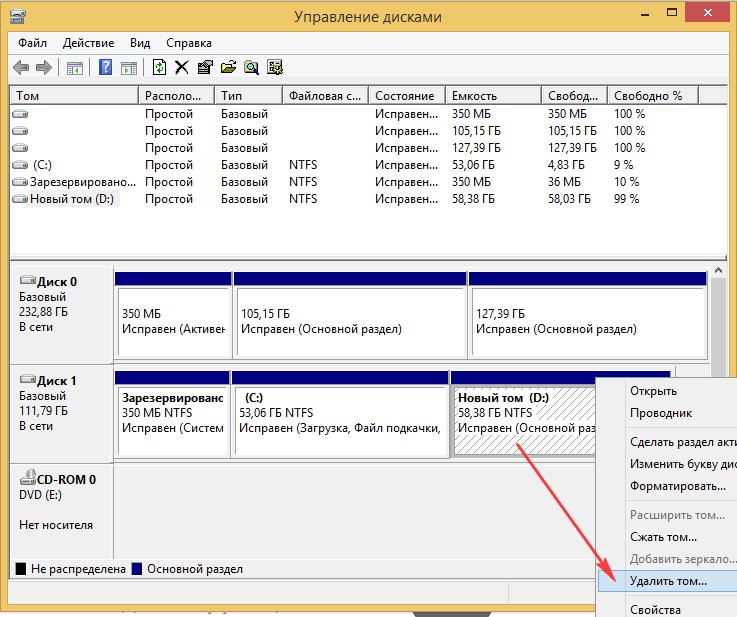
Friends, pay attention to the disk (E :), it will be created sooner, since this is a drive cloning operation, but the disk (E:) will be completely empty. After cloning, we simply delete it in Disk Management, and attach the resulting unallocated space to the C: drive, that's all.
Proceed. The cloning process begins.


Disk Clone operation completed successfully.

We restart the computer and enter the boot menu, select the SSD for booting and boot from it.

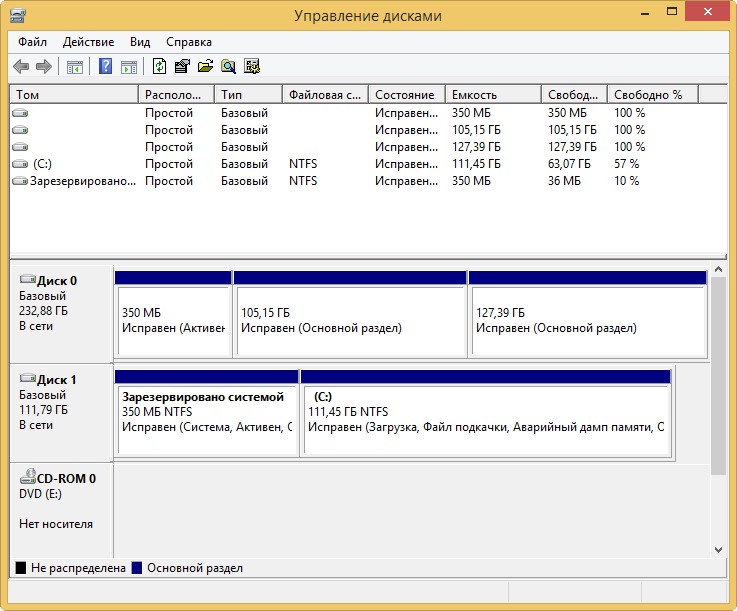
Cloned Windows 8.1 boots fine. Windows activation failed. We go to Disk Management and see this picture.
Partitions on a simple hard drive have lost drive letters, but you can simply assign them and that's it.
On the SSD, as intended when cloning, there are three partitions. The first is with the operating system boot files. Second drive C: with cloned Windows 8.1. Third disk D: completely empty.


Delete drive D: and attach unallocated space to drive C:.

I would be glad if I could help.