Draining a piece of land. Do-it-yourself site drainage: stagnation of water - no! Construction of a surface drainage system
Some summer residents sleep and dream of how to bring water to their plot, while others - on the contrary, how to take it somewhere far away. Moreover, in the second case, it can be much more difficult to realize what is planned.
Fatal mistake
When buying a dacha, my wife and I made a major mistake - we looked at the plot in the winter (a very tempting price was indicated in the ad), and the seller, of course, only praised it. And in the spring it turned out that it was sort of in a lowland, and therefore, because of the melt water, everything turned into a solid swamp. It’s funny to say: it was difficult to get from home to the toilet in rubber boots. And the barn almost floated away to the neighbors...
I had to accept urgent measures to drain the site .
In a hurry, on a whim, I decided to dig ditches to drain water around the perimeter of the garden and even between the ridges. It seemed to work out: the flood subsided, the ground more or less dried out, and the wife sowed a lot of things. We rejoiced at our successes and spent all our free time in the garden. And then the rains came, and again we had to get into our boots, because all the carefully dug trenches overflowed with water and the flood (albeit on a smaller scale) repeated.
Then I realized my second mistake: I didn’t pay any attention to the fact that our soil is loam, and therefore all the water in the ditches stands rooted to the spot, not being absorbed into the soil. It even started to bloom.
It took about a month and a half to correct this miscalculation. To begin with, I drew a plan for the future drainage system, divided the garden into plots, drove in pegs and began work. And again I almost got into trouble: I didn’t take into account that I had to think about the place where the water would come out, and almost ruined all the work that had started. Okay, I got over it.
I’ll say right away that you need to agree with your neighbors in advance so that they don’t experience any inconvenience from your drainage work, otherwise you might make enemies.
My neighbor Nikolai kindly allowed me to bring the drainage pipe into his drain from. He praised my “geodetic” research and suggested what to do next.
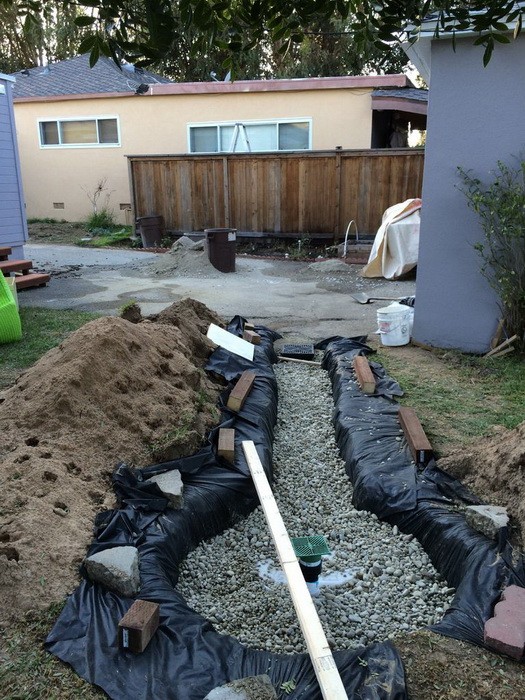
It turned out that there is no need to dig wide trenches at all - narrow and deep ones are enough. Especially for this work, I attached a long handle to the shovel. I dug alone, my wife helped whenever possible - she pulled away the earth. In general, the work was not that hard, it was just tedious.
The soil had to be put into a garden wheelbarrow and taken under a canopy near the barn, otherwise the first rain that came would have turned everything into dirty slurry. Well, nothing, as they say, if you put it further away, you will take it closer. Again, at Nikolai’s prompting, I dug trenches to a solid layer: if you stop earlier, the water will stand under the drainage.
Cute grilles
For a long time I couldn’t think of anything to do with planting shrubs. Either the previous owners specially added clay to get rid of weeds, or they didn’t pay any attention to the berry fields at all. After some thought, I decided to completely remove the clay soil and add good fertile soil.
To drain water from the barn and gazebo, I left already dug ditches, only slightly increased the slope of the bottom and lined them with pieces of roofing felt. And I had to tinker with the house more. I combined the grooves dug around the perimeter of the foundation into one and also reinforced the bottom with roofing felt. Of course, the harmony was broken, and in order to hide the grooves, I covered them on top with gratings knocked together from bars. It turned out very nice, especially on the porch. My wife put all sorts of flower pots right on the grilles, and now it seems that everything has always been like this.
I decided to strengthen the bottom of the trenches in the garden using a homemade sledgehammer with a long handle.
And then - the highlight of the whole project - he poured ordinary crushed stone and crushed brick there. I laid pipes on the resulting coating. I wrapped the joints with rubber from bicycle inner tubes and tightened them with wire. And he covered everything on top with fertile soil.
Yes, all these ditches with pipes are reduced to one main drain, and that, accordingly, goes to the drain on the border with neighbor Nikolai. We now have it in common with him. I suggested covering it with a lattice too. Kolya really liked this idea. Now on this lattice we have a whole fabulous clearing of giant mushrooms cut out by a neighbor from logs (my wife, getting emotional, gave old bowls for hats for them).
I would like to drain the area...
Of course, I am not a master, but I am proud that I did everything myself. It was a little clumsy, but the next year everything somehow straightened out by itself and the places where the pipes were laid became invisible. And most importantly, our swamp has disappeared! It cannot be said that after the rains it is completely dry, but the water quickly seeps in and goes away. It doesn’t stand at all under the bushes, although I just left small grooves there towards the slope.
Every spring I come to the garden immediately after the snow melts and check the operation of my drainage system. I can’t say that everything remains at a high level; here and there we have to make adjustments and dig temporary trenches, but the design itself does not fail. But it was worth working without extension just once!
And now our site is already six years old, and it’s impossible to say that there used to be a swamp here. During this time, we became friends with Nikolai’s family, we even removed the common fence, and we are thinking of starting a small pond.
So are we masters now or not? The most important thing I wanted to say is that simple drainage in the garden can be done by yourself, if only you have the desire.
©Vladimir Vasilievich PLETNEV, Kolchugino Vladimir.
 100% Herbal Therapy Lymphatic Drainage Ginger Oil for Drop Shipping…
140.97 rub.
Free shipping★★ ★★ ★★ ★★ ★★ (4.80) | Orders (114)
 10 pieces. wild bees Venom massage essential oil patches for…
A low-lying area can create many problems for its owners. In waterlogged soil, the foundation of a house collapses faster, and plant roots rot from lack of air. Fertile soil quickly turns into clay unsuitable for agriculture, because the lighter clay is washed into water bodies. Such problems are solved by installing site drainage.
Installation of such a reclamation system is not difficult, but all the work is quite labor-intensive, so you should first make sure that the problem lies precisely in the high level of groundwater flow, and not in other errors in agricultural technology.
How to determine the groundwater level
 A drainage system will be needed in the following cases:
- The site is located on a slope. Melt or storm water will erode the soil, taking with it a layer of humus. The problem is solved by digging transverse drainage ditches.
- The site is located in a lowland. In this case, moisture accumulates directly on it. With prolonged rains or rapid melting of snow, the soil will become swampy and acidic, and buildings will collapse from mold. In this case, it is necessary to install drainage channels along the entire perimeter of the site and around the foundation.
- There is no obvious difference in elevation on the site, but during floods and rainy weather there is still water on it. There is nowhere for it to drain, so the moisture is slowly absorbed and at times appears on the surface in the form of puddles that do not dry out for a long time.
The latter option is typical for flat lowlands with an extensive network of large and small rivers. It is well known to owners of land plots in floodplains.
If the obvious signs listed above are absent, but plantings and buildings still suffer from high humidity, you should pay attention to the condition of the lawn and trees. If your lawn periodically becomes damp and mature trees die for no apparent reason, the problem most likely lies in high standing waters.
Dig a hole 0.5–0.7 m deep and after some time check to see if water is getting into it. If you see water, then its level is less than 1 meter, and drainage of the dacha area will definitely be needed.
Types of drainage
 Drainage is a system of shallow ditches for draining groundwater. A properly installed drainage system can significantly reduce their level. After its installation, the problems of rotting tree roots, mold in the underground and water in the cellar disappear.
There are two types of drainage systems - surface and deep.
The first option is the easiest way to drain sediment. It is a complex of interconnecting trenches dug along the perimeter of a land plot on a slope. With their help, you can relatively quickly, at minimal cost and effectively drain melt and rain runoff into a special reservoir, which is installed in the lowest place on the site. Effluent from the reservoir is discharged into a storm drain or used for irrigation. Small volumes of liquid quickly evaporate on their own.
 Installation of a deep system is more complicated, but superior to a surface one in the following cases:
- groundwater rises above half a meter from the surface;
- the plot is on a slope;
- The soil is predominantly clayey.
Deep drainage differs from surface drainage by the presence of drains - pipes with frequent holes through which water is collected, as well as sand traps and other technological elements.
The deep drainage of the site is completely hidden underground and does not spoil the landscape.
Installation of a deep-type drainage system
 It is not difficult to make a system for draining water from the site yourself, but you need to plan its installation before the stage of building the foundation and laying out the garden. First, preparatory work is carried out. They prepare a project and note in it:
- elevation changes on the site;
- location of the lowest point;
- drainage grooves;
- places for wells;
- pipe laying depth.
For effective drainage operation, the minimum slope must be at least one centimeter per linear meter of pipe.
Upon completion of the preparatory work, you should prepare all the necessary tools, materials and calculate their quantity. Standard set includes:
- perforated pipes of suitable size;
- drainage wells;
- components for connecting drains - various couplings and fittings;
- geotextile;
- sand and crushed stone.
There are pipes for sale for laying drainage on a site with your own hands. Asbestos cement, polyvinyl chloride and ceramic are suitable. Popular are those made from modern porous materials - plastic concrete, expanded clay glass. Water seeps through the pores, but small solid particles do not pass through, that is, they do not clog the system.
Also prepare tools in advance: bayonet and shovel shovels, wheelbarrows for soil, for cutting pipes, construction level.
Next, mark the location of all elements on the ground. Then, in the marked places, trenches are dug at least 0.7 m deep and about half a meter wide. When all the channels have been dug, you should make sure that they have the required slope throughout. The places where the wells will be located are deepened further.
 When all the trenches are ready, the bottom of the grooves and wells is compacted, covered with a layer of sand and compacted again. Then geotextiles are placed in them in such a way as to wrap it around the pipe with a margin.
 Crushed stone is poured onto the geotextile and pipes are laid so that the holes are at the bottom. The entire system is connected, the slope is checked again and finally covered with crushed stone. It should cover the pipes completely. Then the free edges of the fabric are folded inward. The result should be a kind of roll with a pipe in the center.
Layers of fabric, sand and crushed stone prevent the system from silting, significantly extending its service life.
Drainage (inspection) wells are installed at the pipe junctions. They are designed for condition monitoring and cleaning. Mounted just below the level of the pipes. They have a removable lid at the top for ease of maintenance.
After assembling the pipes and wells into a single complex, a collector well is installed at the very bottom of the site. It is the main storage tank for wastewater. Most often, collectors are made from reinforced concrete rings, but if desired, ready-made plastic ones can be purchased and installed. It is necessary to provide drainage from the collector into a storm sewer or reservoir.
How to hide drainage underground and decorate the area at the same time
 At this point, the installation work for the device at the dacha with your own hands can be considered complete. Now the entire system should be backfilled to hide it completely underground. Filled trenches are lined with turf. In the future, flowers or any garden crops with a shallow root system are planted in this place. The grooves filled with large marble chips look interesting. Such elements of landscape design will decorate the site and will not allow you to forget the location of the pipes in the event of repair work.
The water drainage system is usually combined with gutters. To do this, install a gutter connecting the drain to the nearest well, or install a rainwater inlet.
 Installing a closed drainage system in a summer cottage is not the easiest, but it is the most effective way to lower the groundwater level. Some actions may seem too time-consuming or painstaking, but the result in the form of a dry foundation and a healthy garden will delight you for many years.
Do-it-yourself site drainage - video
When you constantly encounter the problem of excess water appearing on your site, you must take measures to drain it. Otherwise, you will not only get into trouble cultivating the site, but also put at risk of damage to the foundation of the house or nearby commercial buildings. Making drainage, or more precisely, a drainage structure in this situation, is the only acceptable solution.
In this article we will look at a simple and economical way to create drainage in a personal plot. 
Preparatory actions
Before you begin the process of assembling and installing a drainage structure, you need to decide what result you would like to achieve. Based on your decision, you need to create for yourself, at least at a primitive level, a project for the future system: determine its location, possible consequences of contact between the system and surrounding objects, dimensions, dimensions. Based on the generalization of all this data, it is already possible to calculate the material costs for the purchase of the entire volume of consumables. By the way, it is useful to understand that the depth of drainage directly depends on the height of the well intended for drainage. It is customary to place the well slightly higher than the elements of the entire structure. 
Now about the design itself: traditional (or “French”) drainage is a trench filled with gravel separated from the ground by geotextile (geotextile is used to prevent mixing of soil and gravel, it also allows water to pass through and prevents weeds from growing). Gravel together with geofabric help water to quickly absorb into the soil, evenly distributing moisture along its location, thus preventing the collection and stagnation of water in any specific one place.
When creating drainage of this type, corrugated pipes are usually used, equipped with longitudinal holes on one side, usually made of PVC. At the end of the entire system there should be a drainage tank, the task of which is to uniformly distribute accumulated water into the ground around it. To create this well, a two-hundred-liter plastic barrel in the form of a drum (a rounded container shape is more preferable in this case) with multiple holes in the bottom and walls is well suited. This well should be placed on a special gravel “pillow” (about 10 cm), the space between the walls of the pit and the container is also filled with gravel (layer thickness 15 cm). In the upper part of the barrel, holes are made to receive incoming water, and one of the holes is for installing a special drainage grid. There is no need to make many holes; two or three, 5 cm each, are enough. One large hole is made in the upper part of the well wall, intended for the entry of the drainage system pipe.
The second large element of such a system is a drainage tank, the width of which should be approximately 30x30 cm. The tank must be equipped with a drain grate. This must be done in the case of providing drainage with a drainpipe, which, when connected to the tank, ensures the flow of clean water into the system. Manual installation of the drainage system on gardening is not a very costly operation. In the manufacture of the system, affordable materials are used and only a small amount is needed. The most expensive part you will need may be the catch basin. A PVC pipe will cost much less. You will need about two cubic meters of gravel. It will also be necessary to purchase a special fabric - geotextiles.
Digging a drainage trench
Next, you need to dig a trench from the drainage area to the drainage area and a hole to install a well on one side and a reservoir on the other. In the place for the drainage well, the hole will need to be deepened by 15 cm compared to the depth of the rest of the trench, the depth of which, in turn, you will need to independently calculate based on the size of the drainage container. 


Making a drainage well
Using a drill with a diameter of 2-3 cm, you can easily turn the walls of the tank into a sieve. Through these holes, if possible made at equal intervals, the wastewater entering the barrel should flow evenly into the surrounding soil. On the wall of the barrel, at the top, you should make a hole along the diameter of the drainage pipe and prepare a mount for the pipe. 


Filling the trench
Then the dug trench must be covered with geotextile. This will prevent silt and dirt particles from mixing with the gravel. Geotextiles will also ensure better absorption of moisture by the earth. Next, place a prepared two-hundred-liter barrel on an 8-10-centimeter gravel bed. Place a small amount of gravel around the barrel and make sure that the tank does not “move” from side to side. Similar actions should be done with the water collector, which must be made so that its upper edge is along the edge of the earth's surface. The height of the water collector can also be adjusted by adding gravel. 


Make sure that the reservoir is also immobilized. Then you need to connect both reservoirs to the drainage pipe. It is important to know that the holes in the drainage pipe should be located on its lower side, and the pipe itself is laid downhill. Fill the trench with gravel. Make sure that 15 cm remains between the surface of the earth and the gravel. Next, install the drainage grate on the tank. Then you need to tuck the geofabric, making sure that the edges of the textile on both sides of the trench overlap, covering each other. 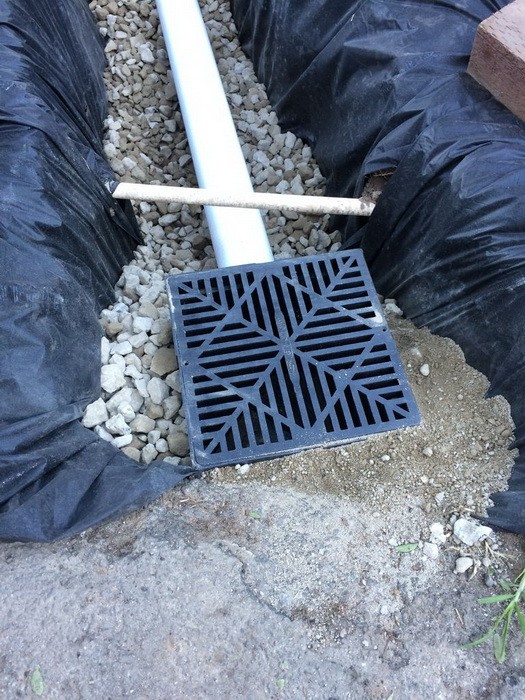


Backfilling with earth
At the final stage of drainage installation, it is necessary to fill the trench well with soil, avoiding soil subsidence and unevenness. If you dig a trench well, then literally within a year you will be able to guess that there is a drainage system under this place only by the “peeping out” gratings. The area where the system is installed can be sown with lawn grass. 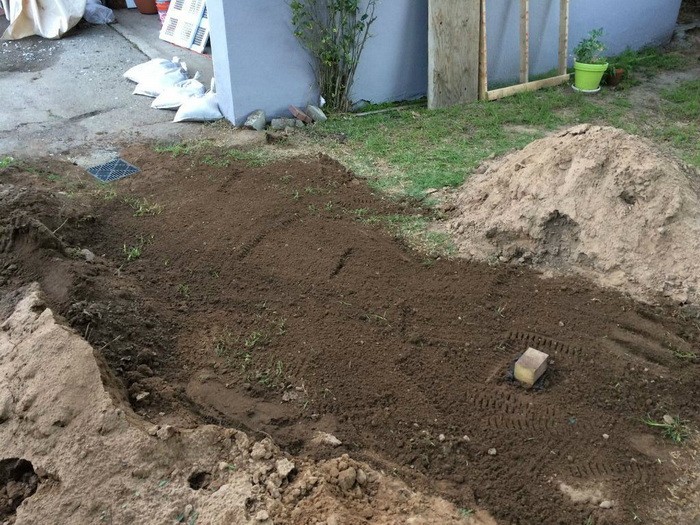

Now you know how you can build drainage yourself in just a couple of days without significant costs. The main thing in this matter, as in all others, is careful preparation.
Video How to make drainage on a site with your own hands
An elevated groundwater level makes it difficult to build and grow plants on a plot of land and leads to regular flooding of the basement or ground floor. Constant humidity and dampness negatively affects the condition of the foundation.
Cracks, rot and mold appear on the structure, as a result of which the walls of the base and the house may become warped. To avoid these problems, experts recommend using drainage of the area. Moreover, it is advisable to do this in advance, before the start of construction work and planting a vegetable garden or garden.
Reducing the water level on a land plot is carried out in several ways. The main method is drainage. In addition, you can organize a pond in the garden, it will be effective and beautiful. When draining, it is important not to overdo it, since groundwater also has a beneficial effect. After all, many wells and boreholes are fed by groundwater. Read about organizing water supply at your dacha and country house. And in this article we will look at ways to drain an area with a high groundwater level.
Groundwater damage
Groundwater is a non-confined aquifer, which is located in the ground at a shallow depth. Each area has its own groundwater level or groundwater level. The close location of the aquifer to the surface of the earth entails constant seasonal changes and fluctuations. So, during heavy and prolonged rain or during a thaw, the level becomes significantly higher, and during drought, on the contrary, it decreases.
A changing ground level is a problem for a land plot. This process causes harm to the vegetable garden, buildings and foundations, and sewage systems.

You may encounter the following problems:
- Flooding of the outdoor toilet and septic tank. This provokes the emergence of dangerous infections, destruction of structures or equipment;
- Negatively affects the sewer system, increases the degree of corrosion of water and sewer pipes that lie underground, and reduces the service life of this equipment;
- Water around the septic tank complicates the cleaning of equipment, leads to overflow of tanks, and negatively affects the operation of equipment;
- Flooding of the basement, cellar or basement, which will interfere with the storage of food or tools. In addition, this leads to the appearance of mold and rot in the underground floor, which can then spread throughout the building;
- High angle and foundation are incompatible things. It is important to properly and reliably protect the foundation of the house from the negative effects of moisture. To do this, they not only reduce the amount of water on the site before starting construction of the foundation, but also provide high-quality waterproofing during installation of the structure. Otherwise, during operation, the foundation will crack, float or warp, and gradually collapse;
- High water angles, which set in autumn or spring, as well as stagnant water poison and have a detrimental effect on plants. They get wet due to oversaturation with moisture and die. In addition, standing water contributes to the accumulation of harmful substances in plants;
- Excess water on the site destroys the blind areas around the house, paths on the site and other garden decorative elements;
- Severe shrinkage of wooden houses, baths and saunas, outbuildings.
You should be concerned about increased moisture levels if the water depth is less than 1.5 meters. Also for owners of flat, flat and gently sloping plots without slopes, cottages with clay and loamy soil, or areas located near water bodies. Pay attention to whether puddles remain on the ground after rain. In each case there is an increased risk of flooding.

Drainage system
Draining an area with a high groundwater level is the most common method to combat this problem. Drainage involves a system for removing excess water from the site by installing pipes, trenches, wells and other similar devices. The drainage system can be open, closed or backfill.
- Open or surface drainage is an easy and affordable method of arranging a system, which involves placing open inclined grooves on the territory without the use of pipes. Along these slopes, water flows into a common drainage ditch. This scheme is quite dangerous, requires regular cleaning and maintenance, and disrupts the aesthetics of the garden plot. However, it is very simple and does not require consumables or financial costs;
- Closed or deep drainage is a safe and aesthetic system when pipes are laid in the ground. These pipes drain excess water into a drainage well. The optimal scheme in this case is considered to be “herringbone”, when the side trenches are collected into one, leading to a catchment well;
- Backfill drainage has low capacity and quickly becomes clogged, so this type is used only for small areas. In this case, trenches are dug along the perimeter of the area at a slope and without pipes, which are filled with crushed stone or brick, and gravel is placed on top. Backfill drainage requires additional filtration and constant cleaning.
To organize open drainage around the perimeter, ditches are made with a slope of up to 30° towards a common ditch for several areas, which will receive water. Trenches are dug 0.7 m deep and 0.5 m wide. Open ditches do not look aesthetically pleasing and spoil the appearance of the site. Therefore, trenches are laid using decorative gratings, and for decoration, gravel or pebbles are laid on the bottom and/or along the grooves.

To install closed drainage, trenches are made on the site in a herringbone pattern to the main trench, which goes to the catch basin. The grooves are made with a slope of 7 cm and a depth of 70-100 cm. A layer of sand and crushed stone is laid at the bottom of each ditch, and then pipes with a diameter of 63 and/or 110 mm are installed. Cover the products with geotextiles (or buy ready-made models), cover them with sand and crushed stone. The result is a reliable and efficient system.
For the backfill system, ditches are made around the perimeter of the site, filled with half-broken brick or crushed stone, a filter layer is made of geotextile and covered with gravel. This type of drainage requires constant maintenance, as the ditches quickly become dirty and clogged.
How to drain an area without drainage
Another solution to the problem of high groundwater levels without drainage is the organization of a reservoir on a land plot. You can build a small pond with your own hands. To arrange it, you need to dig a pit, put a layer of gravel and sand at the bottom, and then fill the bottom with stones. Such a pond is made in the middle of the site.
In addition, plants that love water are planted at the lowest and most waterlogged point of the site. These are poplar and willow, fluffy birch, alder and ash, maple and larch, plum. Trees or shrubs are planted in a hole about a meter deep and at least one and a half meters in diameter. Gravel is poured into the bottom, then a layer of fertile soil is placed and the plant is planted. The hole is filled with soil mixed with coarse gravel, except for the area near the trunk of the seedling.

“MariSrub” craftsmen examine the soil and groundwater level at the design stage of a country house, calculate and install a high-quality drainage system, and select reliable, durable materials. We carry out a full range of works on the construction and finishing of houses made of timber or logs. We build wooden houses on a turnkey basis and for shrinkage according to a standard or individual project, and we help in arranging a garden plot. We guarantee high quality of work and compliance with construction deadlines!