With how to make crafts a young firefighter. Craft on the theme of fire safety “In the power of fire. Application in facing technique
If the child was asked at school or in the garden to do the task crafts on a fire theme, then do not rush to fall into despair. This is a very simple task, and besides, it is also very useful in life. By doing crafts together that are somehow related to the topic of fire safety, you will learn in a playful way the basic rules of behavior in a dangerous situation, explain how the fire department works and what needs to be done to prevent such an unpleasant situation. Both boys and girls will be very interested to learn more about the work of firefighters, about fire equipment, and, of course, about the large and powerful equipment that is used to extinguish fires.
Crafts on the theme of fire safety
Starting from early childhood, you can do with kids fire safety crafts. Big red EMERCOM vehicles capture the imagination of kids as they zip by on the street or are sold in a colorful box in a toy store. Be sure to buy such a car, at least a small one, or a book about fire trucks to tell your child about the important work that these giant red cars do, about how dangerous a fire is, how destructive its consequences are. The sooner the child is aware of the danger of fire, the easier it will be for him to fulfill the most elementary fire-fighting requirements - do not leave the fire open, do not spray aerosols near it. Teach him the phone number to call the fire brigade in case of emergency, but explain that you should never joke with this situation.
If you have the opportunity, then visit the fire station with your baby. This may help you to do it faster later. fire station crafts. Seeing large hangars with cars, sirens, fire extinguishers, the kid will be delighted. After everything that he saw and learned, invite him to dream up and make any craft, for example, a drawing, modeling, a paper three-dimensional figure.

When examining the contents of the fire shield, mark with your child the mandatory items that should be present on it. Make a shield together that will help you learn the rules for handling inventory faster. All the elements on it are, although they look like they are real. The cone-shaped bucket is made of red thick paper, and the ax and spade bayonet are made of cardboard or thick paper folded several times. The handles of the objects are made of paper rolled into a cylinder. A fire hose can be made from foil by folding it into a long strip and twisting it into a spiral. For a fire hook, you can use a thick wire that is pasted over with colored paper. A fire extinguisher is also created using the papier-mâché technique, half of a plastic bottle is pasted over with scraps of newspaper. Such crafts on the theme of the fire are not only bright and visual, but also very informative. You will definitely receive a whole bunch of questions from the child, to which you need to prepare answers in advance. Maybe this information will be useful for you too: what is the expiration date of a fire extinguisher, what kind of fires are extinguished with sand, why buckets are cone-shaped and why a firehook is needed.
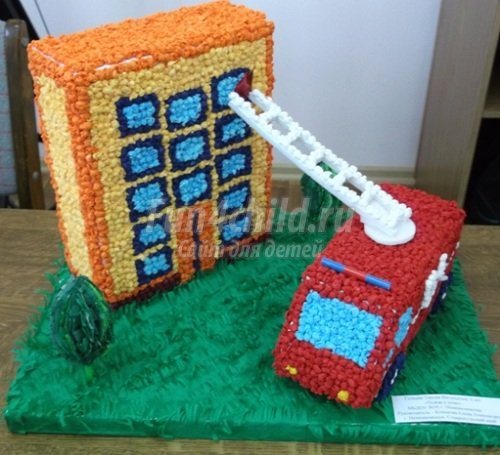
Crafts on the theme of a fire truck
The most beloved among all the boys, of course, crafts on the theme "Fire truck". We have already said that these giant machines with a siren simply captivate the imagination of the boys. Having made such a fire truck with your own hands in the image and likeness of a real one, you can not only present it at the competition of works, but also play with it later at home.

The first car in our review is made from matchboxes. the good thing is that all the “bricks”, that is, the boxes, are the same size, which means you don’t have to measure, cut anything, know for yourself connect the boxes to the desired height, and add decor. For the base of the machine, we need four boxes that we stack on top of each other. The fifth box will be the cabin, we put it on top in the center. The entire structure is covered with red paper. We designate the windows of the car with the help of white paper rectangles, and the headlights are created by two yellow circles. It will be very easy to make a fire escape from matches: we place two wooden skewers in parallel, glue a row of matches to them. When the ladder is ready, attach it to the car using red plasticine. From the same plasticine, we will make a flashing siren, which helps the car to quickly catch a fire in a dense stream of cars. We will not invent wheels for crafts, in every house where a boy grows up there are a lot of such “spare” wheels from broken cars.

Make a fire theme
It can be hard for kids make a fire theme on one's own. Your task is to choose such techniques that will be within the power of the child, will captivate him and make him proud of the results of his work.
Other news
In all educational preschool and school institutions, great attention is paid to fire safety. They conduct trainings, arrange contests of thematic drawings and posters, exhibitions of children's creativity. Children's crafts on the theme "Fire safety" always look interesting. Such events are very important for every child and cannot be in vain.
Fire safety. DIY crafts
Children learn how to behave in case of fire, handle matches, gas and electrical appliances. Because before you do something with your hands, you need to try to comprehend it with your mind. Parents should not be left out in the preparation of such events. Moms and dads should not only help choose and sketch crafts, but also talk about how to use what the child will make in miniature, for example, a fire truck.
Application in facing technique
Crafts on the theme "Fire safety" can be made in a wide variety of techniques. Parents own some of them. Everyone will choose for himself and his child what he likes the most.
It looks very nice and modern. The manufacturing process is simple, a child of kindergarten age can do it.
You need to prepare corrugated paper. It is sold in rolls and comes in a variety of colors. This material is also useful for other crafts, if not all of it is used in this one. You will need another sheet of cardboard, glue, a pencil and scissors.
The future application drawing requires a sketch. Therefore, it must be applied to a sheet of cardboard. The picture should be on the topic of fire safety: you can draw a fireman next to the car. Now that the sketch is ready, glue should be applied to the drawing, but not to the entire sketch at once. Take corrugated paper of the desired color (according to the picture), cut a small square out of it, twist it around a wooden rod or pencil and wrinkle it with your fingers. Now it remains to glue the blank in its place on the cardboard.
Thus, having “drawn” the entire drawing, you will get a voluminous application. Kids will like this activity, they like to crumple something, and if a picture comes out of it, it gives them pleasure.
As the contours of the plan appear in the figure, you can tell the child about the purpose of the special machine for extinguishing fires. You should remind the baby why fires occur and how to prevent them in the apartment. At the end of the work with the picture, it can be placed in a frame.

From semolina
Fire safety crafts can play not only a good educational role, but also help develop fine motor skills of the fingers of the kids. Hard work and perseverance requires working with semolina. It is also often used when creating fire safety crafts for children. On the topic under study, you can perform a fire truck rushing to prevent trouble. As always, a pencil with glue, a sheet of cardboard or thick paper, gouache and semolina will come to the rescue. pre-painted in the desired colors. Then it should be dried on a newspaper or film. Semolina is ready, arranged by color in separate containers. Now you need to draw the outline of the car, apply glue on them and cover them with red-colored semolina. Then fill in all parts of the picture with the necessary colors.

Let at first the crafts on the topic "Fire Safety" be performed not quite skillfully and will not take first place, this is not the main thing. It is important that the child repeated all the rules, talked and listened to the parents, felt their help. That's what's valuable. Let the fire safety crafts try to bring children and parents together. They will want to create together and do many more interesting things. In addition, you can read instructive books together and discuss them.
Fire shield

Not so scary topic "Fire Safety". DIY crafts in this direction can be made from plasticine, you can use modular origami. And when making a drawing on the topic, somewhere in the corner of the drawing, you must definitely depict
Of course, it is necessary to draw the attention of the baby to the fact that he has already seen such a shield in a kindergarten or school. Invite the child to remember what tools are needed to extinguish the fire. You can offer to make such a shield in miniature form. This type of work will be remembered by the child for a long time and will be an addition to any craft on the topic "Fire Safety".
Elements
The bucket and all other elements of the shield will be made of paper, but they need to be given volume. Twist the bucket with a cone and paint it red. An ax, a shovel can be made of thick paper, and for tool handles twist it into cylinders. A sleeve for water, that is, a fire hose, is made of foil. The wire is suitable for a special gaff, which is also used in extinguishing fires.
Fire extinguisher
The fire extinguisher will be voluminous if it is made using the old papier-mâché technique. It's very simple: take a small plastic bottle, cut and glue one half with scraps of newspaper. After giving the desired shape and drying the glue, paint the fire extinguisher red and provide with small additional details.
When performing all the tools, the child will be keenly interested in the purpose of each item. It is necessary to answer in detail about each of them, because the knowledge gained will help save his life in an emergency.

Conclusion
When the important topic of the craft "Fire Safety" is considered, a photo of them next to the baby will remind you of how parents helped the child in completing the task received in kindergarten. These pictures will be a reliable reminder of the rules of behavior in case of fire. It is necessary to be more courageous in the implementation of any fire safety crafts.
Tatiana Petrovskaya
Target: Creation layout"Fire shield", as a necessary element of the security center of the subject-spatial environment in the preschool educational institution.
Tasks: - Create conditions for the formation of rules in preschool children fire safety;
Introduce children to primary means firefighting;
Create conditions for the development of cognitive motivation, curiosity.
Dictionary activation: fire shield, gaff, crowbar, fire extinguisher, firehose.
Cut out of cardboard and color the ax and shovel.

It is better to print scrap and hook on a printer, and then cut it out after pasting it on cardboard.


The most time-consuming in this work is the manufacture of a fire extinguisher. We take any empty spray bottle.

Let's give it the shape we need.

We paste over our future fire extinguisher first with an unnecessary newspaper (using Moment glue, and then with red paper (PVA glue is suitable here).


For fireman Sleeves can use any unnecessary cable.

It will not be difficult to make a bucket - we roll a sheet of red paper with a cone, trim the edge, glue the handle.

Well, for a box of sand, take a box and paste it over with red paper, make the inscription "Sand".
Now for the base we take any box from household appliances, align all surfaces (papier-mâché technique) and cover with yellow paper.

We place all the details on the prepared base, marking them with inscriptions previously printed on the printer. Our " Fire shield" ready!

Related publications:
We continue to replenish our "Nature Center" with visual aids. To make the "Sea" layout, we need: - A sheet of thick cardboard.
Do-it-yourself "Fire shield" model from waste material. Description of the material: the material will be useful when studying the topic of fire fighting.
Description of the material: the material will be useful when studying the topic of fire safety with preschool children. Tasks: to introduce.
To make a layout, we need: 1. A sheet of cardboard or fiberboard. 2. Styrofoam. 3. Newspaper. 4. Napkins. 5. Colored sand. 6. Gouache or watercolor.
So much for kids to learn and remember! Our task is to make the way of learning for children as bright and interesting as possible. For this we.
Quilling is the art of paper rolling, one of the types of decorative and applied art. Narrow and long strips of paper using a special.
With the onset of autumn, the first classes begin in kindergartens. First of all, kids are introduced to the rules of behavior on the road and fire safety. Of course, such lessons are held in a fun and interesting way so that the kids better remember new information. Well, the only thing left for parents is to pick up scissors, papers and other attributes of creativity again and make crafts on the topics of "traffic rules" and "Life safety".
Coming up with fire safety crafts for kindergarten is quite simple. Any natural materials are suitable for them - dry leaves, twigs, small cones, etc. They will make cute main figures. Can also link or stitch a character. As a rule, a traffic light or a traffic police officer is selected for this role.
If you suddenly happen to go to the sea in the summer - do not be lazy and collect some pebbles and shells. And in the summer cottage - plant small pumpkins - in the future they can also be used for crafts.
You can make an application using plain paper, plasticine or salt dough. Crafts from cereals or pasta will look good (as a rule, they are painted with paints). A variety of boxes will also be used, as well as sequins, beads, beads. Or you can just limit yourself to posters on this topic.
Crafts on the topic of traffic rules
Two plots are selected for do-it-yourself crafts on the topic of traffic rules for a kindergarten:
The first tells about what not to do if a fire starts,
The second describes actions during a fire.
An excellent solution would be to create a visual picture according to the rules of compliance with traffic rules. Of course, this option is more complicated, it takes more time, but it turns out incredibly presentable and instructive. For example, you can draw a road with a zebra on the lid of the box and, according to the rules, arrange toys (cars, little men, trees, traffic lights).

You can also make a board for the child on which he could build a real road for himself. You will need:
Large box (you can just take the lid from the package),
Children's toy cars, brick parts, plastic trees,
Plasticine,
white sheet of paper,
Felt pens or paint.
Cover the inside of the box with paper. We draw on it a couple of winding roads, a crossroads and ennoble the "territory". Be sure to put road signs and traffic lights on the box. If you have a printer, you can make similar attributes yourself. Or just buy a set of road traffic in a children's store. As for the infrastructure - shops, houses and stops, they are easily glued from thick cardboard, which can be painted at will in any colors. Plasticine can be used as an additional material.

Fire Safety Crafts
Original crafts on the topic of fire safety can be invented using ordinary semolina. Plus - glue and paints. This type of crafts contribute to the development of the crumbs. To make a semolina painting on the topic of fire safety, you should pre-draw the outlines of the drawing and lightly walk over it with its glue. Then invite your baby to sprinkle the paper with grits (you can also use buckwheat or millet). Usually in children, such lessons cause bouts of wild delight. When the entire drawing is filled, slowly turn the sheet over so that excess material falls off it.

Barley or wheat groats will help create a background (and flat images of objects). But to highlight the main details, use beans or peas.
Well, the easiest, but no less good way for a child to show their imagination is to draw a picture. Invite your child to come up with a story and put it on paper. Just please, do not correct anything, and even more so - do not draw instead of children.
After all, the main task of parents should be to guide the child in the process of creativity, and not to do something for him.

We bring to your attention the craft "Fire Shield".
The base of the craft is a box from a laptop (its back), painted with paint (for entourage).
Sand box - packaging from tea bags. Colored paper and red varnish were used for its decor.
In the role of an ax - a children's toy, slightly tinted black (again with varnish).
Shovel - from a set of children's dishes.
Bucket - glued from colored paper.
Fire extinguisher - a container of mosquito repellent (of course, thoroughly washed, in case someone wants to try to press the sprayer).
The fire hose is a silicone hose, and the plastic tip is borrowed from a children's fire truck.
As you can see, nothing complicated. There would be a fantasy, and the rest will follow.
Crafts traffic rules
As for the "rules of the road" crafts, on the net you can find many examples of a wide variety of crafts made in the form of applications, knitted figures, painted plots and ordinary posters. For example, make a training stand. To make it, you will need multi-colored caps from plastic bottles (about 30 pieces), pictures that show road signs (in double quantity) and some situations on the topic, colored paper and felt-tip pens.


We glue road signs on a large sheet of paper, and next we cut out small holes where the children will have to insert a similar sign pasted on the lid. We also act with traffic lights and pictures (it is better to place them under the signs). An interesting visual aid is ready!
You can even make a whole manual in pictures. To do this, simply select posters that are suitable in size (to fit on an A4 sheet), print and bind. Of course, it’s better to do it yourself, and children can help choose interesting stories. Any craft made by the hands of a child not only plays an educational role, but also helps to develop fine motor skills, teaches perseverance and patience. It is important to encourage children to be creative, which develops imagination, teaches patience and disciplines.
Zolotaya Victoria Anatolyevna,
Gorbacheva Svetlana Alexandrovna,
MBU TO CTT
More than 5 million fires occur on our planet every year. People and animals are suffering, forests and fields are dying. Fires in the modern world have become a real disaster, despite the improved system of fighting them.
According to statistics, the largest number of fires occurs in residential buildings. If in forests and fields there can still be fires due to natural causes, for example, lightning, thunderstorms or spontaneous combustion of peat, then where a person lives, a person is to blame for the outbreak of fire.
A person causes damage with his behavior and the environment, leaving a fire unextinguished, throwing garbage: glass bottles or rags soaked in grease (oil).

Materials:
capron of different colors,
wire,
orange chenille wire,
glue gun sticks
teip tape,
universal glue,
foam or polystyrene for the base,
bulb,
Working process.
For flower petals, wind the wire around the base with a diameter of 12 mm. A thick felt-tip pen, a marker or a cap of nail polish is suitable for this. Make several of these blanks.


Pull capron onto the workpiece. It is necessary to pull tightly, but not strongly, so as not to deform the shape of the petal. Fasten the capron with threads, wrapping the petal at the base, cut off the excess.


For a flower, 6 petals are required.


Prepare 3 stamens, fold them in half, wind the wire. First attach 3 petals, then 3 more petals in between.


Fasten the petals with threads, wrap the stem with teip tape.


For the second flower, make 7 petals of the same diameter, but from blue nylon. Squeeze the petals around the edges to make them oval.


Wrap 9 stamens folded in half with a wire for the stem, tie 7 petals with a thread, close the irregularities with tape tape.


For the rosette, make 9 pink petals of the same diameter.

First, screw 2 petals onto the stem, then 3, then all the rest. Wrap the stem with tape.

For a clearing, you need 3 roses, 2 white and 2 blue flowers. The leaves can be made according to the same principle as the petals for the blue flower.

Separate the cartridge from the old light bulb. It is advisable to take a large light bulb.

Drip universal glue into the light bulb, glue sisal. Use tweezers to glue flowers. Glue the light bulb.
Prepare the base for work, paint it black and brown. Glue a light bulb in the middle.


Twist trees of various shapes and sizes from wire. Glue them on with a glue gun.

Paint the trees black.

Twist a petal with a diameter of 2 cm from the wire. Cover it with red or yellow nylon.


Screw the petals to the trees like flames. Decorate the wire with glue and tint with black paint. Fasten the trees to the base with a light bulb.

Twist a little man from chenille wire: bend the handle, make a leg, wrapping the leg, go up, make a second leg, go up, make a handle from the second wire and screw it to the workpiece.


For the head, make 5 petals of yellow and red fire, for the skirt - 7 petals. For the whole fiery little man, 12 petals are required. Make a few of these little men.


Glue the little men as if they surrounded a flower meadow in a light bulb. One man can be glued on top of the light bulb.


