Connection methods when creating a home local network. Do-it-yourself local network: General rules for building a home network and its main components
The number of office equipment and other gadgets in ordinary apartments and houses is already growing exponentially. In this regard, novice users are very often interested in the question - how to make a home local area network and set up a connection between two computers or laptops.
Despite the fact that from the outside it all seems complicated, in fact everything is very easy and simple to do. and now I'll tell you how. First, let's look at all the possible options for creating a small home network. There are two main methods - cable and using wireless equipment.
Wired network connection
This is a classic way to connect a computer to a computer in a single network, which has been used for several decades. It is simple, reliable and relatively inexpensive.
Today, a network card of the FastEthernet (10/100 Mbps) or GigabitEthernet (10/100/1000 Mbps) standard is in any modern system unit or laptop, which means that in the simplest case, you only need a network cable (patch cord). Here's one:
To create a network, a special 2- or 4-pair twisted-pair cable of the cat.5e standard is used. From both ends it must be filled into a special connector - RJ45. Moreover, the wiring should not be tucked into it anyhow, but in a special order, which is called the "layout scheme". Currently, there are two such schemes - 568A and 568B:

Usually the lace is crimped at both ends, either one or the other. Such a patch cord is called "straight".
If you want to connect two computers or laptops to each other, then in this case you need to use a "reverse" cable, the so-called Cross over. It is crimped from one end according to the 568A pattern, and from the other - according to the 568B pattern.

The Ethernet cable is crimped using a special tool - a crimper. They can remove the insulation, trim the ends and clamp them into the connector. A professional networker will do it within a minute. It will take a little longer for the average user, but it is still quite feasible and affordable.

Now let's look at the main options for connecting a network between two computers or laptops.
1. Cable connection directly
This option is the easiest and cheapest. It implies that you will only be connecting two PCs.

For it, you need a reverse network patch cord (cross-over), which I mentioned above. We include one end of it in the first computer, and the other end - in the second computer. The main disadvantage of this method is that it allows you to create a network between two PCs and nothing more. The third is not to be added here.
2. Connection via switch (hub)
According to this option, most local sites work in various institutions, firms, schools, universities. To combine workstations, a special network device is used - a switch, which is commonly called the "Switch":

By the way, many people, out of old habit, call the switch a "hub". This is not entirely correct. A hub is a simpler and "dumb" device that has not been on sale for more than 10 years, since they have not been produced for a long time. In this scheme, as in the following, ordinary straight patch cords are used.
3. Home router
This option is the most correct in terms of building small networks. The main device in this scheme is the router:

He manages the home LAN - issues dynamic IP addresses via DHCP for computers, connects to the Internet and distributes it to clients. In terms of cost, it is the most expensive, since a normal home router will cost you at a price of 2000 rubles and more.
WiFi network
This method is much younger than the good old cable network, but it is simpler and more convenient, provided that you have a WiFi adapter on both PCs.

No additional cables or tools required. Moreover, you can create not just a computer-to-computer network, but a whole hot spot, to which you can also connect tablets, phones or Smart TVs, as well as distribute the Internet to them if it is connected to the main device.
The wireless network is organized as follows. We select one computer, which will be the main one. On it we will create a virtual access point. To do this, launch a command prompt with administrator rights. You need to write two commands in it. The first command sets the parameters of the created Wi-Fi, namely the name (ssid) and password. Example:
netsh wlan set hostednetwork mode=allow ssid="moi-wifi" key="wifipassword" keyUsage=persistent
Here, the "SSID" param is the name of the grid, which other devices will see in the list of available devices, and KEY is the password for connecting. After entering, press the "Enter" button.

The second command is:
netsh wlan start hostednetwork
It launches the created virtual WiFi hotspot into operation:

After that, you can try to connect other gadgets to this Wi-Fi. If you suddenly need to turn off the virtual access point, type the command:
netsh wlan stop hostednetwork
The only, perhaps, inconvenient moment is that you will have to start WiFi for distribution every time you turn on this computer.
Setting up a local network between computers in Windows 10
Attention: if you have everything organized through a router, then you can safely skip this paragraph.
Connecting computers with a cable is only half the battle. You also need to properly configure the network between the two computers. To do this, open the list of Windows network connections by pressing the key combination Win + R and typing the command ncpa.cpl.

A list of connections will appear, among which you need to select "Local Area Connection" or "Ethernet" in the case of a cable connection and "Wireless Network" in the case of WiFi:

Right-click on it to bring up a menu and select "Properties". The following window will open:

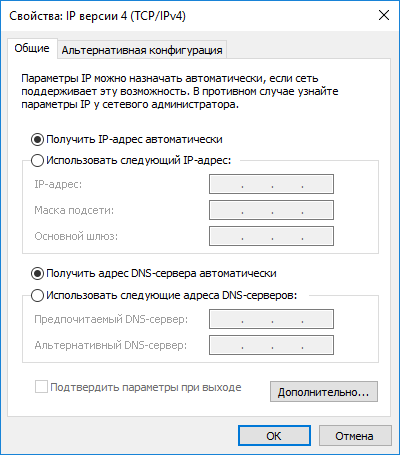
Double-click on the line "Internet Protocol Version 4 TCP/IPv4" to bring up another window:

Here you need to check the box-point on the value "Use the following IP address". At the first computer we prescribe the IP address 192.168.1.1 with a mask 255.255.255.0 .
On the second computer, you need to take the next IP address in order - 192.168.1.2 with a mask 255.255.255.0 :

Click the "OK" button to apply the settings. Now, in principle, computers should be able to see each other.
You can check this through the command line, using the test utility ping. Ping from the first computer to the second. To do this, launch the Windows 10 command prompt and enter the command ping 192.168.1.2. If everything is fine, the result will be like this:

That is, the packets are exchanged, there are no losses - everything is fine. If the IP address is not pinged, check the TCP / IP protocol parameters on it, as well as the firewall or firewall settings. The fact is that by default they can block the ICMP protocol on which the Ping utility works.
In the same way, from the second computer, we ping the first one using the command :

So, we were able to create a local network between two computers or laptops. And then you need to open access to each computer over the network, that is, so that you can go from one to another through a Network connection and download or upload files. To do this, open the Network and Sharing Center and go to Advanced sharing options:

Here you need to check the boxes for your current network profile:
- Enable network discovery
- Enable file and printer sharing
- Allow Windows to manage local group connections.
Click on the "Save Changes" button.
Now you can try to log in from the first PC to the second PC using the usual Windows data transfer protocol - Samba. To do this, go to it either through the network environment, or by entering its IP directly in the address bar of the explorer. Like this:

Note that the address must be preceded by two backslashes - "\\". If you put two regular slashes - "//", then smart Windows 10 will consider this as using the http:// protocol, which means it will try to open a site with that address and, of course, it will give an error.
If suddenly, when you try to log in to a neighboring computer over the network, a login and password request pops up, this means that the "Guest" account is disabled in your system. To activate it, you need to launch a command prompt with Administrator rights and enter the command:
net user guest /active:yes
This is what it looks like to be successful:

After that, when you log on to the computer over the network, you should see a list of available folders and files. If a printer is connected to it, then it can also be made network and used together.
The principle of creating a local network in any version of Windows (XP, 7, 8, 10) is practically nothing is not different. The exceptions are complex multi-layered corporate networks that use multiple subnets, proxy servers, and VPNs.
But in this article we will look at how to create home network, without resorting to buying expensive equipment, but using a regular switch or router with Wi-Fi support.
What is needed to create a network
First of all, to create a local network from a certain number of computers, we need equipment:
note: in the event that a direct connection is used (i.e. we insert a twisted pair cable into both devices without using a router), then you will need not a standard cable, but cross— over, unless modern MDI-X enabled NICs are installed. In this case, the standard crimping method can be used.
How to create a local network
Now we proceed directly to the creation. First we need to prepare:
- Install all equipment in its place - computers, routers, etc.
- crimping cable, if necessary.
- Doing wiring, i.e. we stretch the twisted pair cable to the equipment.
- We connect twisted pair equipment.
Costs note that when the connection is made and all devices are running, the connection connectors on the computers should shine. The same applies to routers with routers, only they have light bulbs located on front panel. If any light is off, then the connection is made. not right.
When the connection is made, you need to configure the network in the operating system.
To start checking working group, for which we go to the properties " my computer". You can not open the properties, but use a combination Win+
R and enter in the window sysdm.
cpl.
On all devices working group must be the same, otherwise the computers will not see each other.
To change the group, just click on the button. change and enter a group name. Name must be entered Latin, and match on all devices. 
Then we look for network icon in the notification area and with its help we get to Network and Sharing Center.
Here we are interested in the link changing advanced options, it's third from the left and will allow you to edit sharing options. For each profile choose: Enable network discovery, autotuning and general access to files and printers. 
Scrolling page and below disable shared access with password protection. All other settings can be left. Click Save changes and exit.
This completes the setup. The network should work, but only if your router distributes dynamic addresses.
If a router was used, or the devices were connected directly with a cable, then a few more settings need to be made.
Network settings
When direct connection or using a router, we need change computer ip addresses. For this necessary:

We will not describe what each setting is responsible for, because. this is a fairly broad topic. It is enough to enter on all computers the addresses that are described above.
After making all the above settings, the network should work. However, do not forget that a firewall or antivirus can completely block the network. Therefore, if nothing worked, check their settings or temporarily disable them altogether.
Local network via WiFi router
Setting up a network through a router is absolutely nothing is not different from what we have described above.
If the device is configured to distribute dynamic addresses, then the addresses do not need to be changed. Well, if IPs static, you will have to use the previous section.
Also, there will be no difference between whether the device is connected by cable or via Wi-Fi, in most routers, the address distribution settings are configured simultaneously and on wireless and on wired connection.
How to make shared folders
After everything is set up, you need to create shared folders to exchange information.
In the Windows operating system, you can share a folder on your local home network to exchange data between computers using shared folders. This is a very convenient and fast way to transfer files on a computer-to-computer basis, without using external media (flash drives, external hard drives, memory cards, etc.).
In this article, I will talk about creating a local network using the Windows 10 operating system as an example. Creating and configuring a local network in Windows 8 and Windows 7 occurs in a similar way, this instruction is universal.
The article discusses the following option for using shared folders on a local network: several computers are connected to the router, connected via cable and a wireless Wi-Fi network, united in a home network. A shared folder is created on each computer, and all computers included in this local network have access to shared folders.
Windows 10, Windows 8, Windows 7 operating systems (different operating systems, or the same operating system) connected to the router via Wi-Fi or cable can be installed on computers connected to a home local network.
Creating and configuring a local network takes place in four stages:
- the first stage is checking the workgroup name and network card settings
- second stage - creating and configuring local network settings
- the third stage is the connection of the shared access to the folder in the local network
- fourth stage - data exchange over the local network
First you need to check the workgroup settings and network card settings, and then create a Windows local network.
Checking Network Card and Workgroup Settings
On the Desktop, right-click on the "This PC" icon ("My Computer", "Computer"), select "Properties" from the context menu. In the "System" window, click on "Advanced system settings".
In the System Properties window that opens, open the Computer Name tab. Here you will see the workgroup name. By default, in Windows 10, a workgroup is named "WORKGROUP".
On all computers connected to this local network, the workgroup name must be the same. If the computers connected to the network have different workgroup names, change the names to the same name for the workgroup.
To do this, click on the "Change ..." button, in the "Change computer or domain name" window, give a different name for the workgroup (write the new name in capital letters, preferably in English).
Now check your network card settings. To do this, in the notification area, right-click on the network icon (Internet access). Click on "Network and Sharing Center". In the "Network and Sharing Center" window, click on the "Change adapter settings" link.
In the Network Connections window, select your network card, Ethernet, or Wi-Fi, depending on how your computer is connected to the Internet. Next, right-click on the network card, in the context menu, click on "Properties".
In the network card properties window, in the "Network" tab, select the "IP version 4 (TCP / IPv4)" component, and then click on the "Properties" button.

In the Internet protocol properties window that opens, in the "General" tab, check the parameters of the IP address and DNS service. In most cases, these parameters are assigned automatically. If these parameters are inserted manually, check the appropriate addresses with your Internet provider (the IP address on the computers connected to the network must be different).
After completing the verification of the parameters, you can go directly to creating a local network in Windows.
Creating a local network
The first step is to configure the LAN settings in Windows. Enter the "Network and Sharing Center", click on the item "Change advanced sharing settings".
In the "Advanced Sharing Options" window, you can change the sharing settings for various network profiles. The Windows operating system for each network used creates a separate network profile with its own special settings.
There are three network profiles available:
- Private
- Guest or public
- All networks
In the private network profile, in the "Network discovery" option, select the "Turn on network discovery" option.
In the "File and Printer Sharing" option, activate the "Turn on file and printer sharing" option.
In the HomeGroup Connection option, select Let Windows manage HomeGroup connections (recommended).

After that, open the network profile "All Networks". In the Public Folder Sharing option, select Turn on sharing so network users can read and write files in shared folders.
In the File Sharing Connections option, select the setting "Use 128-bit encryption to secure sharing connections (recommended)".
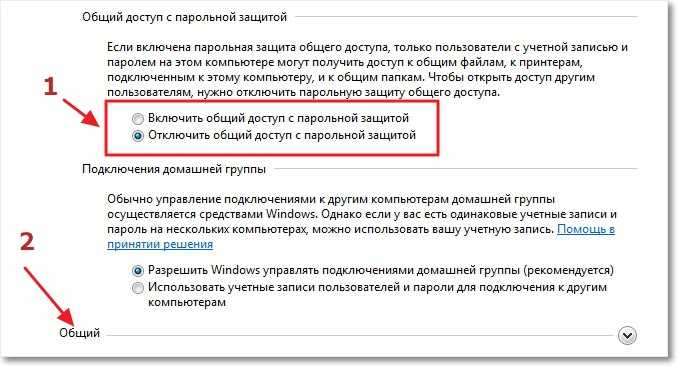
In the "Password protected sharing" option, activate the "Turn off password protected sharing" option.

After completing the settings, click on the "Save Changes" button.
Repeat all these steps on all computers that you plan to connect to your home LAN:
- check workgroup name (name must be the same)
- check network card settings
- in sharing options turn on network discovery, turn on file and printer sharing, turn off password protected sharing
How to enable folder sharing
In this case, I created a folder and named "Public". Right-click on this folder, in the folder properties window, open the "Access" tab.
Then click on the "Advanced Settings" button.

In the "Advanced sharing settings" window, activate the "Share this folder" item, and then click on the "Permissions" button.

Select permissions to use shared folder data from another computer. There is a choice of three options:
- Full access
- Change
- Reading

To save the settings, click the "OK" button.
Go back to the folder properties, open the "Security" tab, and then click on the "Edit ..." button.

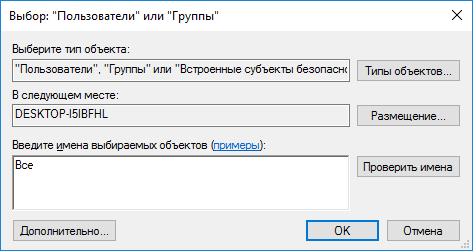
In the window that opens, enter the name "All" (without quotes) in the "Enter the names of the objects to select" field, and then click the "OK" button.
In the folder properties window, in the "Security" tab, configure the permissions that you previously selected for the shared folder.
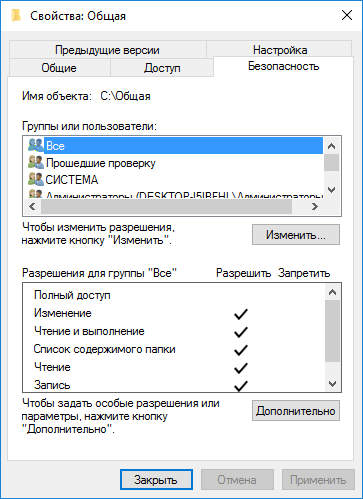
To change the permission for the "Everyone" group, click on the "Advanced" button. In the "Advanced security settings for the shared folder" window, select the "Everyone" group, and then click on the "Edit" button to change permissions.
The LAN setup in Windows is now complete. In some cases, you may need to restart your computer for all changes to take effect.
Login to the local home network
Open File Explorer, in the "Network" section you will see all available computers connected to the local home network. To log in to another computer, click on the computer name, and then click on the shared folder name to access the files and folders in the shared folder.

The local network in Windows 10 is created and configured.
Troubleshooting some network issues
Sometimes, after setting up the network, there are problems with accessing folders on the local network. One of the possible problems may be an incorrectly selected network profile. I have experienced this myself on my computer. After reinstalling the system, I created and configured a local network, but my computer did not see two laptops connected to this network. From a laptop, it was possible to go to the shared folder of my computer without any problems, but the computer did not see them at all.
I checked all the local network settings several times, and only then noticed that my computer was running a public network, and not a private (home) network, like on laptops. How can such a problem be solved?
Enter the "Network and Sharing Center", click on "Troubleshoot". Select the "Shared Folders" section, run diagnostics and troubleshooting. At the very end, the application will offer to set up the network as private. Apply this fix, and then restart your computer. After performing this operation, my computer was able to access shared folders on laptops on the local network.
Often problems arise due to incorrect network settings. Windows 10 has an option to reset network settings to default. Enter "Settings", "Network and Internet", in the "Change network settings" section, click on "Reset network" to apply the default network settings.
There may be other problems, look for their solution on the Internet.
Article Conclusions
In Windows, you can create a local private (home) network between computers to organize data exchange using shared folders, access the printer. Different or identical operating systems (Windows 10, Windows 8, Windows 7) can be installed on computers on the same network.
And why is it, in fact, needed by an ordinary user. Recall the main concepts of this lesson:
- - a local network is a system of computing devices connected by communication lines, designed to transmit information to a finite number of subscribers;
- - there are three main types of topology of local networks, on the basis of which more complex structures of local communication are built;
- - according to the way computers interact, local networks are peer-to-peer (when all PCs connected to the network are equal) and with a dedicated server.
In this article, we will look at how to create a local network with the same access rights for all its users.
The advantages of such a network include simplicity of design (setting up a home network is quite “too tough” for a beginner) and the economic availability of equipment, but the range of functionality of such a network is very limited.
So, to create a local network between computers, we need:
Several computers (in this case, consider the option of a network that combines more than two PCs, but we will tell separately), which will become the nodes of our local network. For each PC, you need to check the presence of a network card (although most modern devices are equipped with a built-in "network card", but "what the hell is not joking" ...).
- - Network hardware. Both managed (configurable) and unmanaged network equipment can be used to organize local networks. To make a small home network, a simple unmanaged 4-6 port switch is quite suitable.
- - Network cable to connect each computer to network equipment. The total cable length directly depends on the final number of PCs, their distance from each other and the architecture of the room (building) in which the local network is created.
- - Connectors(RJ-45 connectors), the number of which also depends on the number of computers connected to the network. So, to compress the cable for each PC, you need at least 2 connectors;
- - Swage(Krimper) - a tool for cable termination. (In its absence, many masters manage with improvised means (for example, a screwdriver), but it will be quite difficult for a beginner to complete this trick).
Creating and configuring a home network
1. Select the computer from which the creation of the local network will begin, and connect it to the network equipment. To do this, on both sides crimp the cable and using RJ-45 connectors we connect it to the ports of the switch and the network card of our computer.
The unmanaged switch does not require any additional settings: we only need to prescribe the correct settings for the local network itself in the operating system of each PC
2. To do this, go to the settings of the computer's network card (we read, windows 8 and windows XP) and write there IP-the address this PC. As a rule, the following IP addresses are used here 192.168.1., 192.168.0;
3. Repeat 1-2 points for each computer connected to the network.
Important: the last digit of the IP address of each subsequent PC must differ from the previous one (in the range indicated above): so, if the first computer was assigned IP 192.168.1.1, the second PC will have it - 192.168.1.2, the third - 192.168.1.3 and so on.
When all computers are connected, we check our local network for operability.
You can do this in two ways:
Check for other devices connected to the network in the "Network Neighborhood" tab of the control panel of this computer;
Ping any computer on this network with a known ip address. Pinging is done like this:
Go to "Start → Run", in the window that opens, assign the command "cmd" and press "Enter";
In the command line window that appears, write ping xxx.xxx.xxx.xxx, where xxx.xxx.xxx.xxx is the IP address of the computer we are looking for.
If, after executing the command, we see a similar picture in the command line window, then the home local network we created is fully functional, but if the computer displays a message about “the request timed out” or that “the specified host is unavailable”
 - it is necessary to search for and eliminate technical malfunctions of this network.
Hello. Recently responding to a blog comment, I promised to write an article about how to set up a local network through a wifi router. And since I have TP-Link TL-WR841N installed, I will write instructions using this router as an example. Although in setting up a local network between computers, the router will practically not be configured, so even if you have a different Wi-Fi router, the article will come in handy for you.
The local network is a useful thing. You can exchange files, you can play games, especially since setting up a network through a router is not very difficult. If you have two or more computers accessing the Internet through one router, then there is already a network between them. And it does not matter how they are connected, both via a network cable, Wi-Fi, or one via cable and the other via a wireless network. Let's get started with the setup process. I will write in order what we have and what needs to be configured. Go.
Setting up a local network via a Wi-Fi router
What we have:
- The Wi-Fi router is connected to the Internet. Distributes IP and DNS automatically.
- Computer #1. Operating system Windows 7. Connected to the router via a network cable, the Internet is working.
- Computer #2. Windows 7 operating system. Connects to the router via a wireless Wi-Fi network, the Internet works.
Target:
Set up a local network between two (you may have more) computers. Share a specific folder or local drive. Get the ability to share files.
We work:
Before setting up the network on computers, I decided to ping from one computer to another in order to understand if there is a connection between them. Read more about ping. If you want to do this too, then you need to go to the router settings from one computer and see what IP address the router assigned to another computer on the network. I recently wrote an article about that, you can read.
Well, I will quickly write how to do it. We type in the browser 192.168.1.1 (192.168.0.1) and go to the router settings. Go to the tab “DHCP” and “DHCP Clients List”, we see there devices that are connected to the router. We look at the IP address that is assigned to the second computer with which we want to set up a local network.
Now we make a ping to it. Click "Start" and in the search bar write cmd, in the search results, run the utility “ cmd.exe“.

A window will appear in which we write the command ping “IP address of another computer” and press "Enter". We look at the result, if you see that packets are being exchanged, then everything is fine, there is a network between computers.

I think I'll do another ping from a laptop that is connected via Wi-Fi, and I see that the packets are not being transmitted. And if the ping fails, then the network will not work. And then it began, for a long time I changed different settings, until it dawned on me that I had installed on my laptop and computer ESET Smart Security, yeah! It also checks the entire network.
If during the setup or operation there are problems with the network connection, then the first thing to do is to check and disable antiviruses and firewalls. I also recommend disabling the Windows Firewall.
I open the antivirus, go to the tab "Settings", "Network", select "Change the computer's network security mode" and celebrate “Allow Sharing”. Click "OK", repeat the ping, everything works. Half done, let's move on.
Setting up a local network
Now you need to check on each computer which workgroup they are connected to and give them a name. If the name is already set, then it is better to change it by writing the word in English letters.
Right click on "My computer" and select "Properties". Farther "Additional settings" and go to tab “Computer Name”. Click the "Change" button. Enter a new name, if necessary, and a group.
It is necessary that all computers that you want to connect to the network work in the same group.
I had a group "WORKGROUP" registered, and I left it.
After making the settings, click “OK” and restart the computer.

I remind you that we do all the actions on both computers.
We continue the setup, go to "Start", "Control Panel", "Network and Sharing Center".
We look to which network your network belongs, you need what would be "Home network" if for example you have “Public network” then click on it and select "Home network".
Now right click “Ready to Build”.

We press .

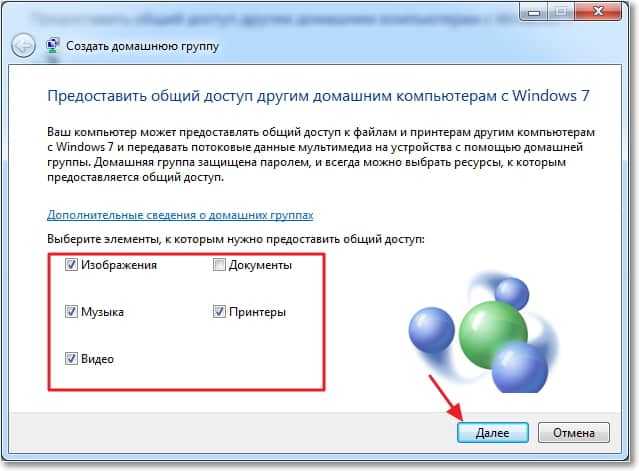
Select the items you want to share and click "Next".
A window with a password will appear, just click "Finish". In the window that appears, click .

We still need to disable the password request when accessing a computer on our local network. Scroll the page and find the item “Sharing with password protection”, choose “Turn off password protected sharing”. Then open the “General” tab, look for the same item, and disable protection. Don't forget to press the button "Save Changes".
Everything, on this network settings are completed. Reboot both computers, or how many you have. For some reason, it seemed to me later that the Home Group could not be configured, everything would have worked anyway, but oh well.
Let's see if our computers can see each other. We go to "My computer" and on the left click "Network". Everything works for me, both my computer and laptop are displayed, which is connected to the router via Wi-Fi. The network also works on the laptop.

If we go to a computer on the network, we will only get access to the Public Folder. In order to share, for example, the entire “D” drive, you need to make some more settings.
If you have different operating systems on your computer, say Windows XP and Windows 7, and you have problems setting up the network, then read the article.
Sharing folders on the local network
Go to the folder or local drive you want to share and click on the button at the top "General access", “Advanced Sharing Settings…”.
 A window will open where you click “Advanced setup”. Check the box next to “Share this folder” and click "OK". If you want, you can also specify the name of the share.

Now all devices that are connected to the network will be able to share this folder.
What did we get. We customized local network via Wi-Fi router TP-Link TL-WR841N. One computer is connected to the network via a network cable, the second via Wi-Fi. In principle, you can have more computers, and they can be connected in different ways.
How to connect an Android smartphone (tablet) to a local Wi-Fi network?
I was already thinking about finishing this article, but I decided to try connecting my HTC One V to the newly created network. For such a case, I advise you to install the program “ ES explorer“. Actually a great program. Launch it and go to the tab "The local network" (phone must be ), click the Search button .
My smartphone found two of my computers on the local network, you can connect to them and go to folders that are open access. I even started the movie on my phone from my computer, wow technology :).

Now that’s all for sure, well, it took time for this article :), I hope it will come in handy for you. For some reason, I am sure that many questions will appear for that article, ask, we will try to figure it out. Good luck friends!
More on the site:
How to set up a local network through a Wi-Fi router? Detailed instructions on the example of TP-Link TL-WR841N updated: February 7, 2018 by: admin