Birch suvel drying. Cap, suvel. preparation, drying, properties. burl products. Tree burls: what are they?
What are mouth guards and suveli, how do they differ? How and where to prepare them? How to quickly and efficiently dry out growths at home?
Cap
So, first, let's define some concepts.
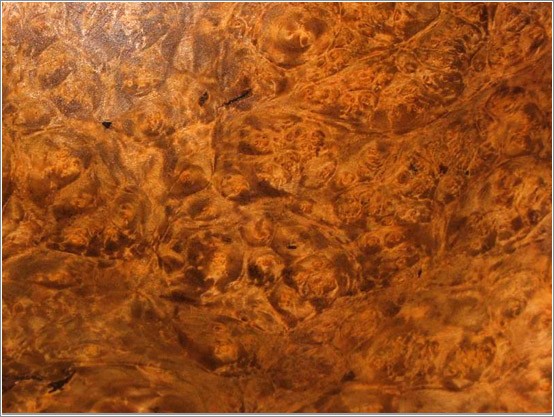
Cap(aka " witch's broom") is a benign formation on a tree, which is a bunch of thin branches growing from a teardrop-shaped (most often) growth. When viewed in a cross section, it has a texture with pronounced knot cores. It is difficult to process due to the highly curled texture and a huge number of knots. Extremely beautiful , durable, perfectly sanded and polished.
Numerous individual areas have a pearlescent tint. Bolshoi industrial value does not have, but is valued very highly because of its beauty. If it is used in industry, it is only in the form of veneer for finishing furniture (burls from exotic tree species are mainly used), as well as for the production of small products such as boxes, cigarette cases, women's hairpins, and small jewelry (birch burls). The use of burls on knife handles is considered good taste, and is also valued by wood carvers for its unique texture.
It is impossible to find two identical pieces of burl - even the halves of a sawn burl have a different pattern, the build-up is so heterogeneous. It grows on many trees (linden, alder, birch, maple, oak, etc.), but the most valuable and beautiful is birch (of those growing in our latitudes). The growth is usually small, at most the size of a volleyball or a large plate.
There is no point in cutting out any pattern on the burl, since the texture clogs everything up.
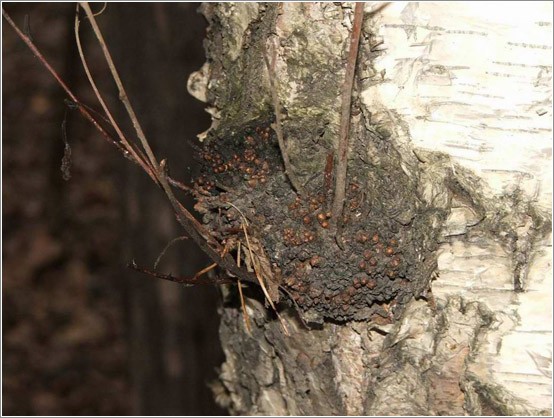
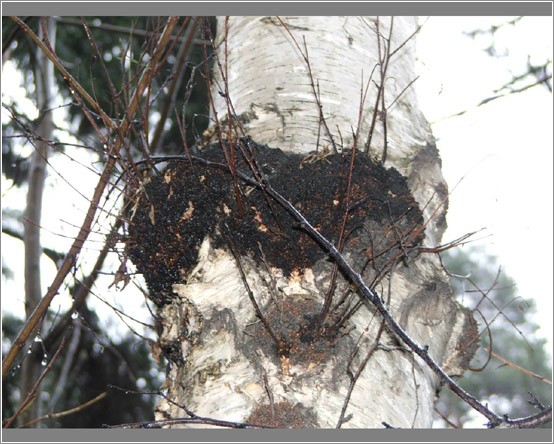
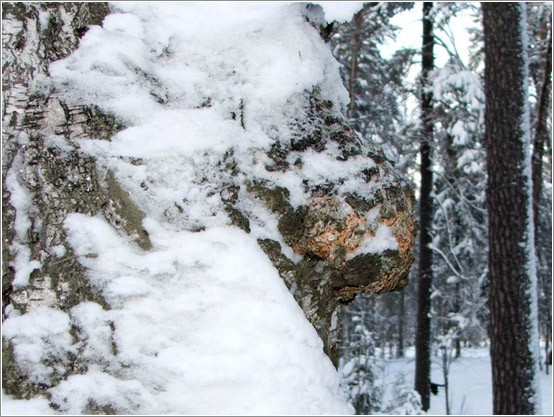
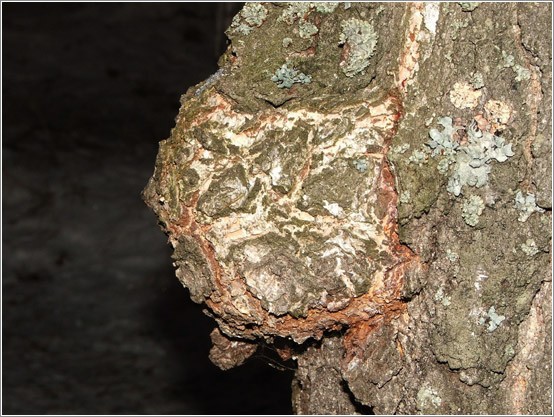
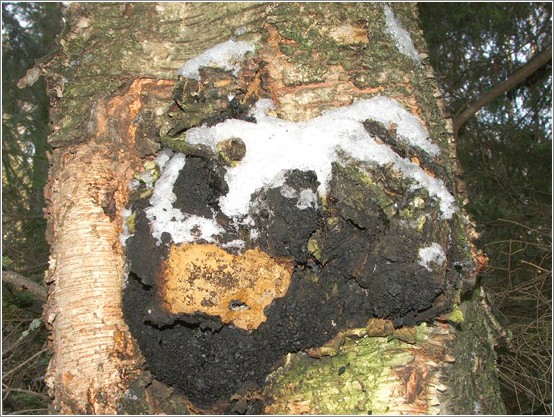
Shown in the photo birch burl. Unfortunately, I couldn’t get a cut of a birch burl (I took these pictures near my native police station, and, as you understand, they wouldn’t let me cut anything down there... But I contrived and found an ash burl; most of the burls are similar in texture and They differ only in the color and size of the knot cores).


(svil) - as the name implies, the growth was named because of its structure. "Twisted structure"
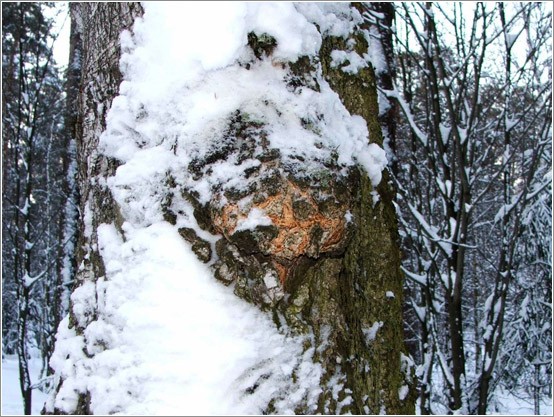
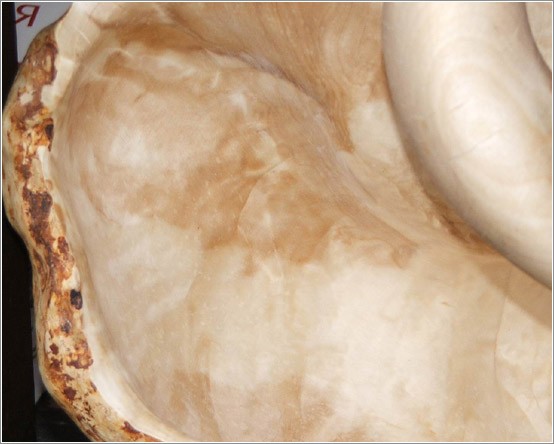
This is putting it mildly. Suvel is a drop-shaped or spherical growth on a tree (there is also a ring variety that covers the tree trunk around the perimeter), usually grows 2-3 times faster than the tree itself. When cut, it has a texture similar in pattern to marble and mother-of-pearl (this is the main difference from mouth guard; in the future, do not confuse suvel and cap). The presence of mother-of-pearl stains on polished wood creates a beautiful shimmering picture that glows from within. Svil is also poorly processed, like burl, but not as hard. The size varies from the size of a nut to 1.5 meters in height (I myself saw one on a birch tree) and up to 2 meters in diameter (a ring suvel that completely covered the tree trunk).
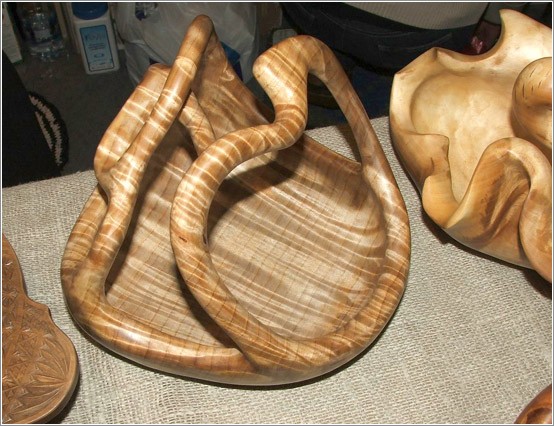
In the Vatican there is a font much more than a meter in diameter, carved from a single piece of suveli. I myself was once sitting in a chair carved from suveli. It holds fine threads perfectly, but cutting suvel is not recommended. It is better to sand and varnish (impregnate with oil). The product will only benefit from this.
The most valuable is the root or butt fork. The presence of dark veins and clearly defined twisted annual rings. This is a fairy tale. BEAUTIFUL, that says it all. Barrel suvel has a finer texture and a more subtle “frosty” pattern. And lighter wood. In terms of strength, butt suvel is slightly superior to trunk suvel due to the structure of the tree trunk. Suvel is durable, beautiful, easy to polish and grind. Well-dried and treated, it begins to “glow” from the inside (with proper impregnation with oils, the wood becomes like amber and even a little transparent). Usually has a color from pale yellow or pinkish-brown to completely ocher-brown. It all depends on the conditions and drying time. The cap has the same colors.


As you can see, suvel is completely different from burl.
- this is a mushroom (not to be confused with the tinder fungus) and we do not need it for our purposes.

Blank
Where to look for growths... Naturally in the forest. BUT! There are no specific places of growth, they grow spontaneously, and the most beautiful growths will be found by the most big-eyed and persistent. This activity is akin to mushroom hunting - who is more and more e gal forest, he got more.
We cut off the growth. We do this with a sharp saw. Otherwise, you will get tired of sawing, and the tree will begin to become shaggy. We do not peel off the bark.
I highlight in red:
- If the growth is a “trunk” or a cap root, then it is better to refrain from cutting it down - the tree may die. It is advisable to purchase such burls and strands during legal logging, when the tree is doomed anyway.
- It is advisable to cut down the growths in the dry season, ideally at the end of August, beginning of September, before the sap begins to flow.
- Don't forget to cover the cut on the wood with oil paint or wax or something similar.
Drying
So how to dry? The "steaming" method. I’ll say right away that this method is suitable for small pieces of wood: about half the size of a soccer ball or a small log.
- We take an unnecessary pan (bucket) and throw a piece of wood there. You need to take an unnecessary pan, since during the cooking process a very tricky broth is formed, which is then very troublesome to wash. It’s better to clean the wood of any tatters of birch bark and other fragile and dangling pieces - they will fall off anyway.
I'm considering exactly birch growth, as the most accessible and beautiful. The remaining growths are cooked using the same technology. The log is accordingly cleaned of any debris and fragile particles. Pour water. It is convenient to do this with a faceted glass (it contains 250 ml). The water should cover the piece of wood by about a centimeter or two. Naturally, the tree floats up, but let’s press it to the bottom and we’ll see everything. It doesn’t matter what kind of water you pour, cold or hot, it will still boil. You can throw as much wood into a saucepan as you like; the volume of an individual piece of wood is important, not the total volume of wood.
- We take table salt, whatever you don’t mind. We're not making soup. Add 2 large tablespoons per liter of water.
with a top of salt. You can do more, as much as you like, it’s okay, it’s impossible to overdo it. The main thing is that the water is sickly salty. You can use sea clean water(precisely clean, otherwise it will smell disgusting of mud). The salt will draw sap from the tree, but will not saturate the tree. - We find sawdust of resinous wood. Spruce and pine are the easiest to get. Take a saw and go ahead. We need two powerful handfuls of sawdust (raking the sawdust with both hands). Precisely sawdust, not shavings from a simple hand plane. The shavings will come from an electric planer (you can get them at the nearest sawmill or plan them yourself). I always use them. They are quite small and can usually be obtained in large quantities and easily. The more resin in the sawdust, the better. And the finer the sawdust, the better. Pour into a saucepan. Sawdust will give the suveli a pleasant ocher color. From soft pink-yellow to ocher-brown. And also see O ly will add strength to the wood and reveal texture.
- When the water boils, reduce the heat and leave it simmering for 6-8 hours, longer if you have the patience. If the saucepan is large, then you don’t have to turn down the flame, let the water boil and bubble. But you need to watch so that the water does not boil away completely. Salt, sawdust, temperature and time will do their job. Add water as needed. During the cooking process, a red “broth” is formed. And scale. It is better to remove scale immediately. It is very difficult to wash off.
- 6-8 hours passed (depending on the size of the piece of wood). We take out the piece of wood. We rinse under running water to remove sawdust. Water from the pan
We throw it out as unnecessary, but you can leave it for next time if you have somewhere to store it. But it's easier to pour out the water. We throw the growth
on the closet, wrapping it in nothing. Let it cool for a day or two. - We repeat the cooking and drying process 2-4 times depending on the volume of the wood. To speed up the process, you can use a pressure cooker. The time is reduced to 4-6 hours.
- During the last cooking, you need to quickly peel off the bark while the tree is hot. Although she herself should fall off by this time. Carefully!!! Hot!!! Use gloves!
- We throw it on the closet for a week or two. The tree is basically already dry, but let the remaining moisture go away. The tree will “get used” to the atmosphere. After final drying, the tree will become like bone, and it can be cut, sawed, polished. There will be no foreign smell. It will smell only of wood.
- In the process of accelerated drying of wood, you need to remember that small cracks may appear, and therefore you need to give
allowance for their removal in subsequent processing. - I remind you once again that large pieces cannot be dried like this. Cracked. Necessarily. Verified.
- After the wood has finally gotten used to the atmosphere, we make a product from it. It is advisable to soak the suvel and cap with oil, and if
If there is a desire, then wax too. The wood will show its texture, “play,” as they say, and all its inner beauty will appear.
If you have any questions or any clarifications about the technology described above, I will answer to the best of my ability.
Processing of burl and suveli
You can often see thickenings or growths on the trunks and roots of birch, maple, oak, spruce, pine and some other tree species. These swellings occur as a result of local tissue proliferation. Usually there are influxes with a smooth surface (suveli), the texture of which on the saw cut is similar to the texture of Karelian birch, and the sagging with an uneven surface (burls), the texture pattern on the cut of which is very beautiful and represents an intricate interweaving of annual layers with concentric circles of the cores of dormant buds scattered here and there. The nature of the formation of both burls and suvels has not yet been clearly defined, but for the master these burls are the most valuable material for work. They are harvested from fallen trees in windfall areas or at sawmills. It is clear that it is easier to separate the influx in the form of a growth from the tree, so in the future we will talk about processing the growths specifically. The latter are cut off with part of the stem wood - then it will be clear what to remove and what to leave. The workpiece is freed from all excess (bark, unnecessary knots), and tar and rot are also removed. Then the workpiece is boiled in a 5% solution of table salt. If the diameter of the workpiece does not exceed 10 cm, boil it for an hour, the duration of such processing of the workpieces large sizes increases to 3...5 hours. Boiling is necessary so that the juice inside the wood warms up, neutralizes and the workpiece dries faster. (By the way, the resulting solution can then be used as a beige dye for yarn and fabrics, and by evaporating it, it is even possible to obtain a stain for tinting wood and bone products.)
Next, the workpiece is removed from the solution and, without allowing it to dry, is subjected to pre-treatment. Wet growth wood is quite soft and pliable, and it is also easier to remove any remaining bark from it. At the same time, during the drying process of the boiled workpiece, the likelihood of cracks appearing in its thin walls, if any, is reduced. Once dry, the wood will become hard and will be much more difficult to process.
When starting work, the master must first of all decide which “direction” product (horizontal or vertical) he intends to make from his workpiece. You can't cut from the shoulder here. If the craftsman is going to cut something vertical, for example, a “standing” vase, the workpiece will have to be “positioned”, forming a flat bottom for it. In this case, a workpiece made from a build-up of a typical shape (like a “hedgehog”) will most likely have to be cut across the grain. When working on vases, dishes, boxes, you have to carefully select the “inside” of the future product from top to bottom. Remove excess wood “on a cone” using a drill, an ax, and semicircular chisels. It is not recommended to thin the walls of the product too much, because wood does not like walls that are too thin; by the way, the walls look even better when they are thick enough.
Message quote Cap, suvel. Harvesting, drying, properties. BURN PRODUCTS
Cap, suvel. Harvesting, drying, properties.
The author of this material is a great specialist in the artistic processing of wood (and not only wood), already familiar to us from the carved Easter egg, Sergei from the Moscow region. Today Sergey will reveal a secret to readers quick drying so rare and interesting materials, like cap and suvel. The information is very rare and useful. Reading...
So first, let's define some concepts.
KAP - (aka witch's broom) is a benign formation on a tree, which is a bunch of thin branches growing from a teardrop-shaped (most often) growth. When viewed cross-section, it has a texture with pronounced knot cores. It is difficult to process due to its highly curled texture and a huge number of knots. Extremely beautiful, durable, perfectly sanded and polished.
Numerous individual areas have a pearlescent tint. It has no great industrial significance, but is highly valued because of its beauty. If it is used in industry, it is only in the form of veneer for finishing furniture (burls from exotic tree species are mainly used), as well as the production of small products such as boxes, cigarette cases, women's hairpins, and small jewelry (birch burls). Used on knife handles is considered good taste and is also valued by wood carvers for its unique texture.
It is impossible to find two identical pieces of burl; even the halves of a sawn burl have different patterns, the build-up is so heterogeneous. It grows on many trees (linden, alder, birch, maple, oak, etc.), but the most valuable and beautiful is birch (of those growing in our latitudes). The growth is usually small, maximum the size of a volleyball ball or the size of a large plate.
There is no point in cutting any pattern on the burl, since the texture clogs everything up.
The photo shows a birch burl. Unfortunately, I couldn’t get a cut of a birch burl (I took these pictures near my native police station and, as you understand, they wouldn’t let me cut anything down there... But I contrived and found an ash burl; most of the burls are similar in texture and only differ color and size of the knots’ cores. Let’s see:


SUVEL - (aka svil) As is clear from the name, the growth got its name because of its structure (twisted structure, that’s putting it mildly). Suvel is a drop-shaped or spherical growth on a tree (there is also a ring variety that covers the tree trunk around the perimeter), usually grows 2-3 times faster than the tree itself. When cut, it has a texture similar in pattern to marble and mother-of-pearl (this is the main sign of difference from KAPA; in the future, do not confuse suvel and burl).
The presence of mother-of-pearl stains on polished wood creates a beautiful shimmering picture that glows from within. Svil is also poorly processed, like burl, but not as hard. The size varies from a nut to 1.5 meters in height (I myself saw one on a birch tree) and up to 2 meters in diameter (a ring suvel that completely covered the tree trunk). In the Vatican there is a font much more than a meter in diameter, carved from a single piece of suveli. I myself was once sitting in a chair carved from suveli. It holds fine threads perfectly, but cutting suvel is not recommended. It is better to sand and varnish (impregnate with oil). The product will only benefit from this.
The most valuable is the root or butt fork. The presence of dark veins and clearly defined twisted annual rings. This is a fairy tale. BEAUTIFUL, that says it all. Barrel suvel has a finer texture and a more subtle “frosty” pattern. And lighter wood. In terms of strength, butt suvel is slightly superior to trunk suvel due to the structure of the tree trunk. Suvel is durable, beautiful, easy to polish and grind. Well-dried and treated, it begins to “glow” from the inside (with proper impregnation with oils, the wood becomes like amber and even a little transparent). Usually has a color from soft yellow to pinkish-brown to completely ocher-brown. It all depends on the conditions and drying time. The cap has the same colors.
Photos:


As you can see, the cap is not at all similar to suvel.
CHAGA is a mushroom (not to be confused with the tinder fungus!!!) and we do not need it for our purposes.
So, how to dry it. I’ll say right away that the “steaming” method is suitable for small pieces of wood. About half the size of a football or a small log.
1. We cut off the growth. We do this with a sharp saw. Otherwise, you will get tired of sawing, and the tree will begin to become shaggy. We do not peel off the bark. Don't forget to cover the cut on the wood with oil paint or wax or something similar.
IT IS PREFERABLE TO CUTT OUT THE GROWTH DURING THE DRY TIME OF THE YEAR, IDEAL AT THE END OF AUGUST, THE BEGINNING OF SEPTEMBER, BEFORE THE COMMONATION STARTS.
2. Take an unnecessary pan (bucket) and throw a piece of wood there. The pan is absolutely unnecessary, since during the cooking process a very tricky broth is formed which is then very troublesome to wash off. It is better to clean the wood of any rags of birch bark and other fragile and dangling pieces. they will still fall off.
I consider birch growth as the most accessible and beautiful; the rest of the growths are cooked using the same technology. The log is accordingly cleaned of any debris and fragile particles. Pour water. It is convenient to do this with a faceted glass (it contains 250 ml). The water should cover the piece of wood by about a centimeter or two. The tree naturally floats up, but let’s press it to the bottom and we’ll see everything. It doesn’t matter what kind of water you pour, cold or hot, it will still boil. You can throw a piece of wood into a saucepan as much as you like, the volume of an individual piece of wood is important and not the total volume of wood.
3. Take table salt, whatever you don’t mind. We're not making soup. For a liter of water, pour 2 large tablespoons of salt (who will count glasses of water??? Eh?). You can do more, as much as you like, it’s okay, it’s impossible to overdo it.
The main thing is that the water is sickly salty. You can use clean sea water (precisely clean, otherwise it will smell disgusting of mud).
The salt will draw sap from the tree, but will not saturate the tree.
4. Find sawdust of resinous wood. Spruce and pine are the easiest to get. Take a saw and go ahead. We need two powerful handfuls of sawdust (raking the sawdust with both hands). Precisely sawdust, not shavings from a simple hand plane.
The shavings will come from an electric planer (you can get them at the nearest sawmill or plan them yourself). I always use them. They are quite small and are usually plentiful and easy to obtain. The more resin in the sawdust, the better. And the finer the sawdust, the better. Pour into a saucepan. You could have taken a bigger saucepan! Sawdust will give the suveli a pleasant ocher color. From soft pink-yellow to ocher-brown. Resins will also add strength to the wood and reveal texture.
5. When the water boils, reduce the heat and leave it simmering for 6-8 hours, longer if you have the patience.
If the saucepan is large, then you don’t have to turn down the flame, let the water boil and bubble. But you need to watch so that the water does not boil away completely. Salt, sawdust, temperature and time will do their job. Add water as needed. During the cooking process, a red “broth” is formed. And scale. It is better to remove scale immediately. It is very difficult to wash off.
6. 6-8 hours have passed (depending on the size of the piece of wood). We take out the piece of wood. We rinse under running water to remove sawdust. We dump the water from the pan as unnecessary, but you can leave it for next time if you have somewhere to store it. But it's easier to pour out the water. We throw the growth onto the cabinet, wrapping it in nothing. Let it cool for a day or two.
7 We repeat the cooking and drying process 2-4 times depending on the volume of the wood.
To speed up the process, you can use a pressure cooker. The time is reduced to 4-6 hours.
8. During the last cooking, you need to quickly peel off the bark while the tree is hot. Although she herself should fall off by this time. Carefully!!! Hot!!! use gloves!
9. We throw it on the closet for a week or two. The tree is basically already dry, but let the remaining moisture go away.
The tree will “get used” to the atmosphere. After final drying, the wood will become bone-like and can be cut, sawed, or sanded. There will be no foreign smell. It will only smell like wood.
10. In the process of accelerated drying of wood, it must be remembered that small cracks may appear, and therefore it is necessary to allow allowance for their removal in subsequent processing.
11. Where to look for growths... Naturally in the forest. BUT! There are no specific places of growth, they grow spontaneously, and the biggest and most beautiful growths will be found by the most big-eyed and persistent. This activity is akin to mushroom hunting; whoever ran around the forest further and further got more.
That seems to be it. I remind you once again that large pieces cannot be dried like this. Cracked. Necessarily. Verified.
12. After the wood has finally gotten used to the atmosphere, you can start working with the workpiece. It is advisable to soak the suvel and cap with oil, and if desired, with wax too. The wood will reveal its texture, it will “play,” as they say, and all its inner beauty will appear.
If you have any questions or any clarifications about the technology described above, I will answer to the best of my ability.
I’ll end with this, your Serjant.
Craftsmen who create amazing crafts from these gifts of nature know exactly how to dry birch suvel. But you can go into the forest yourself in search of suvel and make an exclusive thing with your own hands.
You need to learn how to dry birch suvel in order to create a wonderful thing from the gifts of nature with your own hands.
How to dry birch: suvel and drip
Suvel (the second name for svil) is a special growth on the trunk of some trees. It grows faster than the tree itself and sometimes grows to enormous sizes. It received this name because of the interesting twisted patterns that are unique, like human fingerprints or frost patterns on windows, and therefore valuable.
Birch burls are also growths, but they differ from suveli in shape. Suvel has a twisted structure and a relatively smooth surface, and the cap (another name is witch’s broom) grows in the form of a spherical growth of fibers intertwined inside.
Such growths after preliminary preparation used to create jewelry, amulets and medallions, keychains, decorative interior elements and tableware.
You should go into the forest to hunt for exclusive material at the end of summer - beginning of autumn. Best months for this purpose – August and September. There are no recommendations for searching; you need to inspect all suitable trees on your way; “trophies” of this kind go to only the most attentive.
When you find what you're looking for, don't rush to reach for the saw. Look where the growth is located: if it is on the root or wrapped around the perimeter of the trunk, cutting can seriously damage the tree. In this case, it is worth looking for another copy.
How to dry birch suvel at home
You need to cut off the growths with a sharp thin saw. Do this carefully so as not to damage the bark. After cutting this gift of nature, do not forget to protect the tree and thank it: cover the cut area with wax or oil paint.
Let's move on to the most important thing - the drying method. For this you will need:
- unnecessary large saucepan,
- water,
- salt (you can use discarded salt from the kitchen),
- a handful of pine sawdust.
Pour water into the pan so that it covers our forest finds by several centimeters. Next, add salt - 2 tbsp per liter. l. We wait until the water with pieces of suveli or burl boils, and throw in the sawdust. This is necessary to give the suveli a rich amber hue.
You need to boil water with wood for about 6-8 hours. Then we take it out, wash off the sawdust and leave the souvel alone for two days, without wrapping it in anything. Then we repeat the cooking procedure, reducing the time to 2-4 hours. You can do this with breaks of a day or two two more times. If the bark does not fall off on its own, you need to remove it during the last cooking, not forgetting that the pieces are hot and you need to work carefully.
How to dry a birch burl depends on its size. Cooking is suitable for small pieces; large pieces should be sawn, otherwise they will crack during cooking.
When the blanks are dried, you can begin to create unusual, exclusive items. What will it be - dishes, decorations, decorative elements or Christmas tree decoration, – depends on your imagination and patience.
Drying burls and suveli at home. Drying burl and suveli. So first, let's define some concepts. KAP- (aka witch’s broom) is a benign formation on a tree, which is a bunch of thin branches growing from a teardrop-shaped (most often) growth. When viewed cross-section, it has a texture with pronounced knot cores. It is difficult to process due to its highly curled texture and a huge number of knots. Extremely beautiful, durable, perfectly sanded and polished.
Numerous individual areas have a pearlescent tint. It has no great industrial significance, but is highly valued because of its beauty. If it is used in industry, it is only in the form of veneer for finishing furniture (burls from exotic tree species are mainly used), as well as the production of small products such as boxes, cigarette cases, women's hairpins, and small jewelry (birch burls). Used on knife handles is considered good taste and is also valued by wood carvers for its unique texture.
It is impossible to find two identical pieces of burl; even the halves of a sawn burl have different patterns, the build-up is so heterogeneous. It grows on many trees (linden, alder, birch, maple, oak, etc.), but the most valuable and beautiful is birch (of those growing in our latitudes). The growth is usually small, maximum the size of a volleyball ball or the size of a large plate.
There is no point in cutting any pattern on the burl, since the texture clogs everything up. Look at the photos of what tutati looks like: The photo shows a birch burl. Unfortunately, I couldn’t get a cut of a birch burl (I took these pictures near my native police station and, as you understand, they wouldn’t let me cut anything down there... But I contrived and found an ash burl; most of the burls are similar in texture and only differ color and size of knot cores


SUVEL- (aka svil) As is clear from the name, the growth got its name because of its structure (twisted structure, that’s putting it mildly).
Suvel is a drop-shaped or spherical growth on a tree (there is also a ring variety that covers the tree trunk around the perimeter), usually grows 2-3 times faster than the tree itself. When cut, it has a texture similar in pattern to marble and mother-of-pearl (this is the main sign of difference from KAPA, in the future do not confuse suvel and burl). The presence of mother-of-pearl stains on polished wood creates a beautiful shimmering picture that glows from within. Svil is also poorly processed, like burl, but not as hard.
The size varies from a nut to 1.5 meters in height (I myself saw one on a birch tree) and up to 2 meters in diameter (a ring suvel that completely covered the tree trunk). In the Vatican there is a font much more than a meter in diameter, carved from a single piece of suveli. I myself was once sitting in a chair carved from suveli. It holds fine threads perfectly, but cutting suvel is not recommended. It is better to sand and varnish (impregnate with oil). The product will only benefit from this.
The most valuable is the root or butt fork. The presence of dark veins and clearly defined twisted annual rings. This is a fairy tale. BEAUTIFUL, that says it all. Barrel suvel has a finer texture and a more subtle “frosty” pattern. And lighter wood. In terms of strength, butt suvel is slightly superior to trunk suvel due to the structure of the tree trunk. Suvel is durable, beautiful, easy to polish and grind. Well-dried and treated, it begins to “glow” from the inside (with proper impregnation with oils, the wood becomes like amber and even a little transparent). Usually has a color from soft yellow to pinkish-brown to completely ocher-brown. It all depends on the conditions and drying time. The cap has the same colors.


As you can see, the cap is completely different from suvel.
CHAGA- this is a mushroom (not to be confused with the tinder fungus!!!) and we do not need it for our purposes.

So, how to dry it. I’ll say right away that the “steaming” method is suitable for small pieces of wood. About half the size of a football or a small log.
1. We cut off the growth. We do this with a sharp saw. Otherwise, you will get tired of sawing, and the tree will begin to become shaggy. We do not peel off the bark. Don't forget to cover the cut on the wood with oil paint or wax or something similar.
IT IS PREFERABLE TO CUTT OUT THE GROWTH DURING THE DRY TIME OF THE YEAR, IDEAL AT THE END OF AUGUST, THE BEGINNING OF SEPTEMBER, BEFORE THE COMMONATION STARTS.
2. Take an unnecessary pan (bucket) and throw a piece of wood there. The pan is absolutely unnecessary, since during the cooking process a very tricky broth is formed which is then very troublesome to wash off. It is better to clean the wood of any rags of birch bark and other fragile and dangling pieces. they will still fall off. I consider birch growth as the most accessible and beautiful; the rest of the growths are cooked using the same technology. The log is accordingly cleaned of any debris and fragile particles. Pour water. It is convenient to do this with a faceted glass (it contains 250 ml). The water should cover the piece of wood by about a centimeter or two. The tree naturally floats up, but let’s press it to the bottom and we’ll see everything. It doesn’t matter what kind of water you pour, cold or hot, it will still boil. You can throw as much wood into a saucepan as you like; what is important is the volume of an individual piece of wood and not the total volume of wood.
3. Take table salt, whatever you don’t mind. We're not making soup. For a liter of water, pour 2 large tablespoons of salt (who will count glasses of water??? Eh?). You can do more, as much as you like, it’s okay, it’s impossible to overdo it. The main thing is that the water is sickly salty. You can use clean sea water (precisely clean, otherwise it will smell disgusting of mud). The salt will draw sap from the tree, but will not saturate the tree.
4. Find sawdust of resinous wood. Spruce and pine are the easiest to get. Take a saw and go ahead. We need two powerful handfuls of sawdust (raking the sawdust with both hands). Precisely sawdust, not shavings from a simple hand plane. The shavings will come from an electric planer (you can get them at the nearest sawmill or plan them yourself). I always use them. They are quite small and are usually plentiful and easy to obtain. The more resin in the sawdust, the better. And the finer the sawdust, the better. Pour into a saucepan. You could have taken a bigger saucepan! Sawdust will give the suveli a pleasant ocher color. From soft pink-yellow to ocher-brown. Resins will also add strength to the wood and reveal texture.
5. When the water boils, reduce the heat and leave it simmering for 6-8 hours, longer if you have the patience. If the saucepan is large, then you don’t have to turn down the flame, let the water boil and bubble. But you need to watch so that the water does not boil away completely. Salt, sawdust, temperature and time will do their job. Add water as needed. During the cooking process, a red “broth” is formed. And scale. It is better to remove scale immediately. It is very difficult to wash off.
6. 6-8 hours have passed (depending on the size of the piece of wood). We take out the piece of wood. We rinse under running water to remove sawdust. We dump the water from the pan as unnecessary, but you can leave it for next time if you have somewhere to store it. But it's easier to pour out the water. We throw the growth onto the cabinet, wrapping it in nothing. Let it cool for a day or two.
7 We repeat the cooking and drying process 2-4 times depending on the volume of the wood. To speed up the process, you can use a pressure cooker. The time is reduced to 4-6 hours.
8. During the last cooking, you need to quickly peel off the bark while the tree is hot. Although she herself should fall off by this time. Carefully!!! Hot!!! use gloves!
9. We throw it on the closet for a week or two. The tree is basically already dry, but let the remaining moisture go away. The tree will “get used” to the atmosphere. After final drying, the wood will become bone-like and can be cut, sawed, or sanded. There will be no foreign smell. It will only smell like wood.
10. In the process of accelerated drying of wood, it must be remembered that small cracks may appear, and therefore it is necessary to allow allowance for their removal in subsequent processing.
11. Where to look for growths... Naturally in the forest. BUT! There are no specific places of growth, they grow spontaneously, and the biggest and most beautiful growths will be found by the most big-eyed and persistent. This activity is akin to mushroom hunting; whoever ran around the forest further and further got more. That seems to be it: I remind you once again that large pieces cannot be dried like this. Cracked. Necessarily. Verified.
12. After the wood has finally gotten used to the atmosphere, we make a knife. You’ll find out how to do it yourself, big kids. In any search engine you’ll type in “how to make a knife” and you’ll be happy. It is advisable to soak the suvel and cap with oil and, if desired, with wax too. The wood will show its texture, “play” as they say, and all its inner beauty will appear.