How to make the edges of a plastic bottle smooth and not sharp. New life for ordinary things: plastic bottles How to handle a cut plastic bottle
Many people very often create other interesting crafts, but they don’t know what to do with the cut edges, how to burn or crease them so that they look beautiful. I will tell you now how to round the edges plastic bottle in a couple of seconds. This method is very simple and does not require a lot of auxiliary material, not everyone just knows this method.
For a mini master class, we only need an iron, naturally already heated, as well as a simple sheet of paper that will serve as a barrier that the plastic bottle will not stick to the iron. I will show how to round the edges using the example of a regular bottle. We cut a plastic bottle, or rather cut off the crown. We need the lower part, the one that is larger.

Then we take a plastic bottle, put a sheet on top of it, and iron it over the edge with an iron. Not too long, so that the plastic does not finally drip, we follow the process.

At the end, we should get such edges, they are neat and look great. Now you can create a vase from this.
But remember, the denser the plastic, the longer you need to iron it, as it is difficult to melt wide walls through paper.

And here we have such a craft in the future. How to do it, we can consider in the next article.

Also try to create or original, but it will require huge costs.
How to round the edges of a plastic bottleHow to make the edges of a plastic bottle smooth and not sharp
Master ClassMany people very often create vases or other interesting crafts from plastic bottles, but they don’t know what to do with the cut edges, how to burn or knead them so that it would be beautiful. I will now tell you how to round the edges of a plastic bottle in a couple of seconds. This method is very simple and does not require a lot of auxiliary material, not everyone just knows this method.
For a mini master class, we only need an iron, naturally already heated, as well as a simple sheet of paper that will serve as a barrier that the plastic bottle will not stick to the iron. I will show how to round the edges using the example of a regular bottle. We cut a plastic bottle, or rather cut off the crown. We need the lower part, the one that is larger.

Then we take a plastic bottle, put a sheet on top of it, and iron it over the edge with an iron. Not too long, so that the plastic does not finally drip, we follow the process.

At the end, we should get such edges, they are neat and look great. Now you can create a vase from this plastic jar.
But remember, the denser the plastic, the longer you need to iron it, as it is difficult to melt wide walls through paper.
Helpful Hints
Products made of plastic are used everywhere, as they require less investment to create than products made from other materials.
However, discarded plastic can take hundreds or even thousands of years to decompose, which is why it is very important to recycle it or refuse plastic altogether.
The second option is very difficult to implement today, so recycling comes to the fore. Plastic can be given to special recycling plants, or you can make useful things out of it.
In this collection, you will learn how to make various useful things for your home and garden from plastic bottles.
1. Do-it-yourself ottoman from plastic bottles step by step

You will need:
Plastic bottles
Foam rubber
Knitting needles
Ruler
Scissors
Sewing machine
1. Wash and dry several plastic bottles with caps on. Gather all the bottles in a circle and tape them together.
2. Cut out two circles from the cardboard so that they cover the top and bottom of all connected bottles. Tape these circles to the connected bottles with tape.

3. Prepare two rectangular pieces of foam rubber and one round piece. Rectangular pieces need to cover the side of the collected bottles, and a round piece upper part. Secure everything with tape.

4. From any fabric, make a cover for your seat. If you like knitting, you can knit a cover.


2. We make a do-it-yourself faucet extension from plastic bottles
It will be more convenient for children to wash their hands.


3. Products from plastic bottles with your own hands: a pocket for a rag / sponge

1. Cut out the desired shape from the bottle.
2. Finish the edges with sandpaper.
3. Hang on the faucet.
4. How to make a plastic bottle bag

Photo instruction


Video instruction
5. What can be made from plastic bottles: cups for storing cosmetics

6. Plastic bottle feeder for a cat or dog
There are many ways to make bird feeders, but this bird feeder is designed for cats and dogs.

You will need:
2 large plastic bottles
Scissors
1. In the middle of one bottle, you need to make holes slightly larger than the neck of another bottle.
2. The second bottle must be cut in half across.
3. Fill the bottom with food.
4. Connect the parts and open the cover.
7. Vase for sweets: a master class crafts from plastic bottles

You will need:
Record, round plastic or thick cardboard
6 two-liter plastic bottles
Wooden or plastic rod (you can use an even branch of a suitable diameter and length)
Super glue
Spray paint and glitter (optional)
1. We make the basis for crafts. To do this, you need a plate, ceramic or glass plate. In the middle of the plate, you need to increase the hole to 10 mm with a drill.

2. The drill will also need to make holes in the center of the three plastic bottle pieces you will be using. It's easier to drill from the inside out.

3. Cut off the bottom of each of the 6 plastic bottles. Put 3 parts on the rod and secure with glue. Glue the remaining parts to the base (plate) around the rod. If desired, you can paint everything with spray paint.

It is worth noting that the rod is held on the base thanks to the plastic part, which is glued to the plate, as well as to the rod itself.
4. If you wish, you can decorate your vase.


8. DIY wicker baskets from plastic bottles (master class)

And here is a variant of a wicker basket made of plastic cocktail tubes:

9. Crafts for the garden from plastic bottles (photo): broom

1. Remove the label from the plastic bottle.
2. Use a utility knife to cut off the bottom of the bottle.

3. Start making cuts on the bottle, leaving 1 cm between each.

4. Cut off the neck of the bottle.

5. Repeat steps 1-4 for 3 more bottles. Leave one bottle with a neck.
6. Place all cut bottles without a neck on top of one bottle with a neck. You will get a blank for a broom.

7. Cut off the top of one bottle and put it on top of the resulting blank.


8. Make two holes through all the bottles and insert the wire into them and wrap the ends.
9. Insert a stick or rod into the neck and secure with a nail. You can also use glue.


Video instruction
10. Modular boxes: a description of crafts from plastic bottles

You will need:
Several large plastic bottles or canisters
Stationery knife
Scissors
Marker or pencil
Strong thread.
1. Use a utility knife and/or scissors to cut a suitable hole from a bottle or canister. It shouldn't be too small for everything to fit, or too big for the plastic structure to fall apart.

2. Start connecting the bottles with a strong thread. Start with two, then add two more already connected to them, and so on. Tie strong knots. You can also try using hot glue or super glue (Moment glue).

3. Assemble the design that is convenient for you. You decide how many rows and "floors" to make. However, it is worth knowing that the higher the design, the less stable it is. You may need to once again secure the entire structure with a rope.

4. It's time to clean up the scattered things on the shelf.
By preventing plastic bottles from ending up in general waste bins or using empty lemonade containers on the farm, we are helping nature. Nice? More than! And this pleasure costs absolutely nothing! TOP 10 life hacks will help you recycle plastic to good use.
1. Saucers for goodies
The bottom of a plastic bottle can turn into a saucer for nuts and dried fruits, which is nice to put in the living room or in the children's room. After cutting off the bottom, iron the edges. The finished saucer can be tied or decorated differently.
2. Tamer of tangles
From a plastic bottle, you can carve out a holder for balls. It is enough to cut off a third of the bottle with a neck, thread a thread through the neck, and put the ball inside. Now, while knitting, the ball will not run away and become a victim of a playful kitten. Tell your grandmother about this life hack.
3. How to open a bottle
The mere intention of opening a bottle of drink can be overwhelming. Dont be upset. Find an elastic band in the house - stationery or hair. Wrap an elastic band (one or more) around the lid, distributing it evenly over the surface. Start turning counterclockwise. The rubber band will ensure a good grip between the lid and the hand, and the desired result will be achieved.
4. Bottle light (shining water)
from a water bottle and mobile phone you can make an impromptu lamp. Turn on the flashlight app on your phone, put your phone on a table or any other flat surface with the screen facing down, and place a water bottle on top. The light coming from the flashlight will be scattered in the water column and spread to the surrounding area. By connecting the phone to the network, behind such a lamp you can work or read all night.
5. Decorative curtains
Curtains from the bottoms of bottles resemble flowers floating in the air. All you need to make these decorative curtains is bottle bottoms and fishing line!
6. Holder for toilet paper

Moved to new apartment or after the repair did not have time to hang a toilet paper holder? A temporary compromise in this awkward situation is a 5-liter plastic bottle. Cut off the top of the bottle, poke two holes opposite each other with an awl, put the roll inside and thread the barbecue skewer through the holes and the roll sleeve.
7. Toothbrush case
To make a minimalist toothbrush holder, all you need is a plastic bottle cap and double-sided tape or hot melt adhesive. We cut an opening on one side of the cover and fasten the holder to the wall with the opening down. Ready!
8. Kitchen funnel
A device for pouring liquids, called a funnel, is not an essential thing. That is why it is often absent in kitchen accessories. And if the case once again proved that there are no trifles, get out of a difficult situation by expressly making a funnel from a plastic bottle. Cut off the top of the bottle, unscrew the cap and enjoy!
9. Disposable spoons
And from the remaining bottom of the bottle, you can cut five spoons. Circle the outline of the bottle leg with a marker as shown in the figure, and cut out the spoon with a knife. Finish the edges with a lighter. Let it not be so convenient to eat, but in extreme situation will do!
10. Mosaic for the facade of the house
And finally, you can create a real masterpiece from plastic bottle caps. For example, decorate the facade of the house with a mosaic, as a resident of the taiga village of Kamarchaga, Krasnoyarsk Territory, did.
In this series of articles, we want to help you take a fresh look at the long-familiar, everyday things that surround us, and try to give them a new bright life. IN last time we talked about, and today we have an equally romantic object for crafts. Plastic bottles!
1. Containers for cosmetics or toiletries
- Find some plastic bottles different color and forms.
- Cut off the bottom piece to the desired height.
- Finish the edges with a hot iron.
- Enjoy!
2. Packing for bulk products

If you buy cereals, pasta and other bulk products by weight, then using the neck of a plastic bottle can greatly facilitate their storage and use.
- Cut off the top of the bottle.
- We unscrew the cork and pass the upper part of the bag inside.
- We wrap the bag outside and twist the cork.
Now it will be much more convenient for you to measure the right amount of powder, and there will be no way to scatter it throughout the kitchen. More visual instructions can be found in the next video.
3. Container for every little thing with a zipper
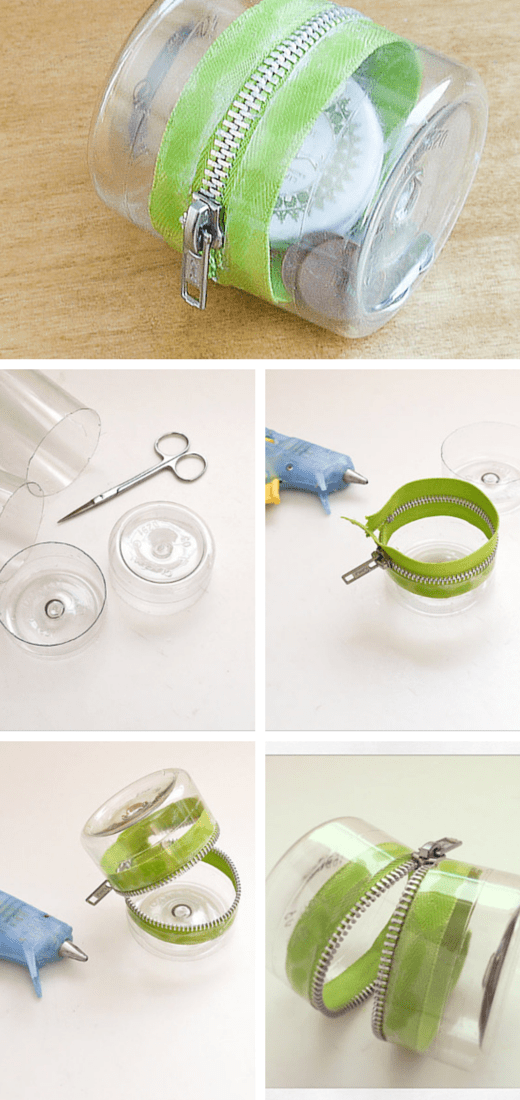
- Cut off the bottoms of two bottles.
- Glue the zipper to the cut line with a glue gun.
- Connect the two halves together.
4. Flower pots
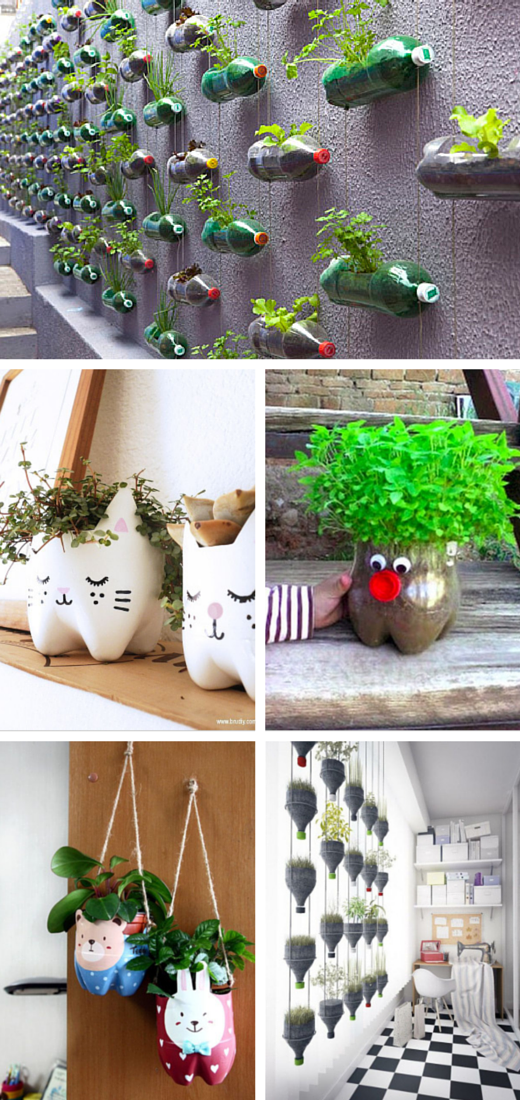
Here you can apply so many different solutions and designs that everything depends only on your imagination. We only present a few options to stir it (your fantasy).
5. Safe transportation of flowers

If you want to give someone a live flower and don't know how to deliver it safe and sound, make a suitable safety cap out of a plastic bottle.
6. Vase for fruit
- Cut off the bottom of the bottle.
- Gently hold it over the fire in such a way that it changes its shape.
- Solder the surface with a soldering iron to form depressions that look like air bubbles.
7. Toy container

Just one ribbon and two strings will turn a plastic bottle into a transparent container for small toys.
8. Thread holder

If you or someone close to you is into knitting, then appreciate this simple device made from plastic bottles that will not allow balls of thread to drive around the room.
We hope you find some of these ideas helpful. And if you have own experience unusual use of used plastic bottles, then share it in the comments.